
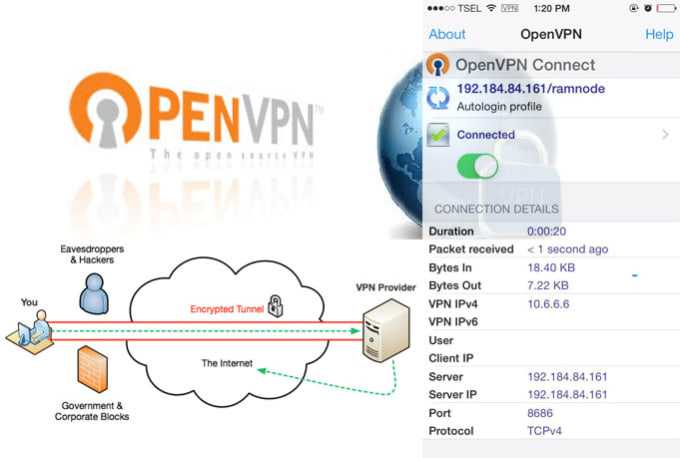
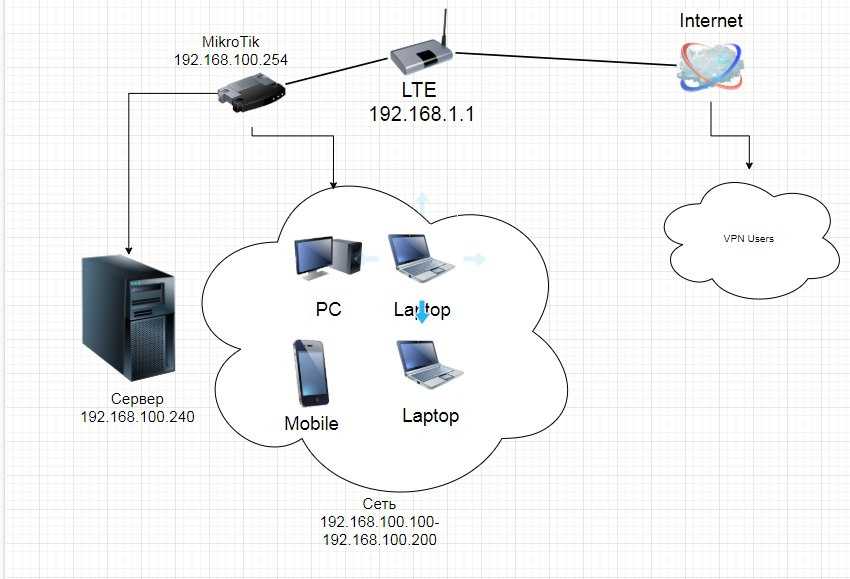
Аутентификация пользователей
Мы можем настроить проверку пользователя по логину и паролю. Это даст дополнительный уровень защиты, а также позволит использовать один и тот же сертификат для всех подключений.
Настройка сервера
Открываем конфигурационный файл openvpn:
vi /etc/openvpn/server/server.conf
И добавляем следующие строчки:
username-as-common-name
plugin /usr/lib64/openvpn/plugins/openvpn-plugin-auth-pam.so login
* где username-as-common-name указывает на то, что openvpn должен использовать логины, как основные идентификаторы клиента; plugin указывает на путь к самому плагину и для чего он используется.
* как путь, так и название файла openvpn-plugin-auth-pam.so могут отличаться. Это зависит от версии Linux и OpenVPN. Чтобы найти путь до нужного файла, можно воспользоваться командой find / -name «openvpn-*auth-pam*» -print.
Перезапускаем сервер:
systemctl restart openvpn-server@server
При необходимости, создаем учетную запись для авторизации:
useradd vpn1 -s /sbin/nologin
И задаем ей пароль:
passwd vpn1
Настройка на клиенте
В конфигурационный файл клиента добавляем:
auth-user-pass
Теперь при подключении программа будет запрашивать логин и пароль.
Вход без ввода пароля (сохранение пароля)
Если необходимо настроить авторизацию, но автоматизировать вход клиента, открываем конфигурационный файл последнего и строку для авторизации меняем на:
auth-user-pass auth.txt
* где auth.txt — файл, в котором мы будем хранить логин и пароль.
Создаем текстовый файл auth.txt в той же папке, где находится файл конфигурации со следующим содержимым:
username
password
* где username — логин пользователя, а password — пароль.
Переподключаем клиента.
Описанный метод аутентификации является базовым и требует наличие обычной системной учетной записи. Если необходима более сложная авторизация на базе LDAP, можно воспользоваться инструкцией настройка OpenVPN сервера с аутентификацией через LDAP (написана на базе Linux Ubuntu).
Подготовка Ubuntu
Обновляем установленные пакеты:
apt-get update && apt-get upgrade
Устанавливаем утилиту для синхронизации времени:
apt-get install chrony
Разрешаем ее автозапуск и стартуем сервис:
systemctl enable chrony —now
Установим правильную временную зону:
timedatectl set-timezone Europe/Moscow
* в данном примере московское время.
Если в нашей системе используется брандмауэр, открываем порт, на котором будет слушать OpenVPN:
iptables -I INPUT -p udp —dport 443 -j ACCEPT
* в данной инструкции предполагается, что мы настроим VPN-сервер на UDP-порту 443, однако, по-умолчанию, OpenVPN работает на порту 1194.
Для сохранения правила используем iptables-persistent:
apt-get install iptables-persistent
netfilter-persistent save
Background
The OpenVPN 3 Linux project is a new client built on top of the OpenVPN 3 Core Library, which is also used in the various OpenVPN Connect clients and OpenVPN for Android (need to be enabled via the settings page in the app).
This client is built around a completely different architecture in regards to usage. It builds heavily on D-Bus and allows unprivileged users to start and manage their own VPN tunnels out-of-the-box. System administrators wanting more control can also control and restrict this access both by hardening the default OpenVPN 3 D-Bus policy or facilitating features in OpenVPN 3 Linux.


Even though the project name carries “Linux”, it doesn’t mean it is restricted to Linux only. Any platform which has D-Bus available should be capable of running this client in theory. But since D-Bus is most commonly used in Linux environments, this will naturally be the primary focus for the project.
The release notes are stored in git tags in the project git repository. They can also be viewed here: https://github.com/OpenVPN/openvpn3-linux/releases (expand the tag to see the full text)
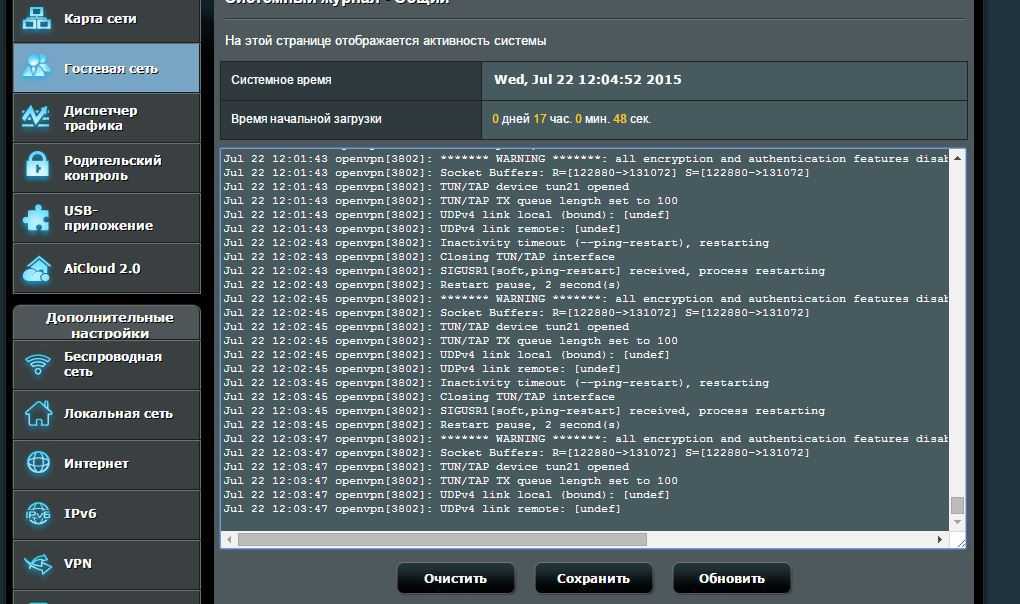
Locating the server log files
To diagnose problems with an OpenVPN server or client, it is helpful to look at the log files. The log files are located in specific areas on your computer systems, and the following is a general guide on how to find them and how to get the best information out of them. Log files are the place to check whenever you’re having any problems making a connection with an OpenVPN client program to the OpenVPN Access Server, they the information needed to ascertain what’s going wrong.
On the OpenVPN Access Server there is the server side log:/var/log/openvpnas.log /var/log/openvpnas.node.log (in case of a failover setup)
In the event that you are having problems with starting the Access Server or certain portions of it, for example the web services, then it may be useful to stop the Access Server service, move the log file aside, then start the Access Server service, and stop it again immediately. This creates a new clean log file that contains the startup and shutdown sequence of the Access Server and no other extraneous information. This makes analysis of the log file much easier. To do so use these commands in order:
You can then grab the /var/log/openvpnas.log file for analysis and start the Access Server again:
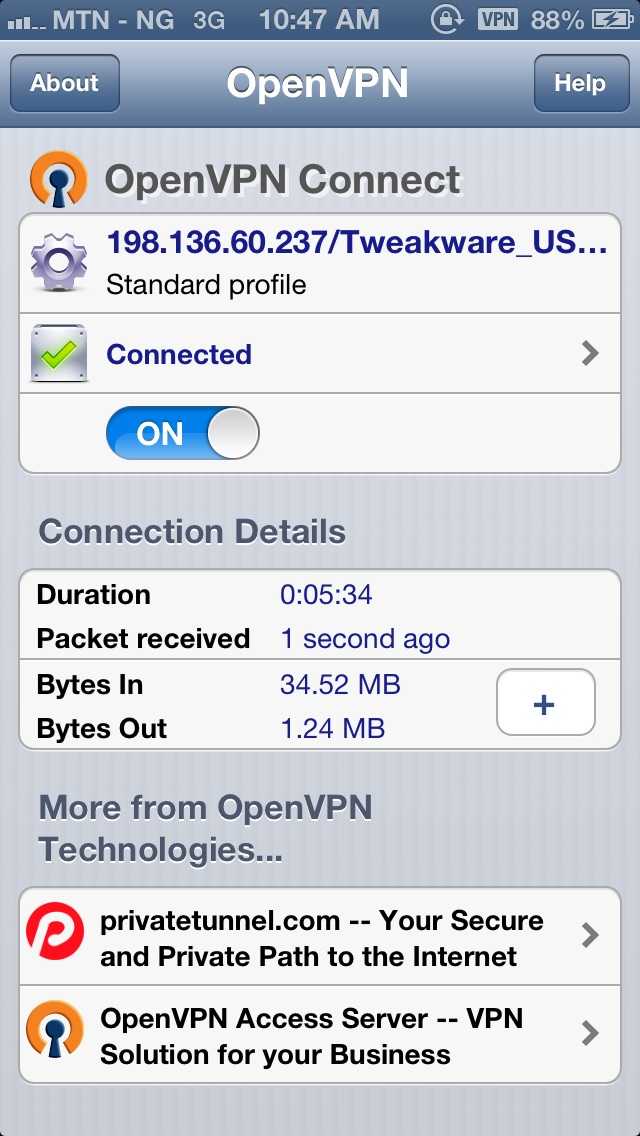
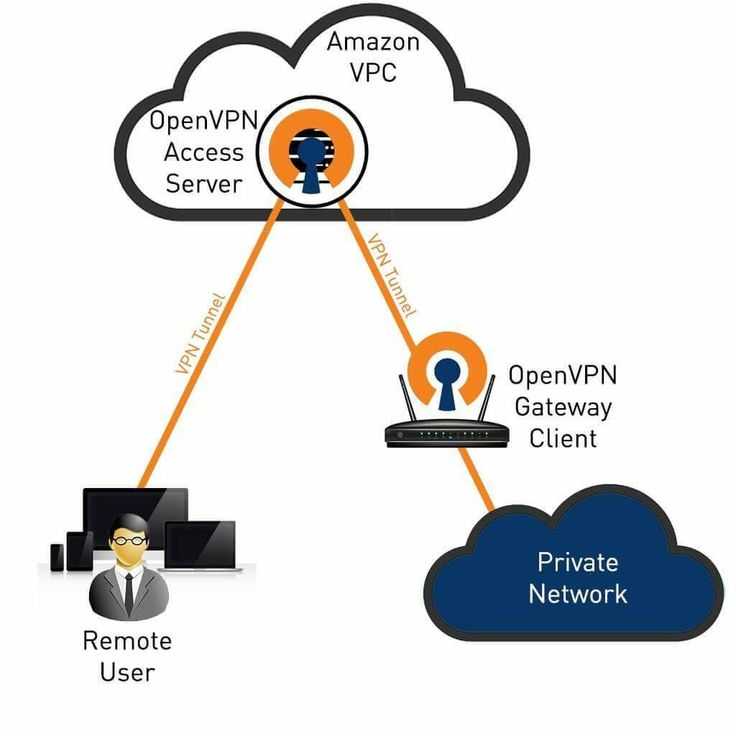
OpenVPN Connect with your Access Server
Your installation of OpenVPN Access Server includes a copy of OpenVPN Connect, which is a separate package called openvpn-as-bundled-clients that is updated when new versions of OpenVPN Connect are released. OpenVPN Connect is our official client app and your users can download it directly from your client UI, pre-configured to connect with your server, or download it separately from our website and import a connection profile.
Steps: Access your client UI
- Open a browser and enter your Access Server IP address or the custom hostname if you have set that up (recommended).
- Enter your username and password.
OpenVPN Connect only supports one active VPN tunnel at a time. It was purposely designed to not support connections to two or more servers simultaneously. Connecting to two servers at the same time requires two different adjustments to the routing table on the client computer. Therefore, it is very easy to make a mistake and break connectivity or cause traffic to flow to the wrong destination. Limiting connections to one server ensures connectivity and traffic flow. OpenVPN Connect can store many profiles for different servers, but you can only actively connect to one at a time.
OpenVPN Connect also supports client-side scripting, importing connection profiles directly from Access Server, and connecting with a server-locked profile. A server-locked profile enables you to authenticate any valid user on your Access Server without installing unique connection profiles for each user.
For more information, refer to: Installation guide for OpenVPN Connect Client on macOS.
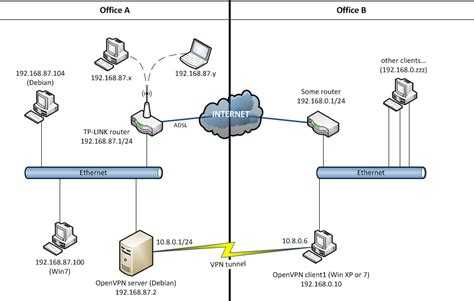
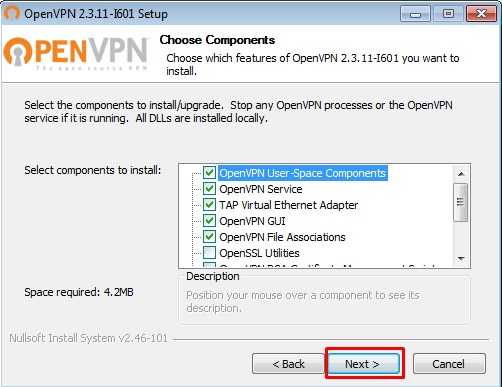
Установка OpenVPN клиента на CentOS/RedHat/Fedora
Недавно я рассказывал в своей статье «Установка openvpn на RedHat/CentOS/Fedora» как установить OpenVPN сервер для CentOS, Fedora или RedHat, а сейчас, в своей новой статье «Установка OpenVPN клиента на CentOS/RedHat/Fedora» я хотел бы рассказать как же установить OpenVPN клиент и подключиться к серверу.
1. Для начала стоит прочитать и установить OpenVPN сервер, вот вам хороший и подробный мануал:Установка openvpn на RedHat/CentOS/Fedora
2. Введите следующую команду из терминала для установки OpenVPN пакета для вашей машины:
# yum install openvpn
Как говорилось в статье о настройке и установке OpenVPN, что нужно скопировать ключи, НЕ ЗАБЫВАЕМ ЭТО СДЕЛАТЬ:
# sudo scp root@78.140.189.243:/etc/openvpn/easy-rsa/keys/ca.key /etc/openvpn/
Эти сертификаты тоже необходимо скачать на машину клиента:
# sudo scp root@78.140.189.243:/etc/openvpn/easy-rsa/keys/ca.crt /etc/openvpn/
# sudo scp root@78.140.189.243:/etc/openvpn/easy-rsa/keys/client.crt /etc/openvpn/
Качаем ключ для клиента ( мы его генерировали, когда устанавливали сервер с OpenVPN):
# sudo scp root@78.140.189.243:/etc/openvpn/easy-rsa/keys/client.key /etc/openvpn/
Тек же скачиваем и сам конфиг с клиентом:
# sudo scp root@78.140.189.243:/etc/openvpn/client.key /etc/openvpn/
Проверяем его на ошибки:
# sudo openvpn --config /etc/openvpn/client.conf
Если все хорошо, то он начнет проверять все и выдаст много информации, а если у вас будут ошибки, то читаем в интернете и фиксим. Думаю что их не должно быть, я же все проверял на своей машине =)
После установки OpenVPN, запустите службу и сделайте так чтобы для автоматически она запускалась при каждой перезагрузке вашей ОС:
# service openvpn start
# chkconfig openvpn on
Теперь проверьте, tun0 (интерфейс VPN) создается:
# ifconfig
Смотрим что нам выдаст, если все хорошо, то должен появится сетевой интерфейс tun ( у меня это tun0 с таким вот ИП адресом 10.8.0.6, собственно на сервере у меня 10.8.0.1). Чтобы окончательно проверить работу клиент-сервера, то выполните пинг:
# ping 10.8.0.1

PING 10.8.0.1 (10.8.0.1) 56(84) bytes of data.
64 bytes from 10.8.0.1: icmp_req=1 ttl=64 time=123 ms
64 bytes from 10.8.0.1: icmp_req=2 ttl=64 time=80.5 ms
........................................................................................
ПРИМЕЧАНИЕ! Не забываем скопировать все нужные файлы на вашу машину ( я описывал что нужно скопировать в статье об установке OpenVPN).
После того как убедитесь что нормально вывелось в ifconfig-е, попробуйте пингануть OpenVPN сервер.
Вот такая простая вышла у меня тема «Установка OpenVPN клиента на CentOS/RedHat/Fedora», если есть вопросы или пожелание по поводу моих статей или моего сайта https://linux-notes.org пишите мне.
Testing
The OpenVPN 3 core includes a stress/performance test of
the OpenVPN protocol implementation. The test basically
creates a virtualized lossy network between two OpenVPN
protocol objects, triggers TLS negotiations between them,
passes control/data channel messages, and measures the ability
of the OpenVPN protocol objects to perform and remain in
a valid state.
The OpenVPN protocol implementation that is being tested
is here: openvpn/ssl/proto.hpp
The test code itself is here: test/ssl/proto.cpp
Build the test:
$ cd $O3
$ cmake --build . -- test/ssl/proto
Run the test:
$ cd test/ssl
$ time ./proto
*** app bytes=72777936 net_bytes=122972447 data_bytes=415892854 prog=0000216599/0000216598 D=12700/600/12700/600 N=109/109 SH=17400/15300 HE=0/0

real        0m15.813s
user        0m15.800s
sys         0m0.004s
The OpenVPN 3 core also includes unit tests, which are based on
Google Test framework. To run unit tests, you need to install
CMake and build Google Test.
Build and run tests on Linux:
$ cd $O3/core/build
$ cmake --build . -- test/unittests/coreUnitTests
$ ./test/unittests/coreUnitTests
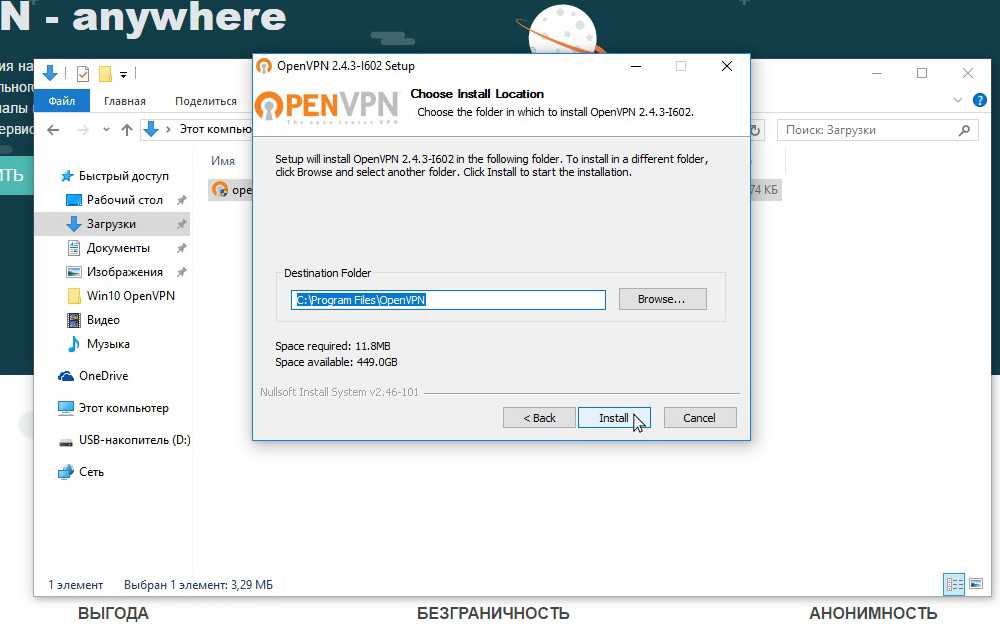
Как настроить OpenVPN на Windows 10
Как работает OpenVPN
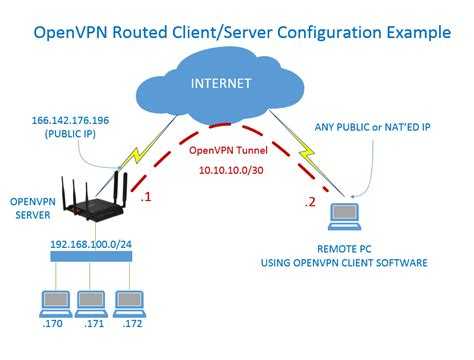
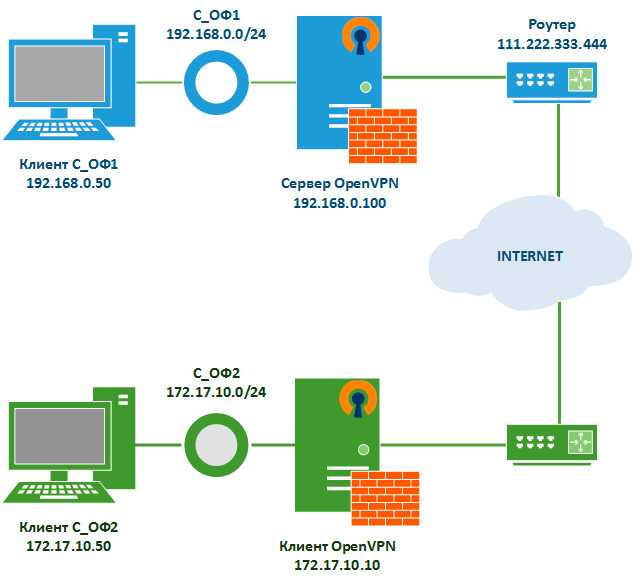
Протокол OpenVPN отвечает за поддержание коммуникации между клиентом и сервером. Как правило, он используется для создания защищённого туннеля между VPN-клиентом и сервером.
Для шифрования и аутентификации OpenVPN использует библиотеку OpenSSL. Кроме того, для передачи данных OpenVPN могут использоваться протоколы UDP или TCP.
- TCP требует отклика от клиента, которому доставлен пакет данных, подтверждения доставки, и для этого ему необходимо установленное заранее соединение. Протокол TCP исключает потери данных, дублирование и перемешивание пакетов, задержки.
- UDP всё это допускает, и соединение для работы ему не требуется. Протокол UDP доставляет пакеты данных гораздо быстрее, потому лучше подходит для приложений, которые рассчитаны на широкую пропускную способность и быстрый обмен.
Как подключиться OpenVPN
Перед подключением нужно выбрать бесплатный VPN сервер, загрузив на компьютер файл конфигурации определённого сервера. Его стоит выбирать исходя из расположения, качества линии, пропускной способности и пинга.
Теперь запустите программу OpenVPN GUI от имени администратора в Windows 10. В противоположном случае просто не удастся подключиться к выбранному серверу.
- На панели задач в контекстном меню OpenVPN выберите Импорт конфигурации… В открывшемся окне проводника укажите расположение ранее загруженной конфигурации.
- После импорта можно смело выбирать пункт Подключиться. При необходимости можно импортировать несколько конфигураций. В таком случае подключений будет два или три.
Рекомендуем импортировать несколько разных конфигураций, после чего перейти к их тестированию. Для тестирования можно воспользоваться сервисами проверки скорости Интернета на компьютере Windows 10.
Если же перейти в расположение: C:\ Пользователи\ Имя_пользователя\ OpenVPN\ config, то можно увидеть, и при необходимости удалить, папки с ранее добавленными конфигурациями.
После подключения к определённому серверу весь трафик пользователя будет проходить через VPN. Таким образом, можно будет играть в игры или посещать сайты, заблокированные в регионе. Скорость — далеко не его сильная сторона, но если у Вас скоростной Интернет, то скорость будет приемлемой. Как правило, скорость интернета падает из-за сильного уровня шифрования в OpenVPN.
Заключение
При необходимости для работы сами используем OpenVPN. На данный момент OpenVPN считается лучшим VPN-протоколом. На практике все наши высказывания подтверждаются. После первого использования, даже бесплатных серверов, сложно использовать другие VPN-клиенты. В принципе и без дополнительного программного обеспечения можно настроить VPN соединение на Windows 10.
Building the OpenVPN 3 client on Mac OS X
OpenVPN 3 should be built in a non-root Mac OS X account.
Make sure that Xcode is installed with optional command-line tools.
(These instructions have been tested with Xcode 5.1.1).
Create the directories and :
$ mkdir -p ~/src/mac
Clone the OpenVPN 3 repo:
$ cd ~/src
$ mkdir ovpn3
$ cd ovpn3
$ git clone https://github.com/OpenVPN/openvpn3.git core
Export the shell variable to point to the OpenVPN 3 top level
directory:
$ export O3=~/src/ovpn3
Download source tarballs ( or ) for these dependency
libraries into
See the file for the expected
version numbers of each dependency. If you want to use a different
version of the library than listed here, you can edit this file.
- Asio — https://github.com/chriskohlhoff/asio
- LZ4 — https://github.com/Cyan4973/lz4
For dependencies that are typically cloned from github vs.
provided as a .tar.gz file, tools are provided to convert
the github to a .tar.gz file. See «snapshot» scripts under
Note that while OpenSSL is listed in lib-versions, it is
not required for Mac builds.
Build the dependencies:
$ DL=~/Downloads
$ OSX_ONLY=1 $O3/core/scripts/mac/build-all
Now build the OpenVPN 3 client executable:
$ cd $O3/core
$ cd $O3/core && mkdir build && cd build
$ cmake -DUSE_MBEDTLS=1 ..
$ cmake --build .
This will build the OpenVPN 3 client library with a small client
wrapper ().
These build scripts will create a x86_x64 Mac OS X executable,
with a minimum deployment target of 10.8.x. The Mac OS X tuntap driver is not
required, as OpenVPN 3 can use the integrated utun interface if
available.
To view the client wrapper options:
$ ./test/ovpncli/ovpncli -h
To connect:
$ ./test/ovpncli/ovpncli client.ovpn
Тест производительности OpenVPN
Условия теста:
- VPN-сервер на ВМ Virtualbox (1 ядро i5-4670)
- Сеть гигабит (без шифрования последовательная скорость передачи 120 МБ/с). Скорость буду указывать в мегабайтах, НЕ в мегабитах!
- Форвардинг на хоста
- Клиент Windows 7, OpenVPN 2.3 64, FX-6300
Результаты:
- Скорость всегда упиралась в ВМ, где процессор бы полностью занят. ЦП клиента был загружен не более 10% — 40% на 1/6 ядер.
- С конфигом выше — 14 МБ/с
- Отключаем сжатие ;comp-lzo — прибавка не более 1 МБ/с — до 15 МБ/с
- Отключаем аутентификацию auth none +2 МБ/с — до 17 МБ/с
- Отключаем шифрование cipher none +2 МБ/с — до 19 МБ/с
- Сжатие comp-lzo сжимает хорошо сжимаемые файлы в 2 раза хуже, чем zlib, зато почти не влияет не загрузку ЦП (в десятки раз быстрее). Проверял на копировании установленного в Windows Libreoffice 5. Сжатие в zip с помощью архиватора 7z дало результат около 35%, сжатие comp-lzo по статистике сетевого интерфейса — около 70%.
Максимальный прирост при отключении сжатия, шифрования и аутентификации составил около 35%. Не думаю, что это стоит того, чтобы отключать механизмы защиты, но ситуации бывают разные.
Может кому-то как мне будет интересно влияние опций на производительность и не придется тратить время на проведение замеров, хотя я бы с удовольствием ознакомился с результами других людей. Изначально тестил для себя, поэтому точных замеров не проводил, потом решил поделиться результатами.
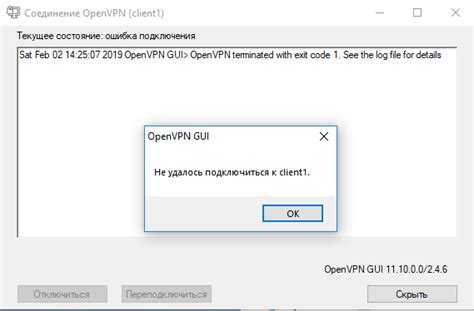
Purpose of this troubleshooting page
This page is specifically about attempting to find and resolve problems with an OpenVPN client program failing to connect to an OpenVPN Access Server. It does not deal with problems in reaching a target system over the established VPN tunnel once the VPN tunnel is already working. That is handled in a separate page: troubleshooting reaching systems over the VPN tunnel.
So if for example you start the OpenVPN client connection and it issues an error and disconnects you, then the information here should help you in determining a possible cause and solution. If not, reach out to us on the support ticket system and provide as much detail as you can.

Installations and upgrades using package installer files
Linux programs are installed as packages, either from a software repository or a separately downloaded and installed file. We recommend using our official repository. We also continue to support OpenVPN Access Server as software package files that can be downloaded and installed separately.
Beginning with Access Server 2.7.5, we have split the program into two pieces:
- OpenVPN Access Server bundled Connect software for Windows and macOS
- The OpenVPN Access Server program itself
You must install both packages:
- Navigate to the Software Repository & Packages page
- Select your Linux operating system
- Click on Option 2: Manually Download Packages in the modal window
- Follow the instructions found there with the download links provided
Installation for Fedora, Red Hat Enterprise Linux, CentOS, or Scientific Linux
Packages for these distributions are provided via a Fedora Copr repository. Supported versions:
| Distribution | Release versions |
|---|---|
| Fedora | 30, 31, 32 |
| Red Hat Enterprise Linux / CentOS | 7, 8 |
In order to install the OpenVPN 3 Client for Fedora, Red Hat Enterprise Linux, CentOS, or Scientific Linux, follow the steps below:
- Open Terminal by typing terminal into the search bar
- If you are running Red Hat Enterprise Linux or its clones, you need to install the Fedora EPEL repository first. Here is the list of commands for each version:(The original article on Fedora EPEL can be found here)RHEL/CentOS 6: RHEL/CentOS 7: On RHEL 7 it is recommended to also enable the optional, extras, and HA repositories since EPEL packages may depend on packages from these repositories: RHEL/CentOS 8: On RHEL 8 it is required to also enable the On CentOS 8 it is recommended to also enable the PowerTools repository since EPEL packages may depend on packages from it:
- You need to install the yum copr module first by running the following command: . Note: Fedora releases usually have the yum/dnf copr module preinstalled.
- With the Copr module available, it is time to enable the OpenVPN 3 Copr repository by running the following command:
- Finally, the OpenVPN 3 Linux client can be installed by running the following command:
Managing a Running Session
- Once a VPN session has started, it should be seen in the session list:
- Using the openvpn3 session-manage there are a few things which can be done, but most typically it is the –disconnect or –restart alternatives which are most commonly used. . This disconnects and re-connects to the server again, re-establishing the connection. The ${CONFIGURATION_PROFILE_NAME} is the configuration name as displayed in openvpn3 sessions-list
- It is also possible to use the D-Bus path to the session as well: . This command above will disconnect a running session. Once this operation has completed, it will be removed from the openvpn3 sessions-list overview. Important: you will be able to start a new session with this or another OpenVPN profile only after you have disconnected from the current session using the command in this step
- It is also possible to retrieve real-time tunnel statistics from running sessions: or
- And to retrieve real-time log events as they occur, run the following command: This might be quite silent, as it does not provide any log events from the past. Issue an openvpn3 session-manage –restart from a different terminal, and log events will occur. You may want to boost the log-level with –log-level 6. Valid log levels are from 0 to 6, where 6 is the most verbose. Note: VPN sessions are also owned by the user which started it. But the Session Manager also provides its own Access Control List feature via
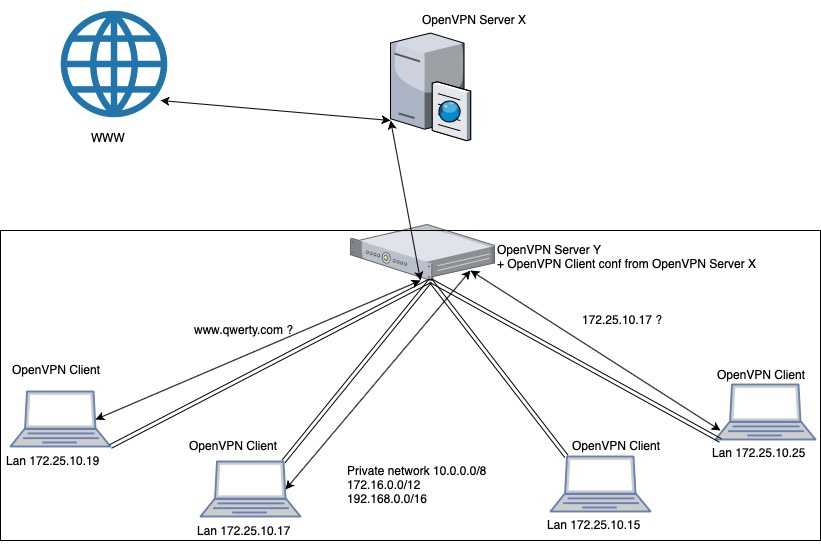
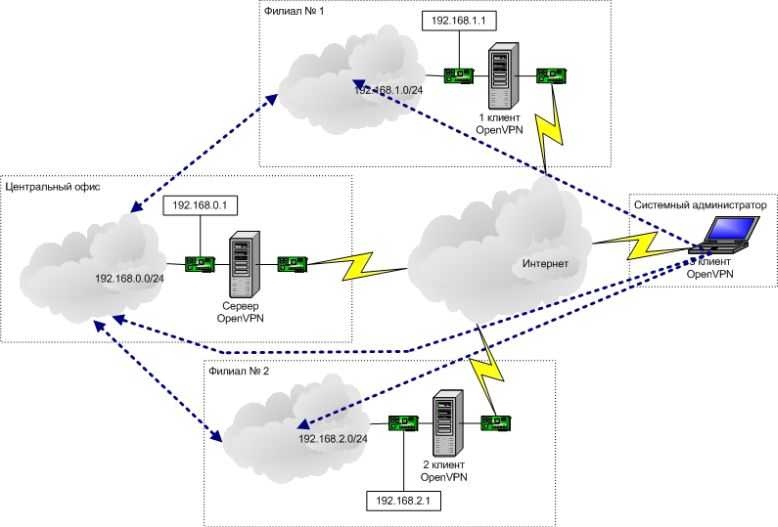
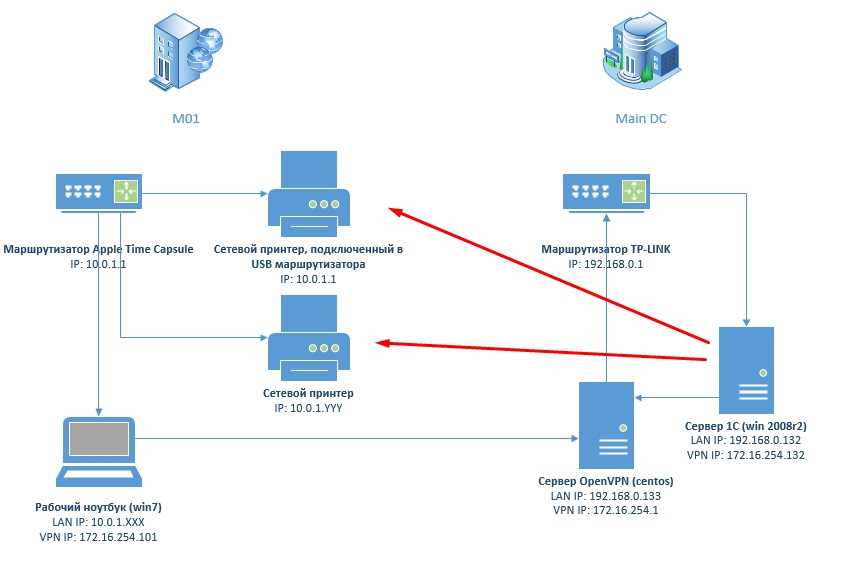
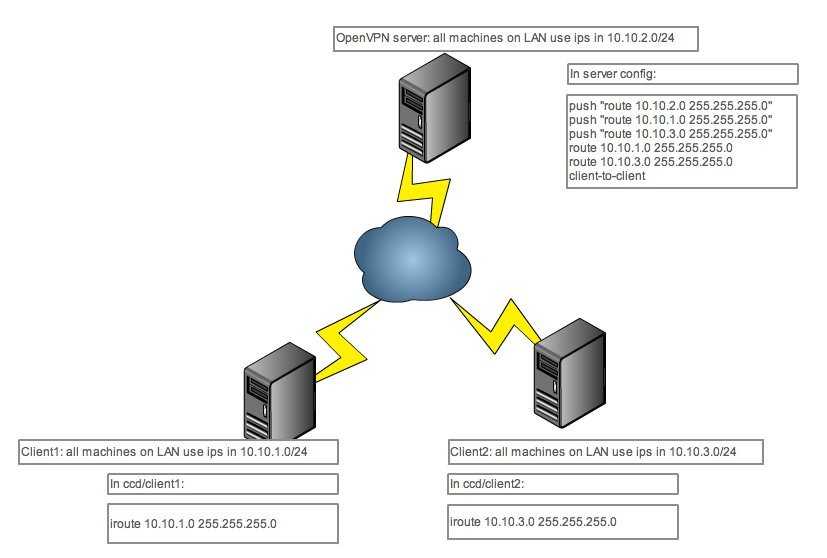
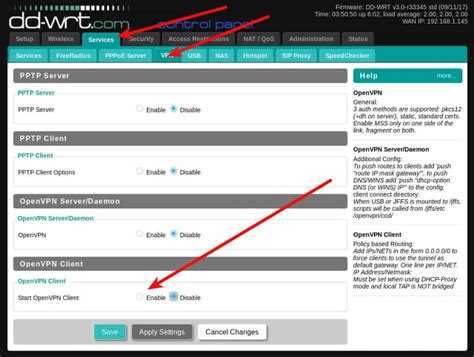
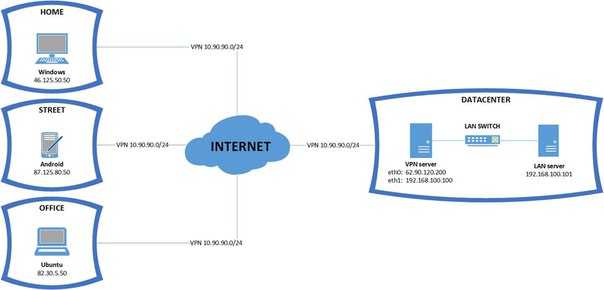
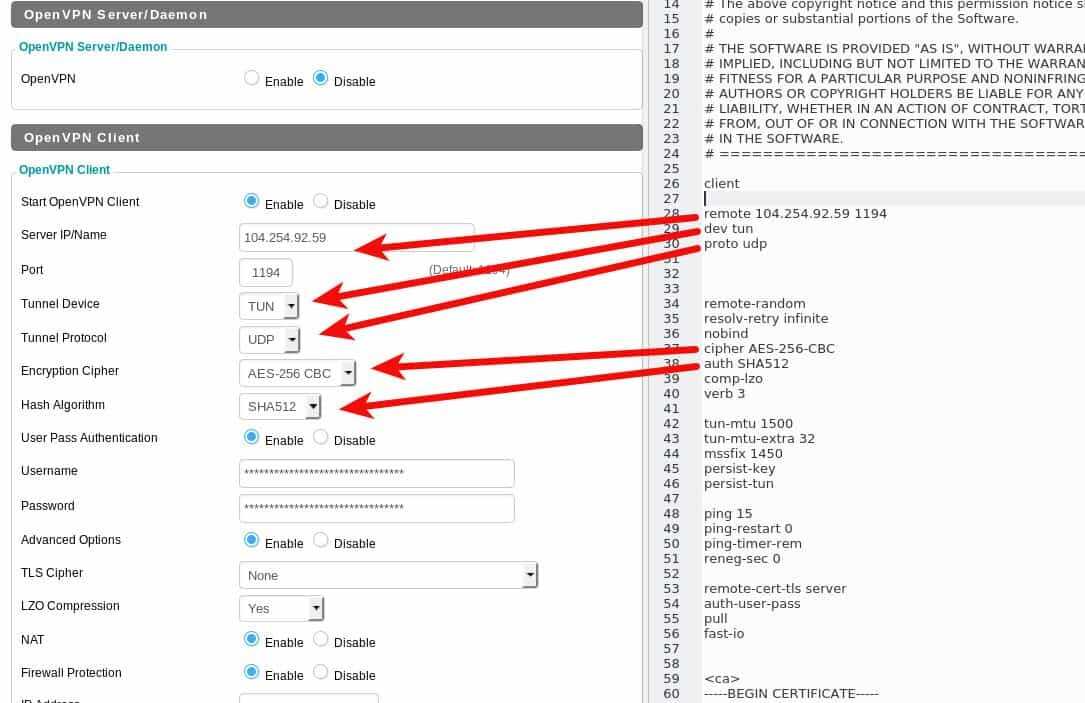
Несколько конфигурационных файлов
Позволит держать несколько конфигураций для подключения к различным VPN-серверам. Между последними можно переключаться из клиентской программы.
Для Windows:
В каталоге config создаем для каждого сервера свою папку и помещаем в нее рабочие файлы (файл конфигурации, сертификаты и так далее). В каждой папке называем конфигурационные файлы ovpn своими именами (даже если файлы будут находиться в разных папках, но с одинаковыми именами, клиент OpenVPN будет воспринимать их как один конфиг).
Пример каталога config:
Пример файлов в одном из каталогов:
Теперь при подключении клиентом к можно выбрать конкретный VPN-сервер:
Для Linux:
Также как для Windows, создаем для каждого сервера свой каталог, куда скопируем рабочие файлы:
mkdir /etc/openvpn/server1
А в каталоге /etc/openvpn создаем для каждого подключения свой конфиг:
vi /etc/openvpn/client1.conf
* в конфигурационном файле все пути до файлов должны вести в соответствующий каталог (в нашем примере, /etc/openvpn/server1).
Запускаем OpenVPN:
openvpn —config /etc/openvpn/server1/client.conf
Для автоматического запуска мы уже ранее применяли команду:
systemctl enable openvpn@client
… где @client — указатель на использование конфигурационного файла client внутри папки openvpn (/etc/openvpn). Таким образом, если мы создали 2 файла client1.conf и client2.conf, команды для разрешения автозапуска бelen такие:
systemctl enable openvpn@client1
systemctl enable openvpn@client2
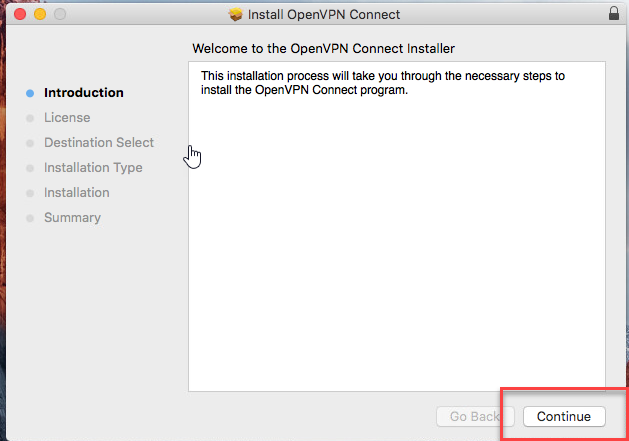
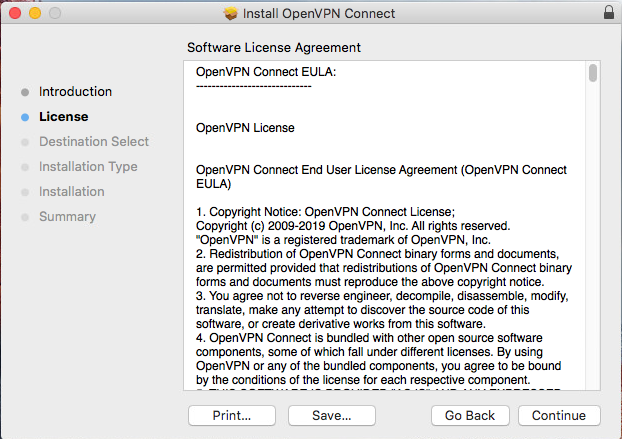
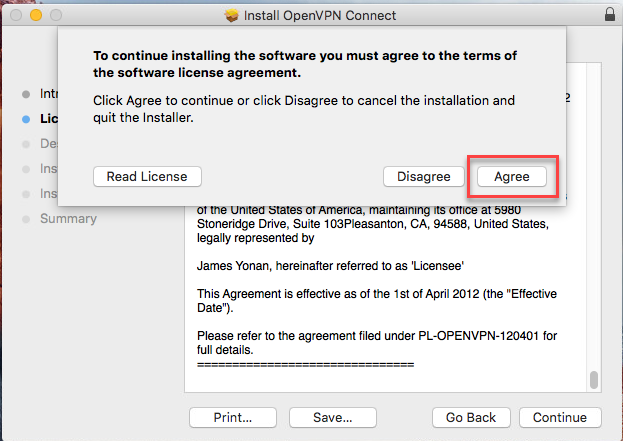
Downloading and installing the OpenVPN Connect Client for macOS
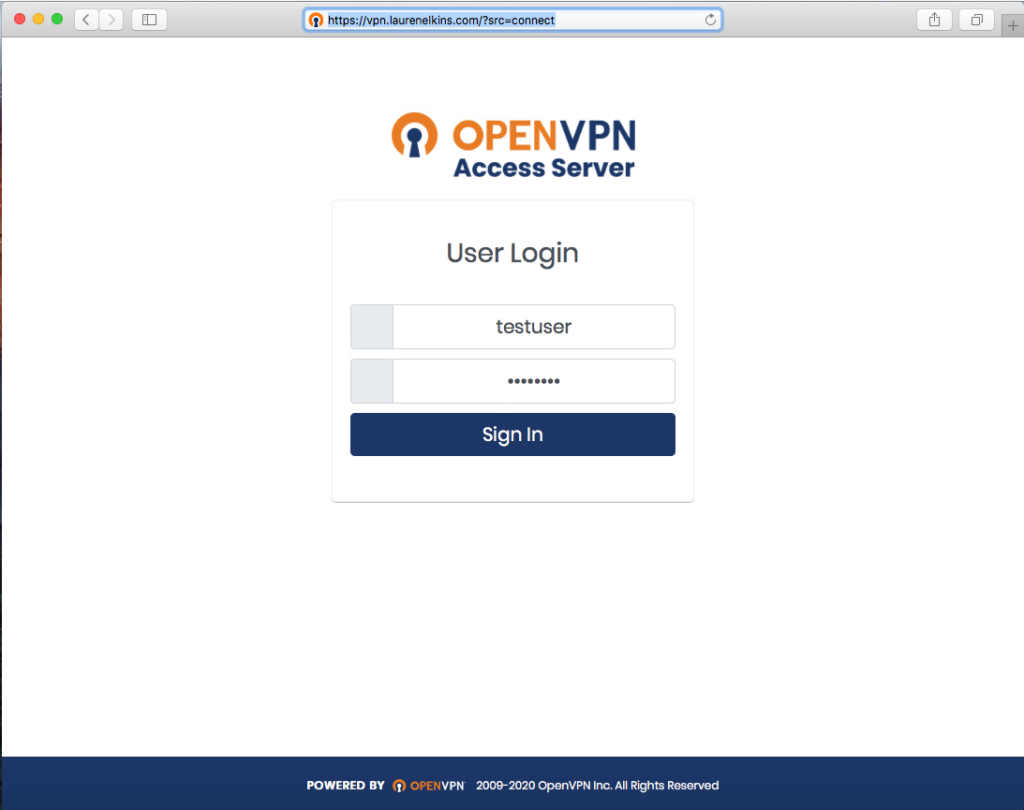
Navigate to the OpenVPN Access Server client web interface.
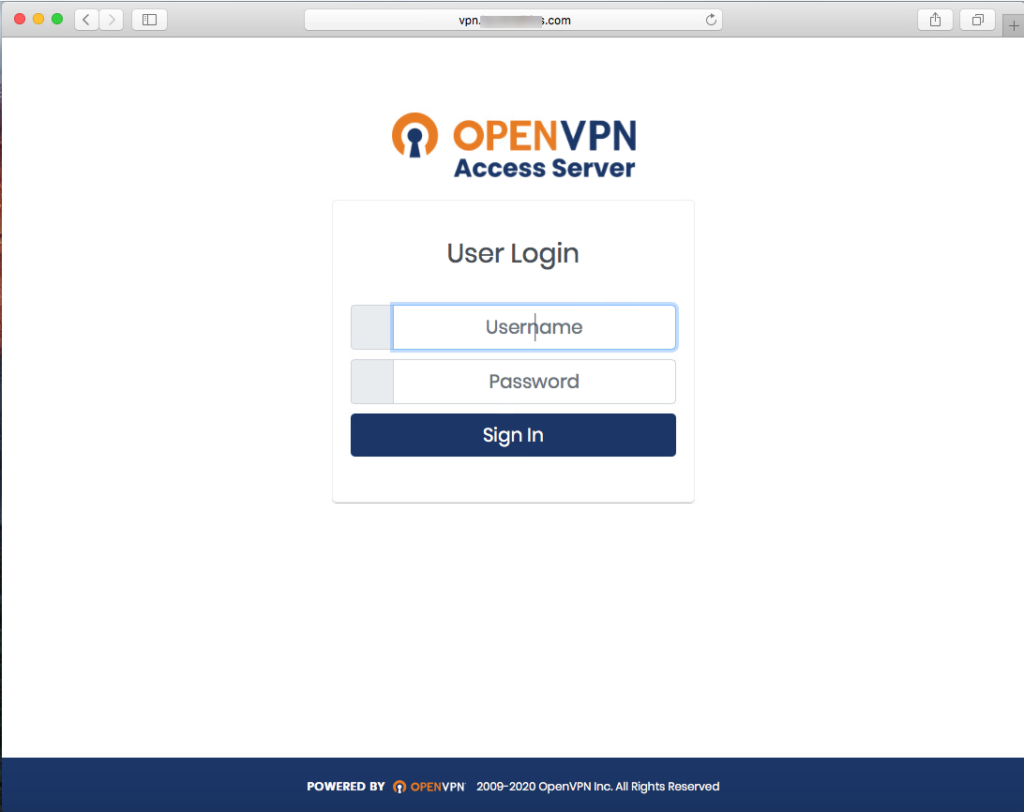
Login with your credentials.
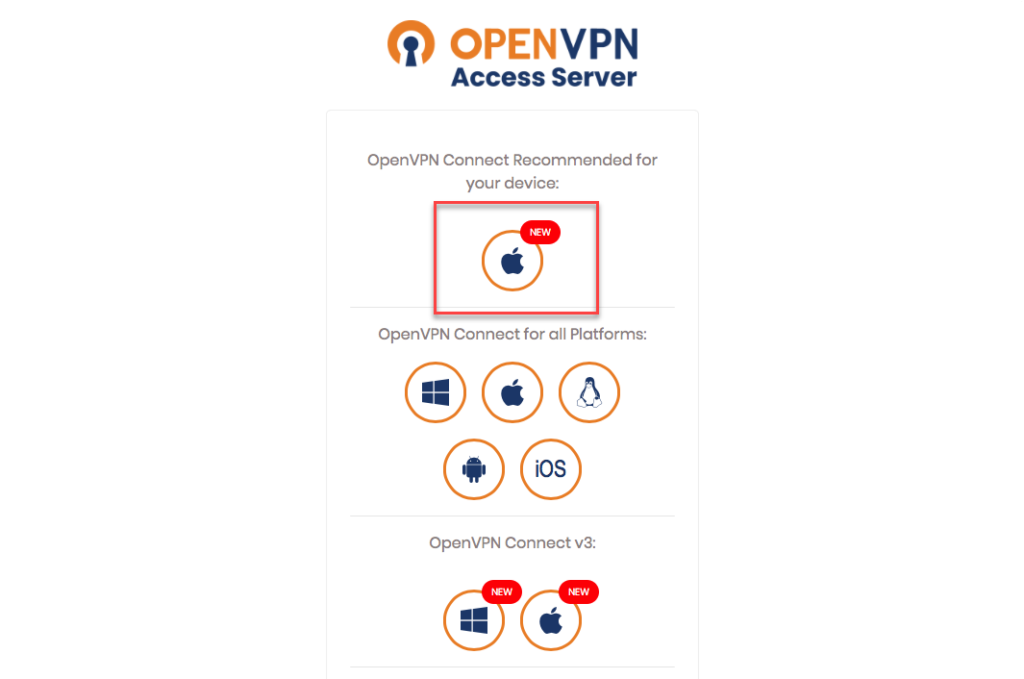
Click on the Mac icon to begin download.
Wait until the download completes, and then open it (the exact procedure varies a bit per browser).
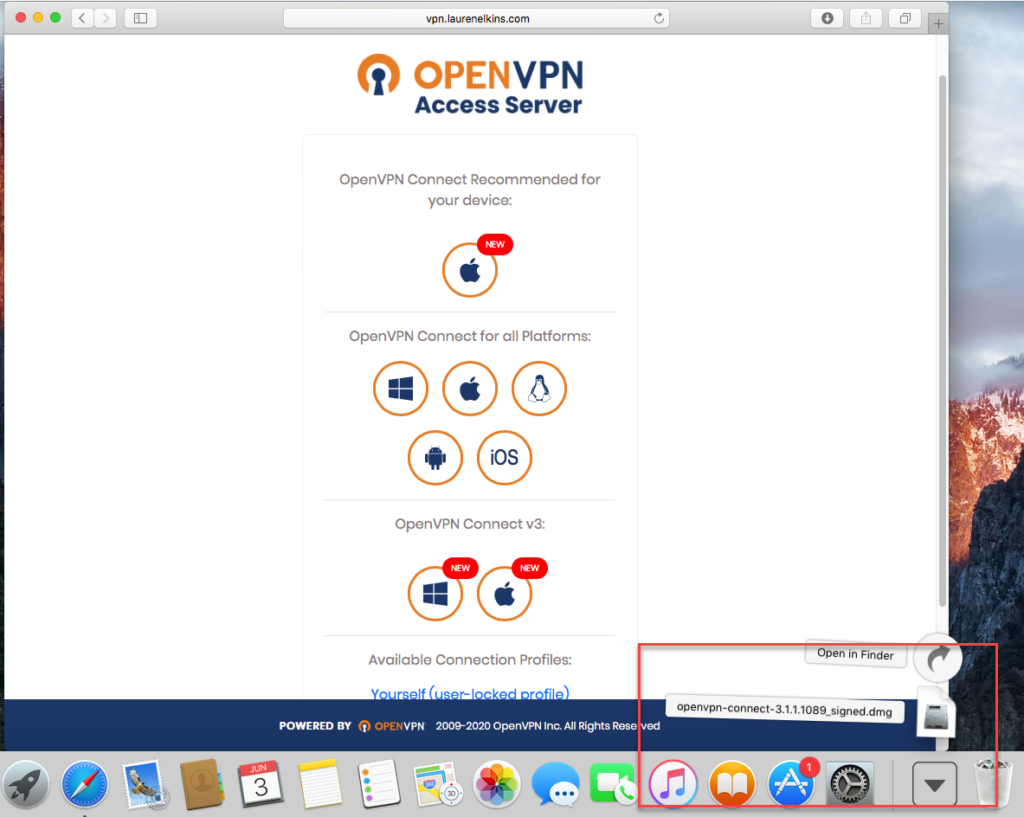
Open the ‘OpenVPN Connect installer’ to start the installation.
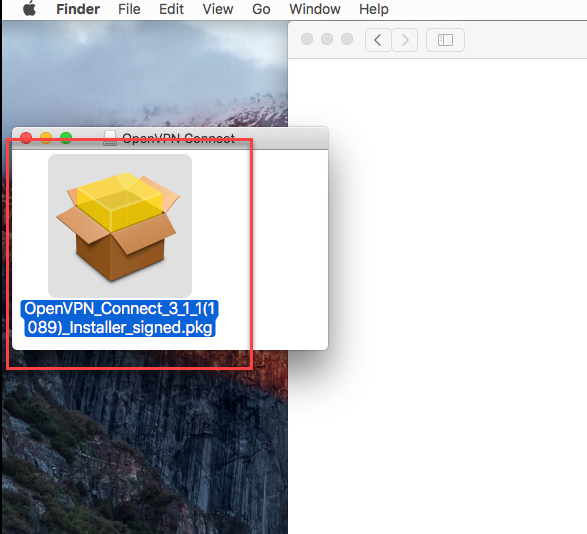
Click ‘Continue’.
Please read the licensing terms. Then click ‘Continue’.

Click ‘Agree’ to accept the licensing terms.
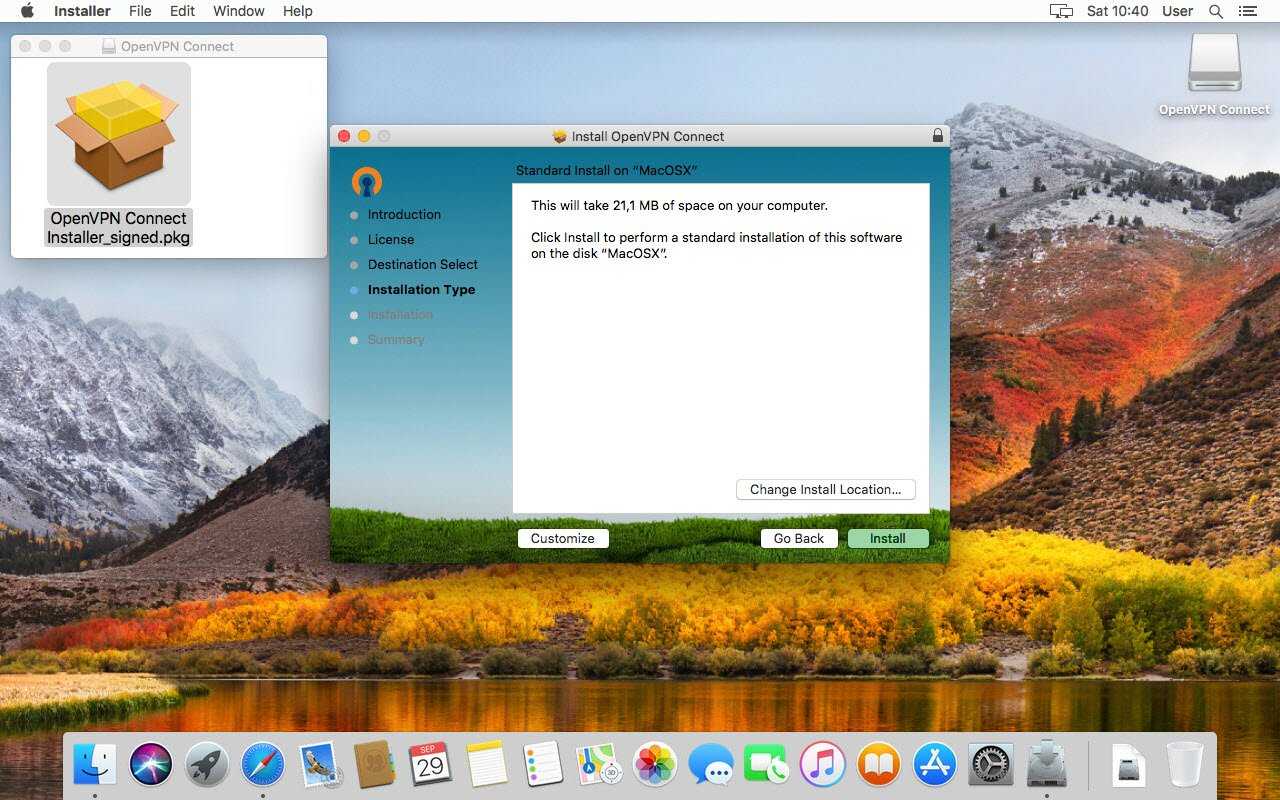
Click ‘Install’ to proceed.
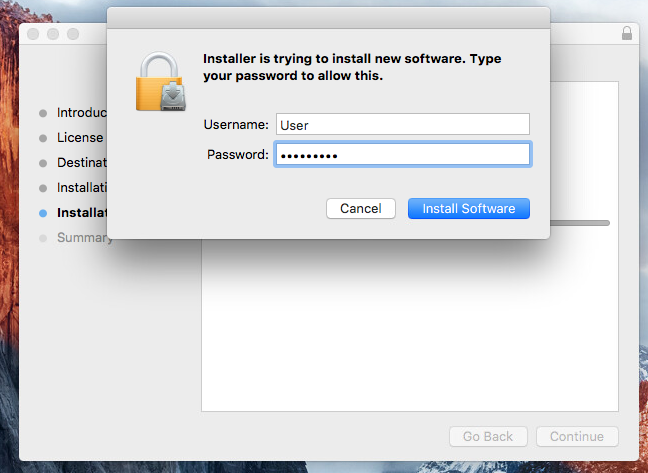
Enter your device password, if you have one configured, and click ‘Install Software’.
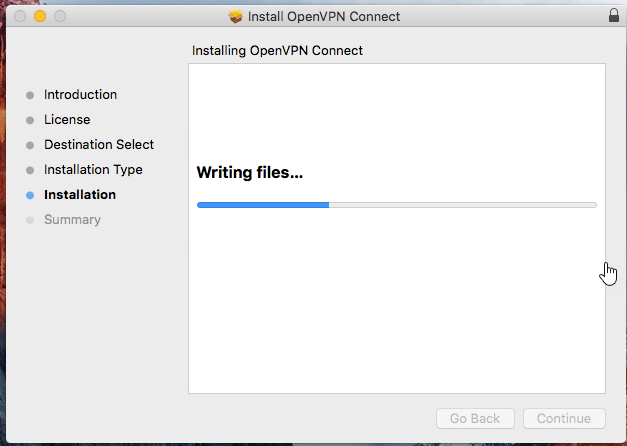
Wait for the installation process to complete.

Click ‘Close’ to end the installation process.
If your device asks, click ‘Move to Trash’ to clean up the installer file.

Rightclick (ctrl+click) ‘OpenVPN Connect’ and eject it.

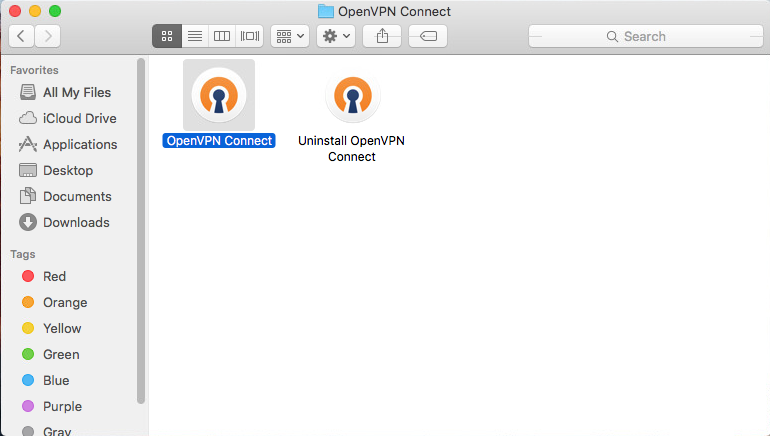
In Applications, OpenVPN Connect is now ready for use.
Service Notice: Perpetual License Keys
If you have a perpetual license key that was purchased prior to 2013, you must purchase a new subscription in order to upgrade your Access Server instance. All Access Server license keys purchased since 2013 are standard license keys, not perpetual.
OpenVPN strictly adheres to the original terms under which we sold perpetual licenses. One of those terms was that neither support nor upgrades were allowed when the license key’s term for support expired. A perpetual license key will not work on an Access Server higher than version 1.8.4.
For more information, refer to My perpetual license key does not work anymore.
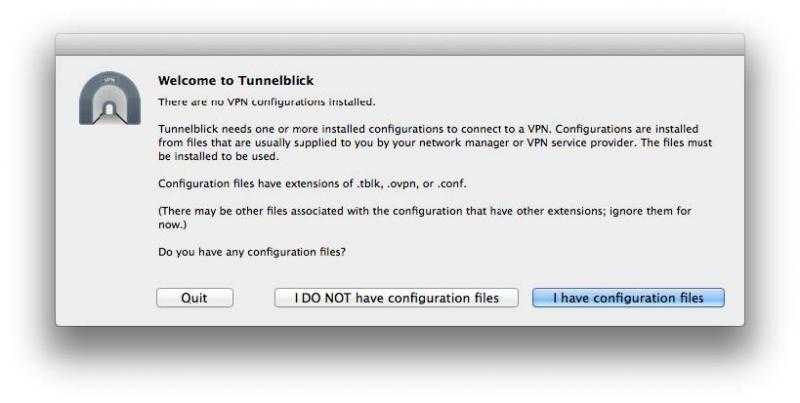
macOS
- Скачиваем с официального сайта (Stable) и запускаем
- В открывшемся окне два раза кликаем по иконке с подписью
- Появится предупреждение, что эта программа скачена из интернета — нажимаем
- В окне приветствия нажимаем
- Далее будет необходимо ввести пароль Администратора
- На вопрос о файле конфигурации ответить: , а в следующем окне нажать
- Через Finder найти файл и открыть его; указать хотите ли только вы пользоваться им, либо также разрешить другим пользователям компьютера
- В трее (иконки возле часов) нажать левой клавишей мыши на иконку ворот и выбрать
- Может быть выведено сообщение «Unrecognized option or missing or extra parameter(s)» — оно не влияет на работоспособность
Before you begin
Backup your settings.
To make a complete backup of your settings without stopping your server, use these . The information stored in Access Server (e.g.: server and client certificates) is unique and cannot be replaced. We recommend setting up automated backup task if you haven’t already done so.
Check server compatibility.
Compatibility of the current version of Access Server to past versions is very good. You can update as described here for versions all the way back to 1.7.1. If needed, Access Server does leave a copy of old data in this directory, whenever you upgrade: /usr/local/openvpn_as/etc/backup
Check client compatibility.
There may be some cases where older client software cannot connect to a modern Access server. To fix this, simply update to a more recent version of the client software. If that is not possible, you may lower the security requirements of the Access server. It may be that an upgraded Access Server has the minimum required TLS security level set to a higher version, causing an issue with older clients. You can change this for your server. Open the Admin Web UI, go to TLS Settings and set OpenVPN daemons to TLS 1.0.
Understand Amazon AWS tiered instance licensing.
If you have an Amazon AWS tiered instance, pre-licensed with “xx connected devices”, you don’t need to worry about licenses. It is taken care of internally by Amazon’s systems that handle licensing and billing. Simply upgrade the Access Server package itself.
Below you’ll find your different installation options. We recommend using the official OpenVPN Software Repository for upgrading.
Failover upgrade procedure
NOTE: Before you begin, make sure that you do backups of both nodes. Use these .
OpenVPN Access Server comes with a built-in failover mode you can deploy on your local LAN network. It allows one primary node to handle all tasks, with a secondary standby node. The secondary node comes online automatically, taking over all tasks, if your primary node fails. This is done with a method called UCARP using VRRP heartbeat network packets. For more details, refer to Setting up high-availability failover mode on our site.


It’s important to keep both Access Server nodes updated with the same versions. We also recommend following a specific upgrade procedure to avoid triggering the failover unnecessarily. This should also ensure that you have a way to easily restore connectivity in the rare event that anything goes wrong with the upgrade.
Begin by making a backup of the failover node and then taking it offline. First make the backup and then, shut down the (virtual) machine where your failover installation of Access Server is installed.
Keeping your primary node online, make a backup first. Then stop the Access Server service with service openvpnas stop. Then do the software upgrade step. To upgrade using the repository, please click on the Software Repository section on this page. To upgrade using the package installer, please click on the Package Files section on this page.
Once you have completed the upgrade of your primary node, validate that everything is working as expected. Access Server should have started automatically after the upgrade, but if not you can start the service yourself with service openvpnas start. Once the primary node is tested, you can bring the failover node online and perform the same upgrade steps there as well. The failover node won’t actually do anything while the primary node is online. So you can now safely upgrade the failover node to the latest version. Afterwards give it 10 minutes to get a configuration update from your primary node before you start testing failover functionality.
At an opportune time, we recommend testing to see if the failover system is working properly. To do this, take the primary node down and check to see that your connections and Admin Web UI work as expected.
If something goes wrong with the upgrade process of the primary node, we recommend you gather log file information and . Then, take the primary node offline. Once it is offline, bring the failover node online. It should start up as the old system it was and take over and handle connections. This keeps your clients up and running while you look into the problem on the primary node. Once issues are diagnosed and resolved, you can bring the primary node back up, take the failover node offline, and perform the upgrade steps as outlined above.


