New Syntax
You specify which primary connection you want to work with by either specifying
the connection name in the command or setting
to the connection you want to work with.
The connection name may include any characters and should be less than 64
characters. Connection names are compared without regard to case (case
insensitive). You should preferably keep the connection name short as it will
be used as a suffix for relay logs and primary info index files.
The new syntax introduced to handle many connections:
- . This creates or modifies a connection to a primary.
- . This is used to reset a replica’s replication position or to remove a replica permanently.
The original old-style connection is an empty string .
You don’t have to use this connection if you don’t want to.
You create new primary connections with CHANGE MASTER.
You delete the connection permanently with RESET SLAVE ‘connection_name’ ALL.
Getting the Master’s Binary Log Co-ordinates
Now you need prevent any changes to the data while you view the binary log position. You’ll use this to tell the slave at exactly which point it should start replicating from.
- On the master, flush and lock all tables by running . Keep this session running — exiting it will release the lock.
- Get the current position in the binary log by running :
SHOW MASTER STATUS;
+--------------------+----------+--------------+------------------+
| File               | Position | Binlog_Do_DB | Binlog_Ignore_DB |
+--------------------+----------+--------------+------------------+
| master1-bin.000096 |      568 |              |                  |
+--------------------+----------+--------------+------------------+
- Record the File and Position details. If binary logging has just been enabled, these will be blank.
- Now, with the lock still in place, copy the data from the master to the slave. See Backup, Restore and Import for details on how to do this.
- Note for live databases: You just need to make a local copy of the data, you don’t need to keep the master locked until the slave has imported the data.
- Once the data has been copied, you can release the lock on the master by running UNLOCK TABLES.
UNLOCK TABLES;
Переменные для многоисточников репликации
Новая переменная репликации указывает, какое соединение будет использоваться для команд и переменных, если вы не укажете соединение. По умолчанию это (имя соединения по умолчанию).
Следующие переменные репликации являются локальными для подключения. (Другими словами, они показывают значение для соединения ). Мы работаем над тем, чтобы все важные для подключения были локальными.
| Type | Name | Description |
|---|---|---|
| Variable | Максимальный размер журнала реле. Устанавливается при запуске на , если 0 | |
| Variable | Скажите ведомому,чтобы он ограничил репликацию обновлениями таблиц,имена которых отображаются в разделенном запятыми списке.Для репликации,основанной на операторах,учитывается только БД по умолчанию (т.е.выбранная USE),а не какие-либо явно указанные таблицы в запросе.Для репликации на основе строк проверяются действительные имена обновляемых таблиц. | |
| Variable | Говорит ведомому ограничить репликацию таблицами в списке,разделенном запятыми. | |
| Variable | Скажите ведомому ограничить репликацию обновлениями таблиц,имена которых не отображаются в списке,разделенном запятыми.При репликации на основе оператора учитывается только БД по умолчанию (т.е.выбранная USE),а не какие-либо явно указанные таблицы в запросе.Для репликации на основе строк проверяются фактические имена обновляемых таблиц. | |
| Variable | Сказывает ведомому потоку не повторять никаких операторов,обновляющих указанную таблицу,даже если другие таблицы могут быть обновлены этим же оператором. | |
| Variable | Сказывает ведомому потоку ограничить репликацию операторами,в которых любая из обновленных таблиц совпадает с указанными шаблонами баз данных и имен таблиц. | |
| Variable | Сказывает ведомой нити не реплицироваться на таблицы,которые соответствуют заданному шаблону подстановочного знака. | |
| Status | Как часто (в секундах)запрашивать у ведущего пакет с биением сердца. | |
| Status | Сколько сердечных сокращений мы получили от хозяина. | |
| Status | Показывает, работает ли ведомое устройство. ДА означает, что поток sql и поток ввода-вывода активны. Нет, значит, ни один из них не работает. » означает, что не существует. | |
| Variable | Сколько записей в журнале репликации следует пропустить (в основном используется в случае ошибок в журнале). |
Вы можете получить доступ ко всем вышеуказанным переменным с помощью или .
Обратите внимание, что переменные _… были добавлены в MariaDB 10.0.2. Обратите внимание,что в отличие от MySQL,все переменные всегда показывают правильное активное значение!
Обратите внимание,что в отличие от MySQL,все переменные всегда показывают правильное активное значение!
Example:
set @@default_master_connection='';
show status like 'Slave_running';
set @@default_master_connection='other_connection';
show status like 'Slave_running';
Если содержит несуществующее имя, вы получите предупреждение.
Все другие переменные, относящиеся к мастеру, являются глобальными и влияют либо только на соединения, либо на все соединения. Например, теперь показывает общее количество повторных транзакций по всем ведомым устройствам.
Если вам нужно установить вам нужно установить это для всех мастеров одновременно.
Новые переменные состояния:
| Name | Description |
|---|---|
| Количество выполненных команд . | |
| Количество выполненных команд . Это заменяет . | |
| Количество выполненных команд . Это заменяет . | |
| Количество выполненных команд . |
содержит следующие новые столбцы:
| Name | Description |
|---|---|
| Имя ведущего соединения.Это первая переменная. | |
| Состояние потока SQL. | |
| Количество повторных транзакций для этого соединения. | |
| Максимальный размер релейного журнала для этого соединения. | |
| Сколько записей в журнале выполнил раб. | |
| Сколько сердечных сокращений мы получили от хозяина. | |
| Как часто (в секундах)запрашивать у ведущего пакет с биением сердца. |
Testing
When you have the Replica Servers up and running, you should test each to ensure that they are working and that there weren’t any issues during startup. You should also ensure that the Server is replicating data from the Primary Server.
Checking Replication Status
-
Connect to the Replica Server using MariaDB Client using the user account:
$ sudo mariadb
Welcome to the MariaDB monitor.  Commands end with ; or \g.
Your MariaDB connection id is 38
Server version: 10.4.19-12-MariaDB-Enterprise MariaDB Enterprise Server

Copyright (c) 2000, 2018, Oracle, MariaDB Corporation Ab and others.

Type 'help;' or '\h' for help. Type '\c' to clear the current input statement.

MariaDB >
-
Execute the SHOW SLAVE STATUS statement.
This statement returns a lot of columns, but the important ones are and . If both of those say , then replication is running correctly.
SHOW SLAVE STATUS\G
*************************** 1. row ***************************
                Slave_IO_State: Waiting for master to send event
                   Master_Host: 178.128.150.186
                   Master_User: repl
                   Master_Port: 3306
                 Connect_Retry: 60
               Master_Log_File: mariadb-bin.000003
           Read_Master_Log_Pos: 4919
                Relay_Log_File: mysqld-relay-bin.000003
                 Relay_Log_Pos: 3913
         Relay_Master_Log_File: mariadb-bin.000003
              Slave_IO_Running: Yes
             Slave_SQL_Running: Yes
               Replicate_Do_DB:
           Replicate_Ignore_DB:
            Replicate_Do_Table:
        Replicate_Ignore_Table:
       Replicate_Wild_Do_Table:
   Replicate_Wild_Ignore_Table:
                    Last_Errno: 0
                    Last_Error:
                  Skip_Counter: 0
           Exec_Master_Log_Pos: 4919
               Relay_Log_Space: 5138
               Until_Condition: None
                Until_Log_File:
                 Until_Log_Pos: 0
            Master_SSL_Allowed: No
            Master_SSL_CA_File:
            Master_SSL_CA_Path:
               Master_SSL_Cert:
             Master_SSL_Cipher:
                Master_SSL_Key:
         Seconds_Behind_Master: 0
 Master_SSL_Verify_Server_Cert: No
                 Last_IO_Errno: 0
                 Last_IO_Error:
                Last_SQL_Errno: 0
                Last_SQL_Error:
   Replicate_Ignore_Server_Ids:
              Master_Server_Id: 1
                Master_SSL_Crl:
            Master_SSL_Crlpath:
                    Using_Gtid: No
                   Gtid_IO_Pos:
       Replicate_Do_Domain_Ids:
   Replicate_Ignore_Domain_Ids:
                 Parallel_Mode: conservative
                     SQL_Delay: 0
           SQL_Remaining_Delay: NULL
       Slave_SQL_Running_State: Slave has read all relay log; waiting for the slave I/O thread to update it
              Slave_DDL_Groups: 17
Slave_Non_Transactional_Groups: 0
    Slave_Transactional_Groups: 7
Testing Replication
-
Connect to the Primary Server using MariaDB Client using the user account:
user@primary-server$ sudo mariadb
-
Create a database with the CREATE DATABASE statement:
CREATE DATABASE IF NOT EXISTS test;
-
Create a table with the CREATE TABLE statement:
CREATE TABLE test.names (
   id INT PRIMARY KEY AUTO_INCREMENT,
   name VARCHAR(255));
-
Insert some data with the INSERT statement:
INSERT INTO test.names(name) VALUES ("Walker Percy"), ("Kate Chopin"), ("William Faulkner"), ("Jane Austen"); -
Confirm that the data was inserted properly with the SELECT statement:
SELECT * FROM test.names;
+----+------------------+
| id | name             |
+----+------------------+
|  1 | Walker Percy     |
|  2 | Kate Chopin      |
|  3 | William Faulkner |
|  4 | Jane Austen      |
+----+------------------+
-
Connect to the Replica Server and start MariaDB Client:
user@cluster-node2$ sudo mariadb
-
Confirm that the data was replicated properly with the SELECT statement:
SELECT * FROM test.names;
+----+------------------+
| id | name             |
+----+------------------+
|  1 | Walker Percy     |
|  2 | Kate Chopin      |
|  3 | William Faulkner |
|  4 | Jane Austen      |
+----+------------------+
We can confirm that the DDL and DML were replicated from the other Replica Server, allowing both Servers to return the same data.
Next steps:
Options
-
Description: Controls how the server should treat the plugin when the server starts up.
- Valid values are:
- — Disables the plugin without removing it from the mysql.plugins table.
- — Enables the plugin. If the plugin cannot be initialized, then the server will still continue starting up, but the plugin will be disabled.
- — Enables the plugin. If the plugin cannot be initialized, then the server will fail to start with an error.
- — Enables the plugin. If the plugin cannot be initialized, then the server will fail to start with an error. In addition, the plugin cannot be uninstalled with UNINSTALL SONAME or UNINSTALL PLUGIN while the server is running.
- See for more information.
- Valid values are:
- Commandline:
- Data Type:
- Default Value:
- Valid Values: , , ,
- Removed: MariaDB 10.3.3
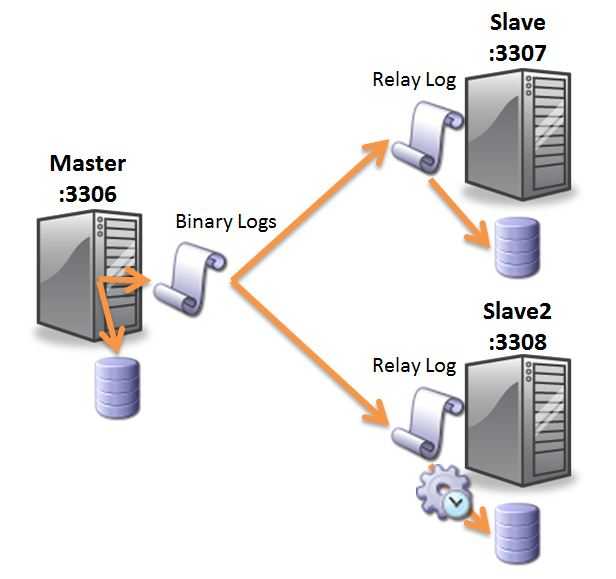
Threads on the Slave
The slave has three types of replication-related threads: the slave I/O thread, the slave SQL thread, and worker threads, which are only applicable when parallel replication is in use.
When multi-source replication is in use, each independent replication connection has its own slave threads of each type.
Slave I/O Thread
The slave’s I/O thread receives the binary log events from the master and writes them to its relay log.
Binary Log Position
The binary log position of the slave’s I/O thread can be checked by executing the statement. It will be shown as the and columns.


The binary log position of the slave’s I/O thread can be set by setting the and options with the statement.
The binary log position of the slave’s I/O thread and the values of most other options are written to either the default file or the file that is configured by the option. The slave’s I/O thread keeps this binary log position updated as it downloads events. See for more information
Slave SQL Thread
The slave’s SQL thread reads events from the relay log. What it does with them depends on whether parallel replication is in use. If parallel replication is not in use, then the SQL thread applies the events to its local copy of the data. If parallel replication is in use, then the SQL thread hands off the events to its worker threads to apply in parallel.
Relay Log Position
The relay log position of the slave’s SQL thread can be checked by executing the statement. It will be shown as the and columns.
The relay log position of the slave’s SQL thread can be set by setting the and options with the statement.
The relay log position of the slave’s SQL thread is written to either the default file or the file that is configured by the system variable. The slave’s SQL thread keeps this relay log position updated as it applies events. See for more information.
Binary Log Position
The corresponding binary log position of the current relay log position of the slave’s SQL thread can be checked by executing the statement. It will be shown as the and columns.
GTID Position
If the slave is replicating binary log events that contain GTIDs, then the will write every GTID that it applies to the table. This GTID can be inspected and modified through the system variable.
If the slave has the system variable enabled and if the slave has the binary log enabled, then every write by the will also go into the slave’s binary log. This means that GTIDs of replicated transactions would be reflected in the value of the system variable.
See for more information.
Starting the Replica Server
Replica Servers are MariaDB Community Servers that replicate binary logs from the Primary Server in a MariaDB Replication deployment. In order to start the Replica Server, we need to go through the following process:
-
Take a backup of the Primary Server.
-
Restore the backup to the Replica Server.
-
Start MariaDB Community Server on the Replica Server.
-
Start MariaDB Replication on the Replica Server.
Backing Up the Primary Server
Before the Replica Server can be started, its data needs to be consistent with the Primary Server. To ensure that it is consistent, take a backup of the Primary Server:
The instructions below show how to perform a backup using MariaDB Backup. For more information about backing up and restoring the database, please see the Recovery Guide.
-
On the Primary Server, take a full backup:
$ sudo mariadb-backup --backup \
      --user=mariabackup_user \
      --password=mariabackup_passwd \
      --target-dir=/data/backup/replica_backup
Confirm successful completion of the backup operation.
-
On the Primary Server, prepare the backup:
$ sudo mariadb-backup --prepare \
      --target-dir=/data/backup/replica_backup
Confirm successful completion of the prepare operation.
Restoring the Backup on the Replica Server
To make the Replica Server consistent with the Primary Server, we restore the new backup on the Replica:
-
On the Primary Server, copy the backup to the Replica Server:
$ sudo rsync -av /data/backup/replica_backup replicaserver:/data/backup/
-
On the Replica Server, restore the backup using MariaDB Backup.
On MariaDB Community Server 10.4:
$ sudo mariadb-backup --copy-back \
   --target-dir=/data/backup/replica_backup
-
On the Replica Server, fix the file permissions of the restored backup:
$ sudo chown -R mysql:mysql /var/lib/mysql
-
After the backup has been restored on the Replica Server, we can start MariaDB Community Server, and confirm that the backup is valid by ensuring that the server starts properly and that all data was properly imported.
Starting the Server
MariaDB Community Server includes configuration to start, stop, restart, enable/disable on boot, and check the status of the Server using the operating system default process management system.
Ubuntu 16.04 LTS uses systemd. You can manage the Server process using the command:
|
Operation |
Command |
|
Start |
|
|
Stop |
|
|
Restart |
|
|
Enable during startup |
|
|
Disable during startup |
|
|
Status |
Starting MariaDB Replication
The last step is to set up MariaDB Replication.
-
Get the GTID position that corresponds to the restored backup.
If the backup was taken with MariaDB Backup, this position will be located in :
$ cat xtrabackup_binlog_info
mariadb-bin.000096 568 0-1-2001,1-2-5139
The GTID position from the above output is .
-
Connect to the Replica Server using MariaDB Client using the user account:
$ sudo mariadb
-
Set the gtid_slave_pos system variable to the GTID position:
SET GLOBAL gtid_slave_pos='0-1-2001,1-2-5139';
-
Execute the CHANGE MASTER TO statement to configure the Replica Server to connect to the Primary Server at this position:
CHANGE MASTER TO
   MASTER_USER = "repl",
   MASTER_HOST = "192.0.2.1",
   MASTER_PASSWORD = "repl_passwd",
   MASTER_USE_GTID=slave_pos;
The above statement configures the Replica Server to connect to a Primary Server located at using the user account. These account credentials must first be .
-
-
Start replication using the START SLAVE command:
START SLAVE;
The above statement configures the Replica Server to connects to the Primary Server to retrieve new binary log events and replicate them into the local database.


Starting the Replica Server
Replica Servers are MariaDB Community Servers that replicate binary logs from the Primary Server in a MariaDB Replication deployment. In order to start the Replica Server, we need to go through the following process:
-
Take a backup of the Primary Server.
-
Restore the backup to the Replica Server.
-
Start MariaDB Community Server on the Replica Server.
-
Start MariaDB Replication on the Replica Server.
Backing Up the Primary Server
Before the Replica Server can be started, its data needs to be consistent with the Primary Server. To ensure that it is consistent, take a backup of the Primary Server:
The instructions below show how to perform a backup using MariaDB Backup. For more information about backing up and restoring the database, please see the Recovery Guide.
-
On the Primary Server, take a full backup:
$ sudo mariadb-backup --backup \
      --user=mariabackup_user \
      --password=mariabackup_passwd \
      --target-dir=/data/backup/replica_backup
Confirm successful completion of the backup operation.
-
On the Primary Server, prepare the backup:
$ sudo mariadb-backup --prepare \
      --target-dir=/data/backup/replica_backup
Confirm successful completion of the prepare operation.
Restoring the Backup on the Replica Server
To make the Replica Server consistent with the Primary Server, we restore the new backup on the Replica:
-
On the Primary Server, copy the backup to the Replica Server:
$ sudo rsync -av /data/backup/replica_backup replicaserver:/data/backup/
-
On the Replica Server, restore the backup using MariaDB Backup.
On MariaDB Community Server 10.4:
$ sudo mariadb-backup --copy-back \
   --target-dir=/data/backup/replica_backup
-
On the Replica Server, fix the file permissions of the restored backup:
$ sudo chown -R mysql:mysql /var/lib/mysql
-
After the backup has been restored on the Replica Server, we can start MariaDB Community Server, and confirm that the backup is valid by ensuring that the server starts properly and that all data was properly imported.
Starting the Server
MariaDB Community Server includes configuration to start, stop, restart, enable/disable on boot, and check the status of the Server using the operating system default process management system.
Red Hat Enterprise Linux 7 uses systemd. You can manage the Server process using the command:
|
Operation |
Command |
|
Start |
|
|
Stop |
|
|
Restart |
|
|
Enable during startup |
|
|
Disable during startup |
|
|
Status |
Starting MariaDB Replication
The last step is to set up MariaDB Replication.
-
Get the GTID position that corresponds to the restored backup.
If the backup was taken with MariaDB Backup, this position will be located in :
$ cat xtrabackup_binlog_info
mariadb-bin.000096 568 0-1-2001,1-2-5139
The GTID position from the above output is .
-
Connect to the Replica Server using MariaDB Client using the user account:
$ sudo mariadb
-
Set the gtid_slave_pos system variable to the GTID position:
SET GLOBAL gtid_slave_pos='0-1-2001,1-2-5139';
-
Execute the CHANGE MASTER TO statement to configure the Replica Server to connect to the Primary Server at this position:
CHANGE MASTER TO
   MASTER_USER = "repl",
   MASTER_HOST = "192.0.2.1",
   MASTER_PASSWORD = "repl_passwd",
   MASTER_USE_GTID=slave_pos;
The above statement configures the Replica Server to connect to a Primary Server located at using the user account. These account credentials must first be .
-
-
Start replication using the START SLAVE command:
START SLAVE;
The above statement configures the Replica Server to connects to the Primary Server to retrieve new binary log events and replicate them into the local database.


New Files
The basic principle of the new files used by multi source replication is that they have the same name as the original relay log files suffixed with before the extension. The main exception is the file that holds all connection is named as the normal with a prefix.
When you are using multi source, the following new files are created:
| Name | Description |
|---|---|
| The (normally ) with a prefix. This contains all master connections in use. | |
| -connection_name | Contains the current master position for what’s applied to in the slave. Extension is normally |
| -connection_name | The relay-log name with a connection_name suffix. The xxxxx is the relay log number. This contains the replication data read from the master. |
| -connection_name | Contains the name of the active -connection_name files. Extension is normally |
| -connection_name | Contains the current master position for the relay log. Extension is normally |
When creating the file, the connection name is converted to lower case and all special characters in the connection name are converted, the same way as MySQL table names are converted. This is done to make the file name portable across different systems.
Hint:
Instead of specifying names for with , , , , , , you can just specify and all the other variables are set with this as a prefix.
Starting the Replica Server
Replica Servers are MariaDB Community Servers that replicate binary logs from the Primary Server in a MariaDB Replication deployment. In order to start the Replica Server, we need to go through the following process:
-
Take a backup of the Primary Server.
-
Restore the backup to the Replica Server.
-
Start MariaDB Community Server on the Replica Server.
-
Start MariaDB Replication on the Replica Server.
Backing Up the Primary Server
Before the Replica Server can be started, its data needs to be consistent with the Primary Server. To ensure that it is consistent, take a backup of the Primary Server:
The instructions below show how to perform a backup using MariaDB Backup. For more information about backing up and restoring the database, please see the Recovery Guide.
-
On the Primary Server, take a full backup:
$ sudo mariadb-backup --backup \
      --user=mariabackup_user \
      --password=mariabackup_passwd \
      --target-dir=/data/backup/replica_backup
Confirm successful completion of the backup operation.
-
On the Primary Server, prepare the backup:
$ sudo mariadb-backup --prepare \
      --target-dir=/data/backup/replica_backup
Confirm successful completion of the prepare operation.
Restoring the Backup on the Replica Server
To make the Replica Server consistent with the Primary Server, we restore the new backup on the Replica:
-
On the Primary Server, copy the backup to the Replica Server:
$ sudo rsync -av /data/backup/replica_backup replicaserver:/data/backup/
-
On the Replica Server, restore the backup using MariaDB Backup.
On MariaDB Community Server 10.4:
$ sudo mariadb-backup --copy-back \
   --target-dir=/data/backup/replica_backup
-
On the Replica Server, fix the file permissions of the restored backup:
$ sudo chown -R mysql:mysql /var/lib/mysql
-
After the backup has been restored on the Replica Server, we can start MariaDB Community Server, and confirm that the backup is valid by ensuring that the server starts properly and that all data was properly imported.
Starting the Server
MariaDB Community Server includes configuration to start, stop, restart, enable/disable on boot, and check the status of the Server using the operating system default process management system.
Debian 10 uses systemd. You can manage the Server process using the command:
|
Operation |
Command |
|
Start |
|
|
Stop |
|
|
Restart |
|
|
Enable during startup |
|
|
Disable during startup |
|
|
Status |
Starting MariaDB Replication
The last step is to set up MariaDB Replication.
-
Get the GTID position that corresponds to the restored backup.
If the backup was taken with MariaDB Backup, this position will be located in :
$ cat xtrabackup_binlog_info
mariadb-bin.000096 568 0-1-2001,1-2-5139
The GTID position from the above output is .
-
Connect to the Replica Server using MariaDB Client using the user account:
$ sudo mariadb
-
Set the gtid_slave_pos system variable to the GTID position:
SET GLOBAL gtid_slave_pos='0-1-2001,1-2-5139';
-
Execute the CHANGE MASTER TO statement to configure the Replica Server to connect to the Primary Server at this position:
CHANGE MASTER TO
   MASTER_USER = "repl",
   MASTER_HOST = "192.0.2.1",
   MASTER_PASSWORD = "repl_passwd",
   MASTER_USE_GTID=slave_pos;
The above statement configures the Replica Server to connect to a Primary Server located at using the user account. These account credentials must first be .
-
-
Start replication using the START SLAVE command:
START SLAVE;
The above statement configures the Replica Server to connects to the Primary Server to retrieve new binary log events and replicate them into the local database.


Binary Log Filters for Replication Masters
MariaDB provides options that can be used on a replication master to restrict local changes to specific databases from getting written to the binary log, which also determines whether any replication slaves replicate those changes.
Binary Log Filter Options
The following options are available, and they are evaluated in the order that they are listed below:
The option allows you to configure a replication master to write statements and transactions affecting databases that match a specified name into its binary log. Since the filtered statements or transactions will not be present in the binary log, its replication slaves will not be able to replicate them.
This option will not work with cross-database updates with . See the section for more information.
This option can not be set dynamically.
When setting it on the command-line or in a server in an option file, the option does not accept a comma-separated list. If you would like to specify multiple filters, then you need to specify the option multiple times. For example:
...
binlog_do_db=db1
binlog_do_db=db2
This will tell the master to do the following:
- Write statements and transactions affecting the database named db1 into the binary log.
- Write statements and transactions affecting the database named db2 into the binary log.
- Don’t write statements and transactions affecting any other databases into the binary log.
The option allows you to configure a replication master to not write statements and transactions affecting databases that match a specified name into its binary log. Since the filtered statements or transactions will not be present in the binary log, its replication slaves will not be able to replicate them.
This option will not work with cross-database updates with . See the section for more information.
This option can not be set dynamically.
When setting it on the command-line or in a server in an option file, the option does not accept a comma-separated list. If you would like to specify multiple filters, then you need to specify the option multiple times. For example:
...
binlog_ignore_db=db1
binlog_ignore_db=db2
This will tell the master to do the following:
- Don’t write statements and transactions affecting the database named db1 into the binary log.
- Don’t write statements and transactions affecting the database named db2 into the binary log.
- Write statements and transactions affecting any other databases into the binary log.
The option is effectively ignored if the option is set, so those two options should not be set together.
реплицировать…Переменные
- Поддержка переменных была добавлена в MariaDB 10.0.2.
- Можно установить значения для переменных из командной строки или в для данного соединения, добавив к переменной префикс имени соединения.
- Если не использовать префикс имени соединения для переменной , то значение будет использоваться как значение по умолчанию для всех соединений, для которых не задано значение для этой переменной.
Example:
mysqld
Они устанавливают для переменной значение для соединения с именем . Все остальные подключения будут использовать значение .
Можно также использовать этот синтаксис для установки для данного соединения.
Testing
When you have the Replica Servers up and running, you should test each to ensure that they are working and that there weren’t any issues during startup. You should also ensure that the Server is replicating data from the Primary Server.
Checking Replication Status
-
Connect to the Replica Server using MariaDB Client using the user account:
$ sudo mariadb
Welcome to the MariaDB monitor.  Commands end with ; or \g.
Your MariaDB connection id is 38
Server version: 10.4.19-MariaDB MariaDB Server

Copyright (c) 2000, 2018, Oracle, MariaDB Corporation Ab and others.

Type 'help;' or '\h' for help. Type '\c' to clear the current input statement.

MariaDB >
-
Execute the SHOW SLAVE STATUS statement.
This statement returns a lot of columns, but the important ones are and . If both of those say , then replication is running correctly.
SHOW SLAVE STATUS\G
*************************** 1. row ***************************
                Slave_IO_State: Waiting for master to send event
                   Master_Host: 178.128.150.186
                   Master_User: repl
                   Master_Port: 3306
                 Connect_Retry: 60
               Master_Log_File: mariadb-bin.000003
           Read_Master_Log_Pos: 4919
                Relay_Log_File: mysqld-relay-bin.000003
                 Relay_Log_Pos: 3913
         Relay_Master_Log_File: mariadb-bin.000003
              Slave_IO_Running: Yes
             Slave_SQL_Running: Yes
               Replicate_Do_DB:
           Replicate_Ignore_DB:
            Replicate_Do_Table:
        Replicate_Ignore_Table:
       Replicate_Wild_Do_Table:
   Replicate_Wild_Ignore_Table:
                    Last_Errno: 0
                    Last_Error:
                  Skip_Counter: 0
           Exec_Master_Log_Pos: 4919
               Relay_Log_Space: 5138
               Until_Condition: None
                Until_Log_File:
                 Until_Log_Pos: 0
            Master_SSL_Allowed: No
            Master_SSL_CA_File:
            Master_SSL_CA_Path:
               Master_SSL_Cert:
             Master_SSL_Cipher:
                Master_SSL_Key:
         Seconds_Behind_Master: 0
 Master_SSL_Verify_Server_Cert: No
                 Last_IO_Errno: 0
                 Last_IO_Error:
                Last_SQL_Errno: 0
                Last_SQL_Error:
   Replicate_Ignore_Server_Ids:
              Master_Server_Id: 1
                Master_SSL_Crl:
            Master_SSL_Crlpath:
                    Using_Gtid: No
                   Gtid_IO_Pos:
       Replicate_Do_Domain_Ids:
   Replicate_Ignore_Domain_Ids:
                 Parallel_Mode: conservative
                     SQL_Delay: 0
           SQL_Remaining_Delay: NULL
       Slave_SQL_Running_State: Slave has read all relay log; waiting for the slave I/O thread to update it
              Slave_DDL_Groups: 17
Slave_Non_Transactional_Groups: 0
    Slave_Transactional_Groups: 7
Testing Replication
-
Connect to the Primary Server using MariaDB Client using the user account:
user@primary-server$ sudo mariadb
-
Create a database with the CREATE DATABASE statement:
CREATE DATABASE IF NOT EXISTS test;
-
Create a table with the CREATE TABLE statement:
CREATE TABLE test.names (
   id INT PRIMARY KEY AUTO_INCREMENT,
   name VARCHAR(255));
-
Insert some data with the INSERT statement:
INSERT INTO test.names(name) VALUES ("Walker Percy"), ("Kate Chopin"), ("William Faulkner"), ("Jane Austen"); -
Confirm that the data was inserted properly with the SELECT statement:
SELECT * FROM test.names;
+----+------------------+
| id | name             |
+----+------------------+
|  1 | Walker Percy     |
|  2 | Kate Chopin      |
|  3 | William Faulkner |
|  4 | Jane Austen      |
+----+------------------+
-
Connect to the Replica Server and start MariaDB Client:
user@cluster-node2$ sudo mariadb
-
Confirm that the data was replicated properly with the SELECT statement:
SELECT * FROM test.names;
+----+------------------+
| id | name             |
+----+------------------+
|  1 | Walker Percy     |
|  2 | Kate Chopin      |
|  3 | William Faulkner |
|  4 | Jane Austen      |
+----+------------------+
We can confirm that the DDL and DML were replicated from the other Replica Server, allowing both Servers to return the same data.
Next steps: