
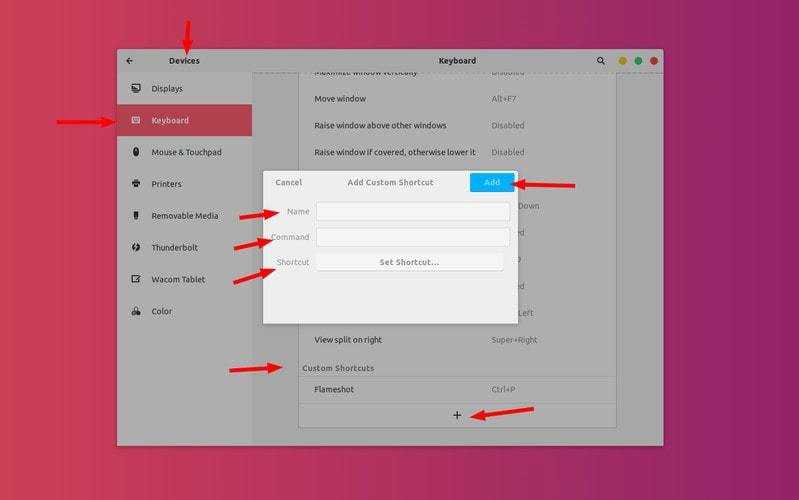
Step 2: Enable Relay Log and Replication on the Slave
Open the file on the slave.
sudo nano /etc/mysql/mariadb.conf.d/50-server.cnf
Find the section in unit and Add these 4 lines.
server-id       = 02
relay-log-index = /var/log/mysql/slave-relay-bin.index
relay-log       = /var/log/mysql/slave-relay-bin
replicate-do-db = database_name
The should be the same as the the database name on the master server. In the above configuration, we didn’t enable binary logging, which is fine if the slave is only used for load balancing. You need to enable binary logging if the slave will also act as a master of another slave, or if the slave will be used for backup. To enable binary logging, add the following 3 lines.
log-bin       = /var/log/mysql/02-bin
log-bin-index = /var/log/mysql/02-bin.index
binlog_format = mixed
If the slave is going to act a master of another slave, add the following line as well.
log_slave_updates = ON
Save and close the file. Then restart the slave MariaDB server for the changes to take effect.
sudo systemctl restart mariadb
Sometimes MariaDB may fail to restart. Run to check the status.
Configuration Variable slave_domain_parallel_threads
The pool of replication worker threads is shared among all multi-source master
connections, and among all replication domains that can replicate in parallel
using out-of-order.
If one master connection or replication domain is currently processing a
long-running query, it is possible that it will allocate all the worker
threads in the pool, only to have them wait for the long-running query to
complete, stalling any other master connection or replication domain, which
will have to wait for a worker thread to become free.
This can be avoided by setting
to a number that is lower
than . When set different from zero,
each replication domain in one master connection can reserve at most that many
worker threads at any one time, leaving the rest (up to the value of
) free for other master connections or replication domains to use in parallel.
The variable is dynamic and
can be changed without restarting the server; all slaves must be stopped while
changing it, though.
New Files
The basic principle of the new files used by multi source replication is that
they have the same name as the original relay log files suffixed with
before the extension. The main exception is
the file that holds all connection is named as the normal
with a prefix.
When you are using multi source, the following new files are created:
| Name | Description |
|---|---|
| The (normally ) with a prefix. This contains all primary connections in use. | |
| -connection_name | Contains the current primary position for what’s applied to in the replica. Extension is normally |
| -connection_name | The relay-log name with a connection_name suffix. The xxxxx is the relay log number. This contains the replication data read from the primary. |
| -connection_name | Contains the name of the active -connection_name files. Extension is normally |
| -connection_name | Contains the current primary position for the relay log. Extension is normally |
When creating the file, the connection name is converted to lower case and all
special characters in the connection name are converted, the same way as MySQL
table names are converted. This is done to make the file name portable across
different systems.
Hint:
Instead of specifying names for with , , , ,
and , you can just
specify and all the other variables are set
with this as a prefix.
Checking Program Options
You can check which options a given program is going to use by using the command-line argument:
| Option | Description |
|---|---|
| Read options from option files, print all option values, and then exit the program. |
This command-line argument can be used with most of MariaDB’s command-line tools, not just . It must be given as the first argument on the command-line. For example:
$ mysqldump --print-defaults
mysqldump would have been started with the following arguments:
--ssl_cert=/etc/my.cnf.d/certificates/client-cert.pem --ssl_key=/etc/my.cnf.d/certificates/client-key.pem --ssl_ca=/etc/my.cnf.d/certificates/ca.pem --ssl-verify-server-cert --max_allowed_packet=1GB
You can also check which options a given program is going to use by using the utility and providing the names of the option groups that the program reads. For example:
$ my_print_defaults mysqldump client client-server client-mariadb
--ssl_cert=/etc/my.cnf.d/certificates/client-cert.pem
--ssl_key=/etc/my.cnf.d/certificates/client-key.pem
--ssl_ca=/etc/my.cnf.d/certificates/ca.pem
--ssl-verify-server-cert
--max_allowed_packet=1GB
The utility’s command-line option provides a shortcut to refer to all of the :
$ my_print_defaults --mysqld
--log_bin=mariadb-bin
--log_slave_updates=ON
--ssl_cert=/etc/my.cnf.d/certificates/server-cert.pem
--ssl_key=/etc/my.cnf.d/certificates/server-key.pem
--ssl_ca=/etc/my.cnf.d/certificates/ca.pem
Installation
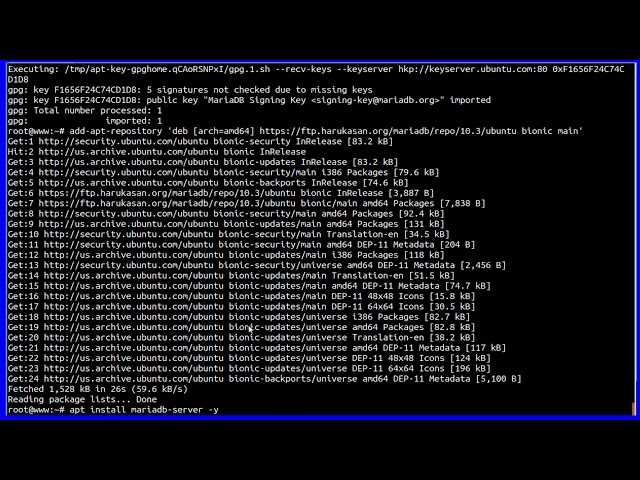
MariaDB Corporation provides a APT package repository for Ubuntu 20.04 LTS.
MariaDB Community Server does not require any additional software to operate as a node in MariaDB Replication.
Install via APT (Debian/Ubuntu)
-
Configure the APT package repository.
To configure APT package repositories:
$ sudo apt install wget $ wget https://downloads.mariadb.com/MariaDB/mariadb_repo_setup $ echo "fc84b8954141ed3c59ac7a1adfc8051c93171bae7ba34d7f9aeecd3b148f1527 mariadb_repo_setup" \ | sha256sum -c - $ chmod +x mariadb_repo_setup $ sudo ./mariadb_repo_setup \ --mariadb-server-version="mariadb-10.3" $ sudo apt update -
Install MariaDB Community Server and package dependencies:
$ sudo apt install mariadb-server mariadb-backup
-
Configure MariaDB.
Installation only loads MariaDB Community Server to the system. MariaDB Community Server requires configuration before the database server is ready for use.
Configuring the Cluster
Before we set up replication, we need to ensure that the cluster is configured properly. This involves the following steps:
Set log_slave_updates=ON on all nodes in the cluster. See Configuring MariaDB Galera Cluster: Writing Replicated Write Sets to the Binary Log and Using MariaDB Replication with MariaDB Galera Cluster: Configuring a Cluster Node as a Replication Master for more information on why this is important. This is also needed to enable wsrep GTID mode.
Set server_id to the same value on all nodes in the cluster. See Using MariaDB Replication with MariaDB Galera Cluster: Setting server_id on Cluster Nodes for more information on what this means.
Configuring Wsrep GTID Mode
If you want to use GTID replication, then you also need to configure some things to . For example:
wsrep_gtid_mode=ON needs to be set on all nodes in the cluster.
wsrep_gtid_domain_id needs to be set to the same value on all nodes in the cluster, so that each cluster node uses the same domain when assigning GTIDs for Galera Cluster’s write sets.
log_slave_updates needs to be enabled on all nodes in the cluster. See MDEV-9855 about that.
log_bin needs to be set to the same path on all nodes in the cluster. See MDEV-9856 about that.
And as an extra safety measure:
gtid_domain_id should be set to a different value on all nodes in a given cluster, and each of these values should be different than the configured wsrep_gtid_domain_id value. This is to prevent a node from using the same domain used for Galera Cluster’s write sets when assigning GTIDs for non-Galera transactions, such as DDL executed with wsrep_sst_method=RSU set or DML executed with wsrep_on=OFF set.
Starting the Replica Server
Replica Servers are MariaDB Community Servers that replicate binary logs from the Primary Server in a MariaDB Replication deployment. In order to start the Replica Server, we need to go through the following process:
-
Take a backup of the Primary Server.
-
Restore the backup to the Replica Server.
-
Start MariaDB Community Server on the Replica Server.
-
Start MariaDB Replication on the Replica Server.
Backing Up the Primary Server
Before the Replica Server can be started, its data needs to be consistent with the Primary Server. To ensure that it is consistent, take a backup of the Primary Server:
The instructions below show how to perform a backup using MariaDB Backup. For more information about backing up and restoring the database, please see the Recovery Guide.
-
On the Primary Server, take a full backup:
$ sudo mariabackup --backup \
      --user=mariabackup_user \
      --password=mariabackup_passwd \
      --target-dir=/data/backup/replica_backup
Confirm successful completion of the backup operation.
-
On the Primary Server, prepare the backup:
$ sudo mariabackup --prepare \
      --target-dir=/data/backup/replica_backup
Confirm successful completion of the prepare operation.
Restoring the Backup on the Replica Server
To make the Replica Server consistent with the Primary Server, we restore the new backup on the Replica:
-
On the Primary Server, copy the backup to the Replica Server:
$ sudo rsync -av /data/backup/replica_backup replicaserver:/data/backup/
-
On the Replica Server, restore the backup using MariaDB Backup.
On MariaDB Community Server 10.3:
$ sudo mariabackup --copy-back \
   --target-dir=/data/backup/replica_backup
-
On the Replica Server, fix the file permissions of the restored backup:
$ sudo chown -R mysql:mysql /var/lib/mysql
-
After the backup has been restored on the Replica Server, we can start MariaDB Community Server, and confirm that the backup is valid by ensuring that the server starts properly and that all data was properly imported.
Starting the Server
MariaDB Community Server includes configuration to start, stop, restart, enable/disable on boot, and check the status of the Server using the operating system default process management system.
Ubuntu 20.04 LTS uses systemd. You can manage the Server process using the command:

|
Operation |
Command |
|
Start |
|
|
Stop |
|
|
Restart |
|
|
Enable during startup |
|
|
Disable during startup |
|
|
Status |
Starting MariaDB Replication
The last step is to set up MariaDB Replication.
-
Get the GTID position that corresponds to the restored backup.
If the backup was taken with MariaDB Backup, this position will be located in :
$ cat xtrabackup_binlog_info
mariadb-bin.000096 568 0-1-2001,1-2-5139
The GTID position from the above output is .
-
Connect to the Replica Server using MariaDB Client using the user account:
$ sudo mysql
-
Set the gtid_slave_pos system variable to the GTID position:
SET GLOBAL gtid_slave_pos='0-1-2001,1-2-5139';
-
Execute the CHANGE MASTER TO statement to configure the Replica Server to connect to the Primary Server at this position:
CHANGE MASTER TO
   MASTER_USER = "repl",
   MASTER_HOST = "192.0.2.1",
   MASTER_PASSWORD = "repl_passwd",
   MASTER_USE_GTID=slave_pos;
The above statement configures the Replica Server to connect to a Primary Server located at using the user account. These account credentials must first be .
-
Start replication using the START SLAVE command:
START SLAVE;
The above statement configures the Replica Server to connects to the Primary Server to retrieve new binary log events and replicate them into the local database.
Start Replication on the New Slave
At this point, we need to get the replication coordinates of the master from the original backup directory.
If we took the backup on the master, then the coordinates will be in the file. If we took the backup on another slave and if we provided the option, then the coordinates will be in the file file.
Mariabackup dumps replication coordinates in two forms: GTID coordinates and binary log file and position coordinates, like the ones you would normally see from output. We can choose which set of coordinates we would like to use to set up replication.
For example:
mariadb-bin.000096 568 0-1-2
Regardless of the coordinates we use, we will have to set up the master connection using and then start the replication threads with .
GTIDs
If we want to use GTIDs, then we will have to first set to the GTID coordinates that we pulled from either the file or the file in the backup directory. For example:
$ cat xtrabackup_binlog_info
mariadb-bin.000096 568 0-1-2
And then we would set in the command. For example:
SET GLOBAL gtid_slave_pos = "0-1-2";
CHANGE MASTER TO
   MASTER_HOST="dbserver1",
   MASTER_PORT=3306,
   MASTER_USER="repl",
   MASTER_PASSWORD="password",
   MASTER_USE_GTID=slave_pos;
START SLAVE;
File and Position
If we want to use the binary log file and position coordinates, then we would set and in the command to the file and position coordinates that we pulled; either the file or the file in the backup directory, depending on whether the backup was taken from the master or from a slave of the master. For example:
CHANGE MASTER TO
   MASTER_HOST="dbserver1",
   MASTER_PORT=3306,
   MASTER_USER="repl",
   MASTER_PASSWORD="password",
   MASTER_LOG_FILE='mariadb-bin.000096',
   MASTER_LOG_POS=568;
START SLAVE;
Parallel Replication Overview
MariaDB replication in general takes place in three parts:
- Replication events are read from the master by the IO thread and queued in
the relay log. - Replication events are fetched one at a time by the SQL thread from the relay log
- Each event is applied on the slave to replicate all changes done on the
master.
Before MariaDB 10, the third step was also performed by the SQL thread; this
meant that only one event could execute at a time, and replication was
essentially single-threaded. Since MariaDB 10, the third step can optionally be
performed by a pool of separate replication worker threads, and thereby
potentially increase replication performance by applying multiple events in parallel.
Настройка репликации MySQL
В этой инструкции мы будем использовать для примера Ubuntu 16.04 и MariaDB версии 10.1. Перед тем, как начать полностью обновите систему:
Поскольку мы будем развертывать нашу конфигурацию на нескольких узлах, нужно выполнить операции обновления на всех них. Если сервер баз данных MariaDB еще не установлен, его нужно установить. Сначала добавьте репозиторий и его ключ:
Когда обновление списка пакетов завершено, установите MariaDB командой:
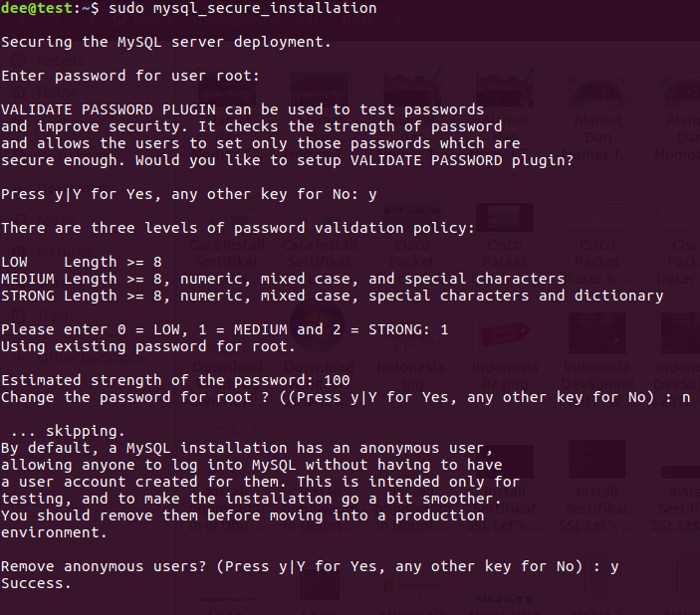
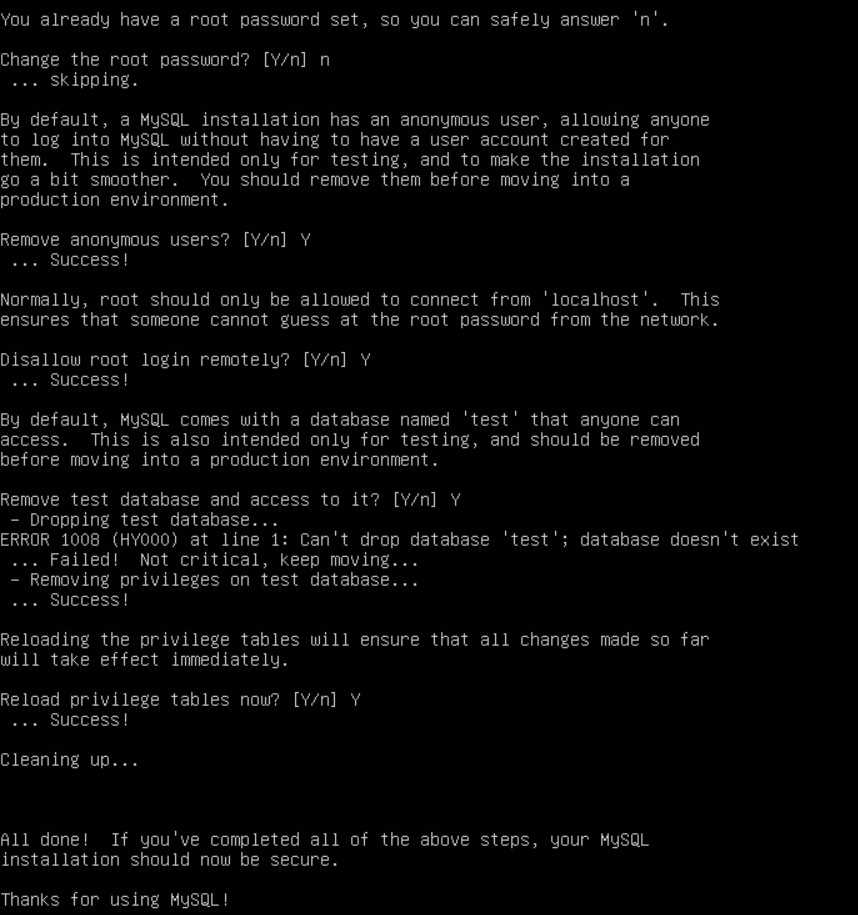
Пакет rsync нам понадобится для выполнения непосредственно синхронизации. Когда установка будет завершена, вам необходимо защитить базу данных с помощью скрипта mysql_secure_installation:
По умолчанию разрешен гостевой вход, есть тестовая база данных, а для пользователя root не задан пароль. Все это надо исправить. Читайте подробнее в статье установка MariaDB в Ubuntu. Если кратко, то вам нужно будет ответить на несколько вопросов:
Когда все будет готово, можно переходить к настройке нод, между которыми будет выполняться репликация баз данных mysql. Сначала рассмотрим настройку первой ноды. Можно поместить все настройки в my.cnf, но лучше будет создать отдельный файл для этих целей в папке /etc/mysql/conf.d/.
Добавьте такие строки:
Здесь адрес 192.168.56.101 — это адрес текущей ноды. Дальше перейдите на другой сервер и создайте там такой же файл:
Аналогично тут адрес ноды — 192.168.0.103. Остановимся на примере с двумя серверами, так как этого достаточно чтобы продемонстрировать работу системы, а добавить еще один сервер вы можете, прописав дополнительный IP адрес в поле wsrep_cluster_address. Теперь рассмотрим что означают значения основных параметров и перейдем к запуску:
- binlog_format — формат лога, в котором будут сохраняться запросы, значение row сообщает, что там будут храниться двоичные данные;
- default-storage-engine — движок SQL таблиц, который мы будем использовать;
- innodb_autoinc_lock_mode — режим работы генератора значений AUTO_INCREMENT;
- bind-address — ip адрес, на котором программа будет слушать соединения, в нашем случае все ip адреса;
- wsrep_on — включает репликацию;
- wsrep_provider — библиотека, с помощью которой будет выполняться репликация;
- wsrep_cluster_name — имя кластера, должно соответствовать на всех нодах;
- wsrep_cluster_address — список адресов серверов, между которыми будет выполняться репликация баз данных mysql, через запятую;
- wsrep_sst_method — транспорт, который будет использоваться для передачи данных;
- wsrep_node_address — ip адрес текущей ноды;
- wsrep_node_name — имя текущей ноды.
Настройка репликации MySQL почти завершена. Остался последний штрих перед запуском — это настройка брандмауэра. Сначала включите инструмент управления правилами iptables в Ubuntu — UFW:
Затем откройте такие порты:
Часто задаваемые вопросы по теме статьи (FAQ)
Есть ли отличия в настройке репликации master slave в других форках mysql, например mariadb?
Нет. Описанный мной способ подходит для настройки репликации во всех популярных версиях серверов mysql.
Как следует добавлять дополнительные slave серверы, если возникнет такая необходимость?
Никакой разницы нет, будет ли у вас один slave сервер или несколько. Добавление следующих серверов происходит точно так же, как и первого. Настраиваете slave сервер, заливаете дамп баз и запускаете репликацию.
Что следует сделать, чтобы вернуть репликацию, если slave сервер потеряет связь с мастером?
Ничего особенного делать не надо. Если связь с мастером прервалась и репликация остановилась, достаточно восстановить связь и запустить заново репликацию. Slave сервер подтянет все изменения с мастера.
Настройка с доступом по паролю
Пример создания базы данных и пользователя
Создайте базу данных dbtest и пользователя test для работы с ней:
mysql -u root -p
Enter password:
Welcome to the MariaDB monitor.  Commands end with ; or \g.
Your MariaDB connection id is 11
Server version: 10.2.29-MariaDB-log Source distribution

Copyright (c) 2000, 2018, Oracle, MariaDB Corporation Ab and others.

Type 'help;' or '\h' for help. Type '\c' to clear the current input statement.

MariaDB > CREATE DATABASE dbtest;
Query OK, 1 row affected (0.00 sec)

MariaDB > CREATE USER 'test'@'localhost' IDENTIFIED BY 'secret';
Query OK, 0 rows affected (0.00 sec)

MariaDB > GRANT ALL ON dbtest.* TO 'test'@'localhost';
Query OK, 0 rows affected (0.00 sec)

MariaDB > FLUSH PRIVILEGES;
Query OK, 0 rows affected (0.00 sec)

MariaDB > Bye
Необходимая база и пользователь созданы.
Проверьте подключение к базе данных:
mysql -u test -d dbtest -p
Enter password:
Reading table information for completion of table and column names
You can turn off this feature to get a quicker startup with -A

Welcome to the MariaDB monitor.  Commands end with ; or \g.
Your MariaDB connection id is 156
Server version: 10.2.29-MariaDB-log Source distribution

Copyright (c) 2000, 2018, Oracle, MariaDB Corporation Ab and others.

Type 'help;' or '\h' for help. Type '\c' to clear the current input statement.

MariaDB > Bye
Резервное копирование и восстановление баз данных MariaDB
Создайте резервную копию базы данных testdb от пользователя test testdb-dump.sql, выполнив команду:
mysqldump -u test -p testdb > testdb-dump.sql
Восстановите базу данных testdb от пользователем test из резервной копии testdb-dump.sql, выполнив команду:
mysql -u test -p testdb < testdb-dump.sql
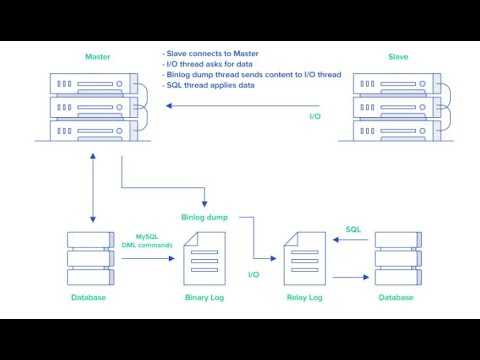
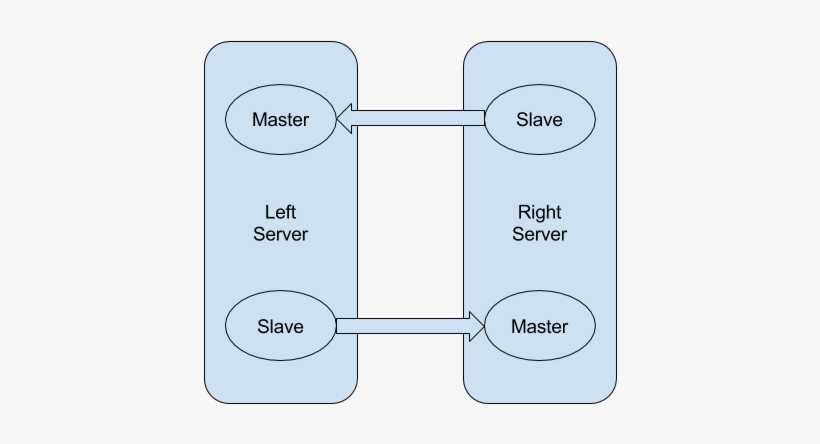
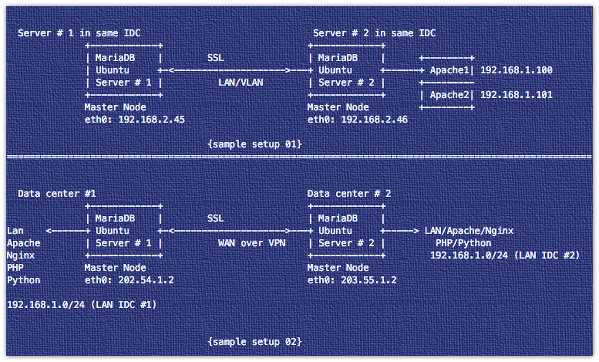
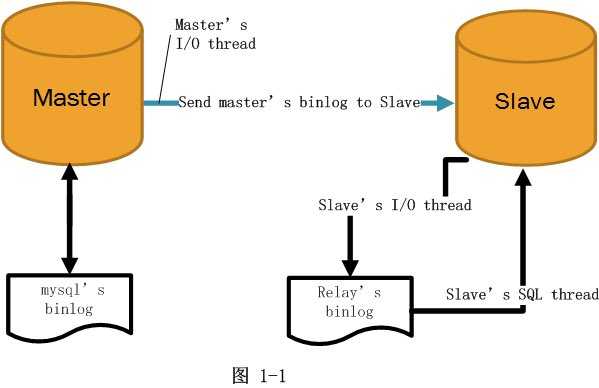
How Master-Slave Replication Works in MariaDB
MariaDB replication is based on the binary log (binlog). The purpose of binary log is to allow replication, backup and restore databases. You must enable binary logging on the master server in order for replication to work. Binary logging is not required on the slave server, but it’s recommended.


For replication to work, the master and slave server must have the same data at first. Then changes to the data (aka transactions) happen on the master server. The master assigns every transaction a global transaction ID (GTID) and writes the transaction to its binary log. A slave will periodically check the binary log on the master. If there are new transactions, the slave will write the new transaction to its own relay log and execute the transaction.
The master-slave replication in MariaDB is called asynchronous replication, which means that the master executes transactions immediately and does not wait for any of the slaves to replicate the transaction, so it does not affect write performance. In asynchronous replication, there’s no need for a permanent connection between the slaves and the master.
The opposite of asynchronous replication is synchronous replication, which is often used in multi-master cluster. With synchronous replication, a transaction is executed after its changes have been replicated to every node in the cluster.
Setting up master-slave replication can be done in 5 steps:
- Enable binary log and replication on the master
- Enable relay log and replication on the slave
- Dump databases on the master and import them into the slave
- (optional) Enable TLS encryption
- Connect the slave to the master
Step 5: Connect the Slave to the Master
Now log into the slave MariaDB monitor and run the following command to create a connection profile.
MariaDB > change master 'master01' to
    -> master_host='master_IP_address',
    -> master_user='replicant',
    -> master_password='replicant_password',
    -> master_port=3306,
    -> master_log_file='master-bin.000001',
    -> master_log_pos=62307428,
    -> master_connect_retry=10,
    -> master_use_gtid=slave_pos,
    -> master_ssl=1;
In the first line, the connection name is set to master01. The value of and can be obtained from the command on the master MariaDB server. enables GTID (Global Transaction ID) in MariaDB replication. GTID is a feature available starting with MariaDB 10.0.2.
The last line enforces TLS encryption. If the master and slave are in a secure private network, then you don’t have to enforce TLS encryption, so you can remove the last line. Notice that the last line ends with a semicolon.
Then start this connection.
MariaDB > start slave 'master01';
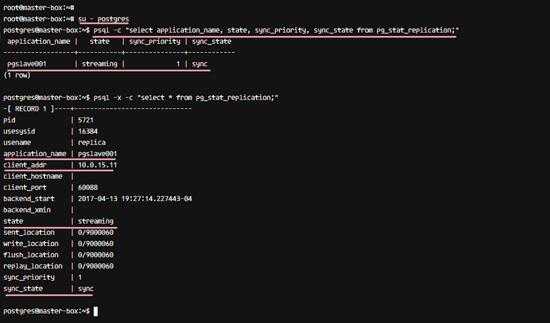
Check the status.
MariaDB > show slave 'master01' status\G;
If you see no errors in the output, that means replication is running smoothly. You should see the following two “Yes” indicating everything is going well. If one of them is not “Yes”, then something is not right.
 Slave_IO_Running: Yes
 Slave_SQL_Running: Yes
Now if you make a change in your master database server, it will be replicated to the slave database server. The slave I/O thread connects to the master and requests binary log. If there are new transactions in the binary log, the slave I/O thread writes them to the relay log on the slave server. Then the slave SQL thread reads the relay log and executes new transactions in the database.
To stop replication, run:
MariaDB > stop slave 'master01';
If you want the replication to restart from a clean state, you can reset the replication.
MariaDB > reset slave 'master01';
By default, when MariaDB server restarts, it resumes all stopped replication tasks. To permanently delete a connection, first stop that connection and run the following statement.
MariaDB > reset slave 'master01' all;
Step3: Dump Databases On the Master
Log into the master MariaDB server and issue this command to prevent any further changes to databases.
flush tables with read lock;
Then
show master status;
Do NOT exit yet. Record and details. Now open another terminal window and SSH into your master server. Use utility to dump the database to a file.
mysqldump -u root -p database_name > database_name.sql
You can now unlock tables on master server by running the following command at the MariaDB monitor.
unlock tables;
Use to copy this dump file to your slave server. Then import it into the slave server.
mysql -u root -p database_name.sql < database_name
Настройка master — slave репликации
У нас все готово для настройки непосредственно репликации. Но перед тем, как ее начать, убедитесь, что у вас настроен или отключен firewalld. В общем случае на мастере разрешите подключаться к серверу по tcp порту 3306, на котором работает mysql сервер.
Теперь запускаем репликацию. Для этого идем на мастер и смотрим master log position в консоли mysql.
Переходим на slave и выполняем в консоли mysql.
Проверяем статус репликации.
Скорее всего вы увидите ошибку:
Суть ее в том, что в версии Mysql 8 поменялся плагин для аутентификации с mysql_native_password на caching_sha2_password. Теперь для корректной работы репликации необходимо настраивать подключение с использованием tls сертификатов. Если инфраструктура закрытая и данные передаются не через интернет, то этим можно пренебречь. К примеру, я всегда настраиваю vpn тоннель, если репликация работает через интернет.
Самый простой способ исправить ошибку, это зашифровать пароль пользователя предыдущим плагином. Делается это так.
После этого вернитесь на slave, остановите репликацию, обновите информацию с мастера и запустите заново. Ошибки быть не должно.
Проверьте теперь статус репликации. Признаком того, что все в порядке, будет отсутствие ошибок и информация в следующих строках.
- Slave_IO_State — состояние репликации, в норме ожидание событий с мастера.
- Slave_IO_Running — индикатор работы демона по сбору бинарного лога с мастера и записи его в локальный relay лог.
- Slave_SQL_Running — индикатор выполнения команд из локального relay лога.
- Seconds_Behind_Master — то, насколько слейв сервер отстает от мастера в репликации. Идеально 0 секунд, но может и отставать немного.
Если репликация идет нормально, slave будет идти за master. Номер лога Master_Log_File и позиция Exec_Master_Log_Pos будут расти. Если значение Slave_IO_State пусто или Connecting to master, а Seconds_Behind_Master равно NULL, репликация не началась.
Option Prefixes
MariaDB supports certain prefixes that can be used with options. The supported option prefixes are:
| Option Prefix | Description |
|---|---|
| Sets the option value automatically. Only supported for certain options. Available in MariaDB 10.1.7 and later. | |
| For all boolean options, disables the setting (equivalent to setting it to ). Same as . | |
| For all boolean options, enables the setting (equivalent to setting it to ). | |
| Don’t produce an error if the option doesn’t exist. | |
| Sets the maximum value for the option. | |
| For all boolean options, disables the setting (equivalent to setting it to ). Same as . |
For example:
...
# determine a good value for open_files_limit automatically
autoset_open_files_limit

# disable the unix socket plugin
disable_unix_socket

# enable the slow query log
enable_slow_query_log

# don't produce an error if these options don't exist
loose_file_key_management_filename = /etc/mysql/encryption/keyfile.enc
loose_file_key_management_filekey = FILE:/etc/mysql/encryption/keyfile.key
loose_file_key_management_encryption_algorithm = AES_CTR

# set max_allowed_packet to maximum value
maximum_max_allowed_packet

# disable external locking for MyISAM
skip_external_locking
Start the Slave
CHANGE MASTER TO
  MASTER_HOST='master.domain.com',
  MASTER_USER='replication_user',
  MASTER_PASSWORD='bigs3cret',
  MASTER_PORT=3306,
  MASTER_LOG_FILE='master1-bin.000096',
  MASTER_LOG_POS=568,
  MASTER_CONNECT_RETRY=10;
If you are starting a slave against a fresh master that was configured for replication from the start, then you don’t have to specify and .
MariaDB starting with 10.0
MariaDB 10.0 introduced global transaction IDs (GTIDs) for replication. It is generally recommended to use (GTIDs) from MariaDB 10.0, as this has a number of benefits. All that is needed is to add the option to the statement, for example:
CHANGE MASTER TO MASTER_USE_GTID = slave_pos
See Global Transaction ID for a full description.
Now start the slave with the START SLAVE command:
START SLAVE;
Check that the replication is working by executing the SHOW SLAVE STATUS command:
SHOW SLAVE STATUS \G
If replication is working correctly, both the values of Slave_IO_Running and Slave_SQL_Running should be Yes:
Slave_IO_Running: Yes
Slave_SQL_Running: Yes
Заключение
Вот так относительно просто настраивается обычная master — slave репликация mysql. Подобным же образом настраивается и master-master репликация, но на практике она очень нестабильно работает. Я пробовал в свое время, но в итоге отказался, так как надоело ее чинить и исправлять ошибки. Для полноценного кластера с мультизаписью лучше использовать какие-то специализированные решения типа Percona XtraDB Cluster.
Кстати, он же может заменить и текущую конфигурацию, если сделать его из двух нод и писать только в одну. Разрешив ему работать при выходе из строя реплики, получится примерно то же самое, что и в статье. Но смысла в этом особо нет, так как предложенная мной конфигурация настраивается проще и быстрее. Плюс, это типовое решение для любого mysql сервера.
Онлайн курс «DevOps практики и инструменты»
Если у вас есть желание научиться строить и поддерживать высокодоступные и надежные системы, научиться непрерывной поставке ПО, мониторингу и логированию web приложений, рекомендую познакомиться с онлайн-курсом «DevOps практики и инструменты» в OTUS. Курс не для новичков, для поступления нужны базовые знания по сетям и установке Linux на виртуалку. Обучение длится 5 месяцев, после чего успешные выпускники курса смогут пройти собеседования у партнеров.
Проверьте себя на вступительном тесте и смотрите программу детальнее по .


