
Troubleshooting Proxy Setup
Double check notes above.
Check the output of
1 |
Check the output of
1 |
Note
A common problem is the name of your proxy in the Zabbix User Interface, should be the same as your Hostname setting in the Zabbix proxy config in
Debian/Ubuntu/Raspbian
For more information about installing on Debian/Ubuntu/Raspbian visit,
https://www.zabbix.com/documentation/current/manual/installation/install_from_packages/debian_ubuntu
Red Hat/Centos
For more information about installing on Red Hat/Centos visit,
https://www.zabbix.com/documentation/current/manual/installation/install_from_packages/rhel_centos
PSK Encryption between the Proxy and Server
Later on, you may be tempted to add PSK encryption between your Zabbix server and the Proxy. PSK is discussed more later on in the course.
You may see an error in the Proxy logs, «cannot send proxy data to server at «zabbix.your-domain.tld»: connection of type «TLS with PSK» is not allowed for proxy «your-proxy»
When setting up PSK encryption for communications specifically between the Proxy and Server, you should add the PSK Identity and Secret to Administration—>Proxies—>—>Encryption and also adjust the settings inside the file /etc/zabbix/zabbix_proxy.conf
If you also want Encryption between your Proxy and its local Agent, then create another secret for the agent, set its PSK settings in the Proxy Agents Host configuration at Configuration—>Hosts—>—>Encryption, and modify the settings in the file /etc/zabbix/zabbix_agentd.conf
Understand that the Proxy process, and the Proxies own Agent process are two different things with there own configurations. The proxies own agent is discussed in the next section.
Шаг 5 — Настройка базы данных MySQL для Zabbix
Импортируем схему базы данных для Zabbix сервера. Логинемся на сервер MySQL с учетной записью root и создаем базу данных MySQL и пользователя с помощью следующих команд.
# mysql -uroot -p
password
mysql> create database zabbix character set utf8 collate utf8_bin;
mysql> create user zabbix@localhost identified by 'password';
mysql> grant all privileges on zabbix.* to zabbix@localhost;
mysql> quit;
Импорт начальной схему и данных Заббикс производим от пользователя MySQL созданного выше.
# zcat /usr/share/doc/zabbix-server-mysql*/create.sql.gz | mysql -uzabbix -p zabbix
Enter password
Настроим подключение Заббикса к базе данных, для это следует отредактировать файл /etc/zabbix/zabbix_server.conf и задать пароль для подключения к MySQL. Остальные 3 параметра уже настроены, если вы конечно не извращались с именем пользователя и базы данных.
DBPassword=password
DBHost=localhost
DBName=zabbix
DBUser=zabbix
Настройка Zabbix proxy
Открываем файл конфигурации zabbix proxy для настройки:
# mcedit /etc/zabbix/zabbix_proxy.conf
Необходимо изменить несколько параметров, все остальное можно не трогать:
server=84.143.241.246
hostname=proxy01
DBName=/var/lib/sqlite/zabbix.db
| server | Адрес центрального сервера мониторинга |
| hostname | Имя прокси сервера, которое мы будем использовать на основном сервере |
| DBName | Путь к локальной базе данных |
Добавляем proxy в автозагрузку и запускаем:
systemctl enable zabbix-proxy
systemctl start zabbix-proxy
Если сейчас посмотреть лог, то увидим там следующее:
# cat /var/log/zabbix/zabbix_proxy.log
2701:20160816:225839.865 cannot obtain configuration data from server at "84.143.241.246": proxy "proxy01" not found
2702:20160816:225839.865 cannot send heartbeat message to server at "84.143.241.246": proxy "proxy01" not found
В данном случае все в порядке, это не ошибка. Просто основной сервер еще ничего не знает о только что настроенном прокси. Нам нужно идти на сервер и добавлять свежеустановленный proxy. Заходим в web панель, идем в раздел Administration -> Proxies (Администрирование -> Прокси) и справа нажимаем на кнопку Create proxy (Создать прокси):
Заполняете необходимые поля. В данном случае обязательное только одно поле Proxy name.
| Proxy name | Имя прокси сервера, должно соответствовать параметру hostname в файле конфигурации прокси |
| Proxy mode | Режим работы: active — прокси всегда сам обращается к основному серверу и отправляет данные, passive — команды на получение данных каждый раз инициирует основной сервер |
| Hosts | Хосты, которые будут мониториться через этот прокси. Так как мы только добавляем прокси, вряд ли у нас есть хосты для него. |
| Description | Произвольное описание сервера |
После добавление proxy на основной сервер, можно перезапустить сам прокси сервер и посмотреть лог:
# systemctl restart zabbix-proxy
# cat /var/log/zabbix/zabbix_proxy.log
2871:20160816:231130.025 received configuration data from server at "84.143.241.246", datalen 2664
Все в порядке, прокси подключился к основному серверу и забрал от него данные. При этом на основном сервере изменился статус прокси:
В качестве теста запустим на самом прокси сервере zabbix agent и подключим его к основному серверу мониторинга через proxy. Для этого открываем конфиг агента и устанавливаем следующие параметры:
# mcedit /etc/zabbix/zabbix_agentd.conf
Server=192.168.56.10
ServerActive=192.168.56.10
Hostname=proxy01
192.168.56.10 — локальный ip адрес прокси сервера.
Сохраняем файл, агента пока не запускаем. Идем в веб интерфейс и добавляем новый хост.
Имя указываем такое же, как Hostname у агента, ip адрес — локальный адрес агента, Monitored by proxy выбираем в выпадающем списке нужный proxy сервер. Когда добавите их несколько, они все будут в этом списке. Не забудьте назначить какой-нибудь шаблон. Если этого не сделать, то можно долго ждать поступления данных и недоумевать, почему ничего не поступает, хотя на вид все в порядке и ошибок в логах нет. Я много раз с подобным сталкивался в своей практике.
После того, как добавите новый хост на основном сервере, возвращаемся на proxy и перезапускаем его, чтобы сразу же получить настройки с основного сервера. Это делать не обязательно, через некоторое время (не знаю точно какое, любопытно было бы узнать) прокси сам заберет конфигурацию. Но мы форсируем процесс:
# systemctl restart zabbix-proxy
Теперь запускаем агент и добавляем его в автозагрузку:
# systemctl enable zabbix-agent
# systemctl start zabbix-agent
Проверяем лог агента:
# cat /var/log/zabbix/zabbix_agentd.log
Все в порядке, ошибок нет. Через некоторое время данные начнут поступать на основной сервер мониторинга с помощью посредника zabbix proxy.
Шаг 5: Зарегистрируйте Zabbix Proxy в веб-интерфейсе Zabbix
Теперь, когда ваш прокси запущен, вам нужно зарегистрировать его в веб-интерфейсе Zabbix, используя опцию « Прокси » в разделе « Администрирование ». Нажмите кнопку « Создать прокси » снизу, затем установите « Имя прокси » на Zabbix proxy и « Режим прокси » на « Активный » « Пассивный*».
* « Пассивный» режим включается на стороне zabbix-server и zabbix-proxy модом
Чтобы включить на на стороне zabbix-proxy надо дописать строчку в /etc/zabbix/zabbix_proxy.conf добавив
Обратите внимание, что для работы прокси в активном режиме « Имя прокси» должно быть таким же, как параметр « hostname » в файле а в пассивном может быть произвольным
Изображение, показывающее, как зарегистрировать пассивный Zabbix Proxy в веб-интерфейсе Zabbix
Сразу после добавления прокси к веб-интерфейсу вы получите сообщение, что прокси не подключен.
Однако, если вы подождете 100 секунд, в статусе « Последний раз (возраст) » вместо « Не подключен » будут отображаться секунды, что означает, что прокси-сервер обменивается данными с сервером.
Почему 100 секунд? Помните, что мы указали для параметра « ConfigFrequency » в « » файле? Независимо от того, что вы туда поместите, сколько времени потребуется прокси, чтобы связаться с Zabbix сервером для получения данных конфигурации. Это правило применяется только в том случае, если прокси находится в активном режиме.
Обратите внимание, что статус « Последний раз был доступен (возраст) » не должен превышать 6 секунд, если связь прокси-сервера работает
Step 9: Optimizing MySQL database (optional)
a. Create custom MySQL configuration file
Create file “ with “” and paste this configuration:
Save and exit the file (ctrl+x, followed by y and enter) and set the correct file permission:
Two things to remember!
Configuration parameter must be larger than the total number of all the proxy processes plus 50. You can use the command below to automatically check the number of Zabbix processes and add 50 to that number:
The second most important parameter is , which determines how much memory can MySQL get for caching InnoDB tables and index data. You should set that parameter to 70% of system memory if only database is installed on server.
However, in this case, we are sharing a server with the proxy server so you should set innodb_buffer_pool_size to 50% of total system memory. That would be 1G because my Ubuntu server has 2G RAM.
I didn’t have any problems with memory, but if your proxy crashes because of lack of memory, reduce “” and restart MySQL server.
Зачем нужен Zabbix proxy

Расскажу своими словами что такое zabbix proxy и зачем он нужен. Допустим у вас есть распределенная сеть, где отдельные сегменты никак не связаны друг с другом. То есть условно, у вас 5 разных сетей с адресацией 192.168.0.0/24. Вам нужно настроить мониторинг узлов в этих сетях. Сети ничего не знаю друг о друге, у них нет прямого IP, только доступ в интернет.
В таком случае вы устанавливаете zabbix сервер на внешний ip адрес, в каждом сегменте сети настраиваете прокси, который будет собирать данные с узлов в этом сегменте и отправлять их на основной сервер мониторинга. Все управление при этом происходит на основном сервере, достаточно только один раз подключить прокси к основному серверу. Схематично подобная схема изображена в документации с официального сайта:
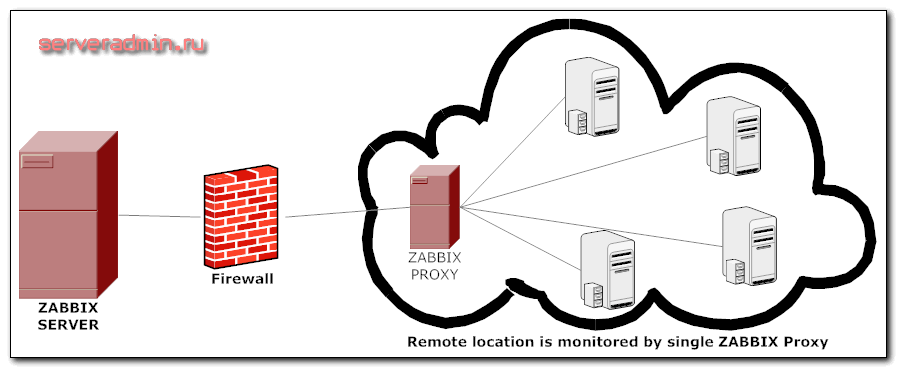
Если у вас полностью связаная сеть, в которой каждый узел имеет прямой доступ к серверу мониторинга, proxy сервера имеет смысл устанавливать и использовать для распределения нагрузки. 100 узлов, отправляющиие данные напрямую на сервер мониторинга, нагружают его сильнее, чем прокси, который собирает данные с этих 100 узлов и отправляяет их на основной сервер.
Вроде понятно и доступно объяснил. Приступим теперь к установке zabbix proxy. Устанавливать будем на сервер под управлением CentOS 7. Если у вас его еще нет, то читайте об установке centos 7 и его первоначальной настройке. Требования к железу зависят от нагрузки на прокси, но в общем случае они будут не высоки. Для мониторинга 20-30 узлов я использовал виртуальную машину с 512 мб оперативной памяти и 10 гб диском. Сама прокси почти ничего не хранит, отправялет данные на сервер.
В качестве основного сервера мониторинга у нас будет выступать Zabbix 3. Если вы его еще не настроили, то рекомендую мою подробную статью с видео по установке и настройке zabbix. Дальше я буду считать, что у вас уже настроен сервер мониторинга, к которму мы будем подключать proxy и добавлять новые узлы из подключенного сегмента сети.
Step 3: Zabbix proxy configuration
In my setup, I will name proxy as Zabbix proxy 01 and configure it to communicate with the Zabbix that has IP address 10.7.44.235 – please change those accordingly to match your environment.
Open file with the command: “” and add database password and configuration frequency in this format anywhere in the file:
“” parameter defines how often proxy retrieves configuration data from the Zabbix server in seconds. You can read more about proxy configuration parameters in the official documentation.
Don’t close the file yet! Now, you need to change the current ““, ““, ““, and “” parameter values to something like this:
Save and exit file (ctrl+x, followed by y and enter).
Шаг 7: Настройка шифрования PSK на прокси Zabbix (необязательно)
Zabbix поддерживает шифрованную связь между Zabbix сервером и Zabbix прокси с использованием протокола Transport Layer Security (TLS) v.1.2. Вы можете использовать шифрование на основе сертификатов и предварительных общих ключей (PSK), но в этом руководстве мы настроим последнее.
а. Сгенерировать ключ PSK на прокси-сервере
Сгенерируйте 256-битный (32 байта) ключ PSK с помощью команды openssl:
Создайте и откройте файл « » с помощью команды или в любом редакторе файлов
скопируйте и вставьте в него только что сгенерированный ключ.
Откройте файл с помощью команды:
и добавьте эту конфигурацию в любое место файла:
Не забудьте перезапустить прокси после изменения файла конфигурации:
Включите шифрование PSK на прокси в веб-интерфейсе Zabbix
Связь между прокси и сервером еще не зашифрована, потому что мы включили шифрование PSK на стороне прокси, но не на стороне сервера.
Нам нужно включить шифрование на стороне сервера, поэтому перейдите в веб-интерфейс и выберите свой прокси в опции « Прокси » в разделе « Администрирование ». Затем на вкладке «Шифрование» установите PSK в разделе «Подключения через прокси» и скопируйте и вставьте «Идентификатор PSK» и «PSK» (ключ), которые вы настроили на прокси. Если вы когда-нибудь потеряете сгенерированный ключ PSK, проверьте его с помощью команды « » на прокси-сервере.
Проверка статуса шифрования Zabbix прокси в веб-интерфейсе
Зачем нужен Zabbix proxy
Расскажу своими словами что такое zabbix proxy и зачем он нужен. Допустим у вас есть распределенная сеть, где отдельные сегменты никак не связаны друг с другом. То есть условно, у вас 5 разных сетей с адресацией 192.168.0.0/24. Вам нужно настроить мониторинг узлов в этих сетях. Сети ничего не знаю друг о друге, у них нет прямого IP, только доступ в интернет.
В таком случае вы устанавливаете zabbix сервер на внешний ip адрес, в каждом сегменте сети настраиваете прокси, который будет собирать данные с узлов в этом сегменте и отправлять их на основной сервер мониторинга. Все управление при этом происходит на основном сервере, достаточно только один раз подключить прокси к основному серверу. Схематично подобная схема изображена в документации с официального сайта:
Если у вас полностью связаная сеть, в которой каждый узел имеет прямой доступ к серверу мониторинга, proxy сервера имеет смысл устанавливать и использовать для распределения нагрузки. 100 узлов, отправляющиие данные напрямую на сервер мониторинга, нагружают его сильнее, чем прокси, который собирает данные с этих 100 узлов и отправляяет их на основной сервер.
Вроде понятно и доступно объяснил. Приступим теперь к установке zabbix proxy. Устанавливать будем на сервер под управлением CentOS 7. Если у вас его еще нет, то читайте об установке centos 7 и его первоначальной настройке. Требования к железу зависят от нагрузки на прокси, но в общем случае они будут не высоки. Для мониторинга 20-30 узлов я использовал виртуальную машину с 512 мб оперативной памяти и 10 гб диском. Сама прокси почти ничего не хранит, отправялет данные на сервер.
В качестве основного сервера мониторинга у нас будет выступать Zabbix 3. Если вы его еще не настроили, то рекомендую мою подробную статью с видео по установке и настройке zabbix. Дальше я буду считать, что у вас уже настроен сервер мониторинга, к которму мы будем подключать proxy и добавлять новые узлы из подключенного сегмента сети.
Add Proxy to Zabbix Server UI
I then create the proxy in Zabbix Server UI, then after several seconds, I refresh the proxy config screen and it will show that the proxy is now in communication with the server.
Zabbix UI -> Administration -> Proxies
| Key | Value | Notes |
|---|---|---|
| Proxy name | raspberrypi | (see notes below) |
| Proxy mode | Active | The is the same as is set on the configuration file on the proxy server. |
Note
The Proxy name must be the same name you configured in the Hostname parameter in the proxy configuration file /etc/zabbix/zabbix_proxy.conf on your proxy server.
In my example, it doesn’t matter that my Zabbix server is on a different network than the proxy. All messages received on the Zabbix Server from the external Proxy will contain this hostname in the payload, so the Zabbix Server process will reject anything that doesn’t match.
Also note that the Proxy name is the only required parameter on this form. You don’t need anything else to make it work.
For extra security also use PSK encryption, but that is discussed later on the course in the section Enable PSK Encryption. The process is conceptually the same for the Proxy, except, you add your PSK values to the /etc/zabbix/zabbix_proxy.conf on your proxy server, rather than the agent configs /etc/zabbix/zabbix_agentd.conf as discussed in the example. You also configure this on the Zabbix UI in the Administration—>proxies—>—>Encryption. This method is for communications between the Zabbix server and the Proxy only. I advise doing the Agent example of setting up PSK before trying to do PSK encryption for the Zabbix Server<—>Proxy communications unless you are totally confident you know what you are doing. Make sure all your communications between all your hosts, proxies, server are working before adding encryption to any parts of the communications between any components, since it wil make problem solving much harder. Solve one problem at a time.
Step 5: Register proxy server in the Zabbix frontend
Now that your proxy server is running, you need to register it in the Zabbix frontend using “Proxies” option under the “Administration” section. Click on the “Create proxy” button on the right, then set “Proxy name” to Zabbix proxy 01 and “Proxy mode” to “Active“.
Note that for a proxy to work in active mode “Proxy name” must be the same as the “hostname” parameter in “” file.
Picture showing how to register an active proxy server in the Zabbix frontend
Immediately after adding a proxy to the frontend, you will be informed that the proxy has never been seen.
However, if you wait for 100 seconds “Last seen (age)” status will display seconds instead “Never” which means that proxy is communicating with the Zabbix server.
Why 100 seconds? Remember what we have put under the “ConfigFrequency” parameter in “” file? Whatever you put there that’s how long will it take for the proxy to contact the Zabbix server to retrieve configuration data. This rule only applies if the proxy is in active mode.
Note that “Last seen (age)” status should never go above 6 seconds if proxy-server communication is working.
Active proxy mod is recommended because it can work behind a firewall but you can check out the section “” If you need to set proxy to work in a passive mode.
Установка и запуск web интерфейса
Все следующие компоненты поставятся, как зависимости:
Debian
# apt install zabbix-frontend-php php-mysql  #1m

# cat /etc/apache2/conf-available/zabbix-frontend-php.conf
...
php_value date.timezone Europe/Moscow
...
php_value date.timezone Europe/Moscow
...
# a2enconf zabbix-frontend-php

# service apache2 reload

# touch /etc/zabbix/zabbix.conf.php

# chown www-data /etc/zabbix/zabbix.conf.php
http://server.corpX.un/zabbix/setup.php
# less /etc/zabbix/zabbix.conf.php
<?php
// Zabbix GUI configuration file.
global $DB;

$DB     = 'MYSQL';
$DB   = 'localhost';
$DB     = '0';
$DB = 'zabbix';
$DB     = 'zabbix';
$DB = 'zabbix';

// Schema name. Used for IBM DB2 and PostgreSQL.
$DB = '';

$ZBX_SERVER      = 'localhost';
$ZBX_SERVER_PORT = '10051';
$ZBX_SERVER_NAME = '';

$IMAGE_FORMAT_DEFAULT = IMAGE_FORMAT_PNG;
Step 12: Learn about common Zabbix Proxy errors
No data in items because proxy server time differs from Zabbix server time
Starting from version 4.0 Zabbix server will no longer adjust value timestamps in cases when proxy time differs from Zabbix server time. This problem is easy to detect because server-proxy communication will work but there will be no data in the items.
Adjust proxy and the Zabbix server to use the same time server (NTP) or set the time manually.
Communication between Proxy and Server is not working
Zabbix proxy is using port 10051 to communicate with the Zabbix server so make sure that you permit traffic coming from port 10051 in your network.
Note that Zabbix is using compression for communication with Proxies. Compression improves performance because it drastically reduces network traffic.
However, this may cause some problems in environments that have security devices (IDS/IPS or NGFW) installed as they can drop network packets if they detect compression in the network stream. To avoid that problem, make sure the application definitions on the security devices are up-to-date, and if you have any problems, contact your device vendor.
Checking logs on proxy server
If you experience a problem with the proxy you can check last 500 lines of the log with the command:
Thank you for reading.
Edit Proxy Configuration file
Edit the Server, Hostname and DBName parameters.
1 |
zabbix_proxy.conf
| Key | Value | Notes |
|---|---|---|
| Proxymode | 0 = Active. This is the default already | |
| Server | zabbix.seanwasere.com | The DNS name of my Zabbix server. You could use IP address if you don’t have a DNS name. |
| Hostname | raspberrypi | (see notes below) |
| DBName | /tmp/zabbix_proxy.db | I am using the SQLite3 database option |
Note
I use the actual network hostname for this value to avoid ambiguity between the several different uses of the term Host name in the Zabbix documentation and UI. I just use the same name as is returned from entering the command on my proxy server. When I enter on my proxy server, it returns
I save, then I enter
1 |
Установка и запуск сервера
Установка из репозитория Debian 10
# apt install zabbix-server-mysql #2m
Сервис MySQL Управление параметрами сервера innodb_strict_mode=OFF
# cat zabbix.sql
#drop database zabbix;
create database zabbix character set utf8 collate utf8_bin;
grant all privileges on zabbix.* to zabbix@localhost identified by 'zabbix';
# mysql < zabbix.sql
# zcat /usr/share/zabbix-server-mysql/schema.sql.gz | mysql -uzabbix -pzabbix zabbix  #1m

# zcat /usr/share/zabbix-server-mysql/images.sql.gz | mysql -uzabbix -pzabbix zabbix

# zcat /usr/share/zabbix-server-mysql/data.sql.gz | mysql -uzabbix -pzabbix zabbix

# cat /etc/zabbix/zabbix_server.conf
...
DBHost=localhost
DBName=zabbix
DBUser=zabbix
DBPassword=zabbix
#end newline!!!
# systemctl enable zabbix-server

# service zabbix-server start
Step 7: Configuring PSK encryption on the proxy (optional)
Zabbix supports encrypted communications between the Zabbix server and proxy using Transport Layer Security (TLS) protocol v.1.2. You can use certificate-based and pre-shared key-based encryption (PSK), but in this tutorial we will configure the latter.
a. Generate PSK key on proxy server
Generate 256-bit (32 bytes) PSK key with openssl command:
Create and open file “” with command “” and copy & paste that newly generated key into it.
Save and exit the file (ctrl+x, followed by y and enter) and set the correct file permission:
b. Configure Proxy to support PSK encryption
Open file with command: “” and add this configuration anywhere in file:
Save and exit file (ctrl+x, followed by y and enter). Keep in mind that “TLSPSKIdentity” can be anything, so for security reasons set something else – don’t use mine!
Don’t forget to restart proxy after changing the configuration file:
c. Enable PSK encryption on the proxy in Zabbix frontend
Communication between proxy and the Zabbix server is not yet encrypted because we have enabled PSK encryption on the proxy side but not on the server-side.
We need to enable encryption on the server side so go to web frontend and select your proxy on the “Proxies” option under the “Administration” section. Next, on the “Encryption” tab set PSK under “Connections from proxy” option and copy and paste “PSK identity” and “PSK” (key) that you have configured on the proxy serve. If you ever lose your generated PSK key check it with command “” on the proxy server.
When you are done with configuration click the “Update” button just as shown in the image below.
Configuring PSK encryption on a proxy in the Zabbix frontend
If you have done everything right you should see something like this:
Checking proxy encryption status in the web frontend
Step 6: Configure hosts in Zabbix to be monitored by a proxy
Zabbix proxy is running and communicating with the Zabbix server, but it is not gathering any data because we didn’t do the last crucial step! We need to configure hosts in Zabbix to be monitored by the proxy server.
Let’s do that together, go to the “Host” option under the “Configuration” section and select hosts that need to monitored by the proxy server.
Configure hosts in Zabbix to be monitored by a proxy server – Step 1
After you have select hosts click on the “Mass update” button, then under the “Host” options select our newly added proxy in the “Monitored by proxy” dropdown and finally click the “Update” button just as shown in the image below.
Configure hosts in Zabbix to be monitored by a proxy server – Step 2
CONGRATULATIONS!You have successfully installed and configured Zabbix Proxy 5 on Ubuntu!No need to change anything else as other steps are optional.CONTINUE TO LEARN MORE:Configuring encryption (PSK) on the ProxyOptimizing Proxy and MySQL databaseHow to manage Proxy and MySQL serviceUnderstanding Zabbix proxy active vs passiveLearn about common Proxy errors
Заключение
Когда я только начинал настраивать распределенный мониторинг, мне очень хотелось иметь возможность установить zabbix proxy на windows. Это бы очень упростило задачу разворачиания мониторинга на всяких мелких удаленных объектах. Но увы, это не возможно. Программа есть только под linux, на windows только агент. Можно без проблем развернуть на любой виртуалке — hyperv, или даже virtualbox.
Я планирую написать подробню статью на основе своего опыта построения распределенного мониторинга в очень разнородной среде. Но пока не сделал это, дам подсказку для тех, кто будет разворачивать много proxy серверов. Сделайте образ виртуальной машины и просто копируйте его на новых объектах. Достаточно будет изменить только сетевые настройки и hostname в конфигурации proxy.


