
# Storage API
Current storage stack on XCP-ng is called . The VHD format is used, which has a maximum file size limitation of 2TiB. This means that when using this format your VM disk can’t be larger than 2TiB.
Why use VHD format?
Mostly for historical reasons. When standardization on VHD(opens new window) was decided, it was the only acceptable format that supported copy on write(opens new window), delta capabilities, and merge possibilities. Thanks to VHD format, you have:
- snapshot support
- delta backup
- fast clone VM
- live storage migration
Using RAW format
Alternatively, you can decide to use a disk without 2TiB limitation, thanks to RAW format. However, the price to pay is to lose all VHD features.
To create a large VDI on a file based SR, it’s trivial, for example:
On a block based storage, it’s a bit more complicated:
- Create a small disk first:
- Extend it with
- Rescan SR
WARNING
You won’t be able to live migrate storage on this disk or snapshot it anymore. Outside of this, it will work very well.
SMAPIv3: the future
is the historical storage interface, and now a big spaghetti monster. That’s why Citrix decided to create a new one, called : it’s far more flexible, and also support (partially) the format. This format has the same concepts as VHD, but without its limitations.
Also, the storage API is far more agnostic and the code is better. So what’s the catch? Problem is there’s no Open Source implementation of , also the current API state isn’t really complete (doesn’t support a lot of features). However, XCP-ng team is working on it too, because it’s clearly the future!
# Advanced Xen
NUMA affinity
On multi-socket and MCM systems, the NUMA affinity may benefit memory-bound applications by restricting a VM to a specific NUMA node. That way, memory and cache accesses are kept local.
The Xen scheduler implements two types of affinity: and . By default, it uses , a best effort algorithm which tries to achieve the memory locality. Since there’s no guarantee, if the sysadmin wants to make sure that a VM will only run on a certain node, he needs to configure the hard affinity through the VM attribute.
Taking a 8C/16T dual socket as example, the topology would be:
If we run , it’ll return as the node affinity. This indicates that the VM can run on any available nodes and cores. Now, change the VM affinity to node1 (VM reboot required):
Check the new affinity. It’ll now display instead of , indicating that the VM will only be allowed to run on cores:
In order to reset the config, just remove the attribute (VM reboot required):
Other useful commands for listing the VM core affinity and cores per NUMA node(s):
Other ways control the vCPUs placement, using the CLI:
You can use the domain name or the domain ID you can obtain from the command.
Or using the CPUPool functionality:
WARNING
Be careful, the changes done using only affect vCPU at the moment, the memory of the VM will not be moved between node nor the pinning stay after a reboot. You need to use for it to be taken into account at the VM startup.
You can see the current memory scheme of the VM using the interface with the key. e.g. .
References:
- https://xcp-ng.org/forum/topic/2265/using-numa-split-on-xcp-ng(opens new window)
- https://wiki.xen.org/wiki/Xen_on_NUMA_Machines(opens new window)
- https://wiki.xenproject.org/wiki/Tuning_Xen_for_Performance(opens new window)
# Network
100 Mbit/s or faster NIC. One or more Gb, or 10 Gb NICs is recommended for faster P2V and export/import data transfers and VM live migration.
We recommend that you use multiple NICs for redundancy. The configuration of NICs differs depending on the storage type. For more information, see the vendor documentation.
XCP-ng requires an IPv4 network for management and storage traffic.
TIP
Ensure that the time setting in the BIOS of your server is set to the current time in UTC. In some support cases, serial console access is required for debug purposes. When setting up XCP-ng configuration, we recommend that you configure serial console access. For hosts that do not have physical serial port or where suitable physical infrastructure is not available, investigate whether you can configure an embedded management device. For example, Dell DRAC or HP iLO. For more information about setting up serial console access, see CTX228930 — How to Configure Serial Console Access on XenServer 7.0 and later(opens new window).
# VM load balancing
This feature is available via Xen Orchestra, and its plugin «Load balancer»:

When using a virtualization platform, you have multiple physical hosts, which runs your virtual machines (VMs). Each host has a limited set of resources: CPU, RAM, network bandwidth etc.
TIP
Maybe you already heard about VMWare DRS (Distributed Resource Scheduler): that’s the same principle here, but for XCP-ng.
So the first objective is to adapt your VM placement in live (without service interruption), depending of the load. Let’s take a simple example:
These 2 hosts are running 6 VMs:

Suddenly, one of your VM starts to have a very high CPU load (in yellow): performance of other VMs on this same host could be impacted negatively (in pink):

We are detecting it and now move others VM to the other host, like this:

This way, the impact of your high load usage on one VM doesn’t penalize everyone.
But it’s not the only way to see this: there is multiple possibilities to «optimize» your existing resource usage:
- maybe you want to spread the VM load on the maximum number of server, to get the most of your hardware? (previous example)
- maybe you want to reduce power consumption and migrate your VMs to the minimum number of hosts possible? (and shutdown useless hosts)
- or maybe both, depending of your own schedule?
Those ways can be also called modes: «performance» for 1, «density» for number 2 and «mixed» for the last.
In Xen Orchestra
We started to work on the «performance» mode inside Xen Orchestra. Our first objectives were:
- to provide an easy way to create «plans» to supervise load balancing with simple rules
- to work only on the host CPU usage
- to start a detection every 2 minutes
- to work across various pools
- to be able to exclude hosts
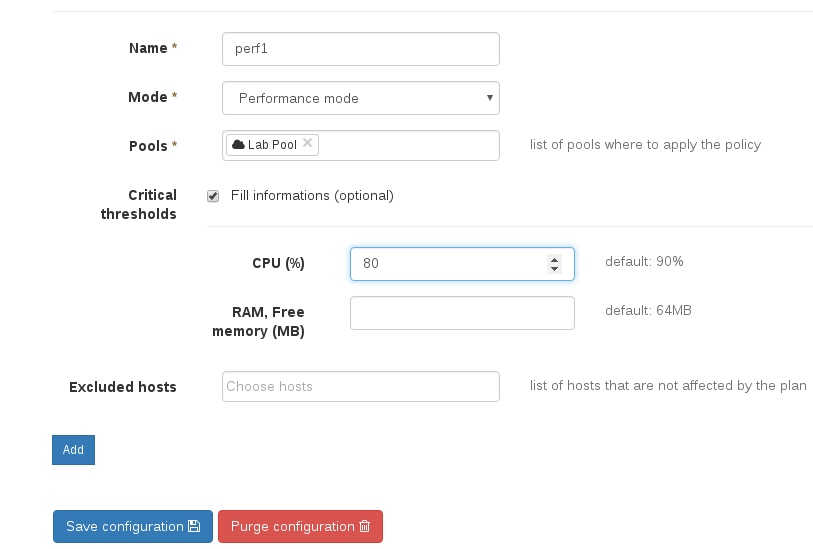
Creating a plan
Creating a plan is the first step. In our example, we want to create a plan called «perf1», using «performance mode», and acting only on one pool, labelled «Lab Pool»:
By default, the CPU threshold is 90%, but it could be set manually (here at 80%):
Let’s play!
Here is the initial situation:
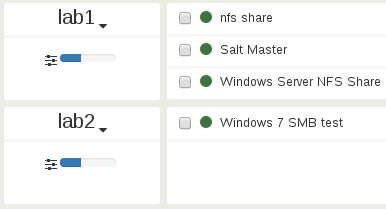
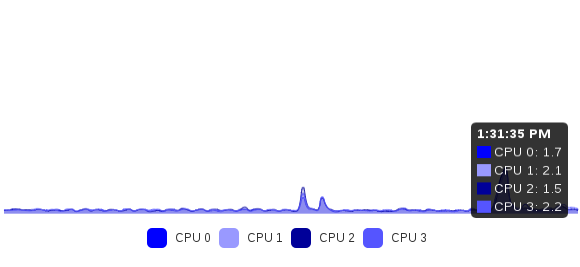
CPU usage on both hosts is very low:
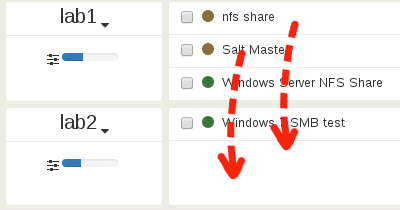
Let’s trigger a very high CPU load on the VM «Windows Server NFS Share» (using Prime95), which is on lab1:
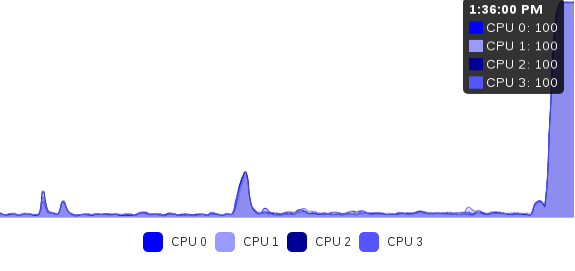
Both «nfs share» and «Salt Master» VMs will suffer this concurrent CPU usage and won’t have enough power to deliver if necessary. And when the average on last 2 minutes hits the threshold (80% here), actions are taken:
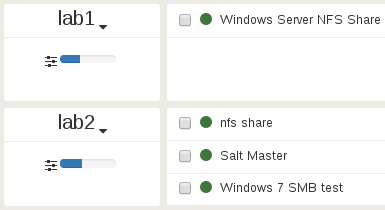
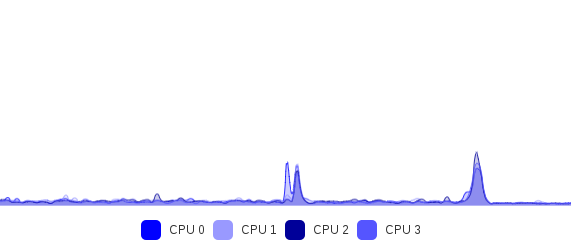
Let’s check the new CPU load on lab2:
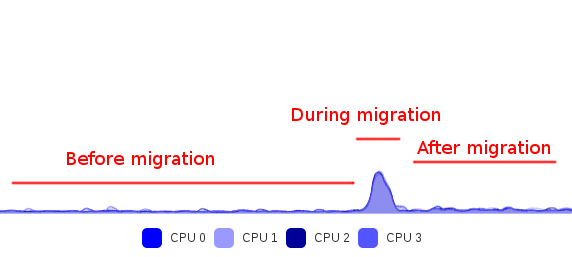
Conclusion
With this simple but first initial algorithm, we managed to mitigate automatically an issue of VM resource usage. Of course, it works also in cases when you have to really spread the load on all your servers (i.e. when the sum of all VM usage is higher than the threshold): that’s the exact same principle.
You have more than 2 hosts? Again, same idea, it will also work.
# Reset root password
Hi, this is a small trick I had to use once (original article)(opens new window)
- Reboot your XenServer into Grub boot menu.
- Use arrows keys to locate an appropriate XenServer boot menu entry and press e key to edit boot options.
- Locate read-only parameter ro and replace it with rw. Furthermore, locate keyword splash and replace it with init=/bin/bash.
- Hit F10 to boot into single-mode
- Once in single-mode use passwd command to reset your XenServer’s root password
- Reboot xenserver by entering the command exec /usr/sbin/init
- If everything went well you should now be able to login with your new XenServer password.
# FreeNAS/TrueNAS
FreeNAS is a locked-down version of FreeBSD, with many packages disabled to ensure a more stable environment for the fileserver. is part of the packages that are not available in FreeNAS. But because it’s based on FreeBSD, the packages from that OS can be installed, at your own risk. This is not a big issue for this particular package, because it’s a leaf in the chain of dependencies — nothing in FreeNAS depends on it.
To install it on versions 11 or higher, until version 12.0-U1 of TrueNAS that includes it as default, follow these steps.
-
Enable the FreeBSD repo first:
If you are using FreeNAS v11.2 or higher, you also have to disable the local package repository to avoid an issue in that particular release and that may affect later versions(opens new window) before running :
-
Create a temporary directory and move into it:
-
Fetch the required packages. A directory All will be created and you will find the packages with their current versions under there:
-
Add the downloaded packages, without their dependencies:
The versions reported here are just the current version and they maybe different in your installation.
-
Revert the repos to their original settings to avoid surprises down the road. The second command should be run just if you disabled the local repo in step 1:
A restart of the VM will perform a reset of these files to their original settings too.
-
Once the package is installed, you need to tell FreeNAS to start the process when starting:
- Go to Tasks -> Init/Shutdown Script
- Create a new task with the following settings:
- Type: Command
- Command:
- When: Pre Init
- Enabled: Checked
-
Reboot. If you do not plan to reboot the VM, you can start the daemon manually running the command . After you’ll see a FreeBSD icon in your VM list on Xen Orchestra, and you can restart/shutdown the VM properly from the Web UI.
More insights and options are available in or this issue(opens new window).
# Upgrade from XenServer
This article describes how to proceed in order to convert your Citrix XenServer infrastructure into a XCP-ng infrastructure.
This is exactly the same thing for any Citrix Hypervisor version.
TIP
Yes you can do that without losing ANY settings (SR, VMs, networks) from your existing Citrix Hypervisor/XenServer infrastructure!
WARNING
- Always upgrade and reboot the pool master FIRST
- DON’T use the in XCP-ng Center. It moves the pool master to another host, which has to be avoided in the upgrading procedure.
- If HA (High Availability) is enabled, disable it before upgrading
- Eject CDs from your VMs before upgrading to avoid issues(opens new window):
- It is very important to make sure clustering is not enabled on your pool. It’s a functionality that relies on proprietary software and that is not available in XCP-ng, and having it enabled before the upgrade will lead to XAPI being unable to start due to unexpected data in the database. If it is enabled or you already upgraded, see .
Before you start
- Please re-read carefully all the previous warnings
- Need a tool to manage your XCP-ng hosts? We strongly suggest that you use Xen Orchestra(opens new window), the web UI for XCP-ng. Alternatively, you can use CLI or XCP-ng Center.
Migration process
XCP-NG installation follows roughly the same workflow as a XenServer installation. Therefore, the migration procedure will be very similar to an upgrade procedure in XenServer.
- Download the XCP-ng ISO
- Follow the to put the ISO into an USB key or a CD
Then boot on the ISO!
Eventually, you will reach a screen offering to upgrade your XenServer 7.X to XCP-ng:
Once the installation process is complete, reboot your host:
Then you’ll boot on XCP-ng, with all your previous settings, VMs, storage and network ready!
Migration from XenServer 6.X
XenServer 7 introduced a new (and better) partition scheme. Therefore, if you want to migrate from a XenServer 6 version you have two possibilities.
- You can keep the old partition model (partitions are too small, it’s NOT recommended!)
- You can «upgrade» it to the new scheme
TIP
As it’s (obviously) a better partition scheme, we strongly recommend you to upgrade to this scheme and not to keep the old one, but it’s your call.
WARNING
Using the new partition scheme will REMOVE the content of your local SR.
Using the new partitions
In order to migrate using the new partition scheme, you need to run this command on your host before launching the migration process.
Then, you can follow the standard migration procedure describe above.
Migrating your XenServer Pool to XCP-ng without downtime
Here is how to proceed in order to migrate without having downtime in your infrastructure:
- Live migrate your VMs from the pool master to other hosts
- Upgrade your pool master
- Live migrate VMs from another host to your pool master
- Upgrade the host
- Repeat until all hosts are migrated
Alternate method: remote upgrade
If you do not have access to your server or remote KVM in order to upgrade using the interactive ISO installer, you can initiate an automatic reboot and upgrade process using the following procedure:
Unpack/extract the XCP-NG ISO to a folder on a webserver. Then get the UUID of your host by running the below command:
Using that host UUID, as well as the URL to the folder hosting the unpacked XCP-NG ISO, run the following command to test access:
The returned output must be true to continue.
Now tell the host to automatically boot to the ISO and upgrade itself on next reboot (using the UUID and URL from before):
The output should also be true. It has created a temporary entry in the grub bootloader which will automatically load the upgrade ISO on the next boot. It then automatically runs the XCP-NG upgrade with no user intervention required. It will also backup your existing XenServer dom0 install to the secondary backup partition, just like the normal upgrade.
To start the process, just tell the host to reboot. It is best to watch the progress by using KVM if it’s available, but if not, it should proceed fine and boot into upgraded XCP-NG in 10 to 20 minutes.
# Installation and upgrade
(Where «upgrade» here designates an upgrade using the installation ISO)
If the installer starts booting up then crashes or hangs
- First of all check the integrity of the ISO image you downloaded, using the provided checksum
- Try the other boot options
- alternate kernel
- safe mode
- Try to boot with the xen parameter.
TIP
How to add or remove boot parameters from command line.
- On UEFI mode, you can edit the grub entries with . Xen parameters are on lines starting with and kernel parameters on lines starting with .
- On BIOS mode, you can enter a menu by typing and then modify the boot entries with the TAB key. Xen parameters are between and the next . Kernel parameters are between and the next .
If any of the above allows to work around your issue, please let us know (github issues(opens new window)). We can’t fix issues we aren’t aware of.
During installation or upgrade
You can reach a shell with ALT+F2 (or ALT+RIGHT) and a logs console with ALT+F3 (or ALT+RIGHT twice).
Full installation log are populated in real time in . They can be read with .
When asking for help about installation errors, providing this file increases your chances of getting precise answers.
The target installation partition is mounted in .
The installer writes in .
The main log file is .
# From Hyper-V
- Remove Hyper-V tools from every VM if installed.
- Install an NFS Server somewhere. (You can also use Win-scp directly from Hyper-V and copy «$uuidger -r».vhd directly to storage and rescan after that)
- Create an NFS share on that server.
- Mount the NFS share as a Storage Repository in XenCenter or XOA.
- Make sure the hyper-v virtual disk is not fixed type, use hyper-v mgmt to convert to dynamic vhd if needed.
- Copy the VHD file you want to import to the NFS share.
-use uuidgen -r to generate uuid and use it to rename vhd file. - Create a new VM in xcp-ng with no disks.
- Attach the VHD from the NFS share to your new VM.
- Install Xenserver Tools.
- If everything work well move virtual disk using XCP-ng center from temporary storage to dedicated storage on the fly, VM can be turned on and disk can be online.
TIP
If You lost ability to extend migrated volume (opening journal failed: -2) You need to move disk to another storage, VM should be ON during moving process. This issue can occur when vhd files was directly copied to storage folder.
# Handling alternate drivers or kernel
If — before the upgrade — your host depends on or on the to function, then it is possible that the upgraded system doesn’t need such alternatives anymore. It is also possible that it still needs them.
When upgrading using the upgrade ISO:
- Alternate drivers will not be installed automatically: install them from the repositories after the first reboot.
- The alternate kernel will not be installed automatically, unless you tell the installer to do so (see ).
When upgrading using :
- Alternate drivers will usually be kept and upgraded if a newer version is provided, but that is not a general rule: we handle it on a case by case basis. Sometimes a newer «default» driver will obsolete an older alternate driver.
- The alternate kernel will be retained and upgraded to the latest version available in the new release. If the alternate kernel was your default boot option, it will remain such.
# VLANs
VLANs, as defined by the IEEE 802.1Q standard, allow a single physical network to support multiple logical networks. XCP-ng hosts support VLANs in multiple ways.
VLANs for VMs
Switch ports configured as 802.1Q VLAN trunk ports can be used with XCP-ng VLAN features to connect guest virtual network interfaces (VIFs) to specific VLANs. In this case, XCP-ng server performs the VLAN tagging/untagging functions for the guest, which is unaware of any VLAN configuration.
XCP-ng VLANs are represented by additional PIF objects representing VLAN interfaces corresponding to a specified VLAN tag. You can connect XCP-ng networks to the PIF representing the physical NIC to see all traffic on the NIC. Alternatively, connect networks to a PIF representing a VLAN to see only the traffic with the specified VLAN tag. You can also connect a network such that it only sees the native VLAN traffic, by attaching it to VLAN 0.
To use VLANs for your network logical isolation, it’s really easy. You’ll create a new network with a VLAN ID, and all virtual interfaces created on this network will transparently have traffic tagged in this VLAN. No need to configure anything inside your VM.
First step, go in Xen Orchestra menu, «New» then «Network»:
Then, select a pool where you want to create this network, and fill what’s required, like physical interface selection, name and description and also VLAN number:
Finally, click on «Create network»:
That’s it!
Major changes since the RC
Alternative Kernel
As we previously announced, XCP-ng 8.0 comes with an updated Kernel (4.19) and a new version of CentOS (7.5).
In addition to this updated Xen Kernel, we introduced an alternative kernel () with more recent updates embedded. This alternative kernel is known to have solved some hardware compatibility issues already.
In the future, we are also planning to include an experimental kernel in order to create a greater bond between the latest innovations in Xen and their integration in XCP-ng.
Security update
In relation to the MDS security breach, two security updates have been applied in XCP-ng 8.0 (as well as XCP-ng 7.6):
- A kernel security update has been applied
- A microcode update for the SandyBridge CPU family
# Prerequisites
Access to the repository
Your dom0 system must either have access to the internet, or to a local mirror. In the second case, make sure to update the values in to make them point at the local mirror, and keep the mirror regularly synced.
Be cautious with third party repositories and packages
If you have enabled third party repositories (CentOS, EPEL…) in the past, make sure to disable them before updating. Otherwise, core packages from your dom0 system can be overwritten with versions of packages that have not been tested in the context of XCP-ng, or lack specific patches.
Set in the relevant files in . Warning: when added manually, the EPEL repository is automatically enabled. Make sure to disable it right away and then use this syntax to install packages from it: .
In any case, installing extra packages from outside the XCP-ng repositories can lead to various issues, including update or system upgrade problems, so make sure to:
- install only packages that are known not to have any adverse effect on XCP-ng (when in doubt, ask on the forum(opens new window));
- check the dependencies pulled by such packages: they must not overwrite existing packages in XCP-ng;
- know that you are doing it at your own risk and be prepared to fix any issues that would arise, especially unforeseen upgrade issues (we can’t test upgrade scenarios where unknown packages are installed on the system).
More at Additional packages.
# Migrate VMs from older XenServer/XCP-ng
Live migration
Live migration should work from any older XenServer/XCP-ng toward the latest release. However, there are some cases where it doesn’t. For example, XenServer (and XCP-ng) 7.6 has a regression that makes live migration with storage motion crash guests that are based on the «Other installation media» template when the source host has a version lower than 7.6 (reported here to Citrix(opens new window)). But this bug has been fixed in latest XCP-ng 7.6 updates.
Alternative VM migration solutions
- clone/copy your VM before trying to live migrate. In case it fails, you won’t have any surprises
- offline migration is the safest if you can afford VM downtime
- a hybrid solution is to use Xen Orchestra continuous replication to avoid downtime
- restore Xen Orchestra backup on latest XCP-ng version will also work
Introduction
ZFS is not easy to run on XCP-ng/XenServer. Why’s that? Because it doesn’t support the flag. And the XCP-ng/XenServer storage stack relies on it quite a bit. Basically, ZFS is not compatible.
Unless you do some modification in the storage code, by allowing optional bypass for a specific storage repository. This way, all your current storage won’t have a behavior change but only ZFS. That’s why the change is safe and was even merged in the mainline of XenServer! However, we don’t know when this change will be integrated into an officiel Citrix XenServer release, and it’s very likely Citrix won’t support it. But XCP-ng does!
# Introduction
Implementing VM High availability (HA) is a real challenge: first because you need to reliably detect when a server has really failed to avoid unpredictable behavior. But that’s not the only one.
If you lose the network link but not the shared storage, how to ensure you will not write simultaneously on the storage and thus corrupt all your data?
We’ll see how to protect your precious VM in multiple cases, and we’ll illustrate that with real examples.
WARNING
Even if you can have HA with only 2 hosts, it’s strongly recommended to do it with at least 3 hosts, for obvious split-brains issues you might encounter.
WARNING
HA requires far more maintenance and will create some traps if you are not aware. In short, it comes at a cost. Before using it, please carefully think about it: do you REALLY need it? We saw people having less uptime because of HA than without. Because you must understand what you are doing every time you are rebooting or updating a host.
# iPXE over HTTP install
This guide is for UEFI boot, using iPXE over an HTTP server to serve files needed for installation.
Requirements
To get XCP-ng installed from iPXE over HTTP, you need:
- An HTTP server to host XCP-ng installation files
- A iPXE compatible network card and iPXE firmware on your host
- In your HTTP root directory copy the contents of the net install ISO.
The top-level should look like this:
- Boot the target machine.
- Press Ctrl-B to catch the iPXE menu. Use the chainload command to load grub.
TIP
Sometimes grub takes a very long time to load after displaying «Welcome to Grub». This can be fixed by compiling a new version of Grub with .
- Once the grub prompt loads, set the root to http and load the config file.
- Select the «install» menu entry.
- Wait for grub to load the necessary binaries. This may take a minute. If you look at your http server log you should see something like:
- Continue with installation as normal.
Benchmarks
Before doing ZFS benchmarks, we’ll run a baseline with the current hardware. First, we’ll use a basic 1TiB 7200rpm drive as an SR LVM backend. Everything will run on the same hardware, a small Dell T30 with an Intel Xeon processor E3-1225 v5 and 32GiB of RAM.
For the sake of simplicity (to be understood by everyone, even non-Linux experts), we’ll use Crystal Diskmark on Windows 2012 R2 64bits, with all updates installed. We use a 4GiB dataset.
More benchmarks on Linux with FIO will probably come later.
Also, please note this is a very simple example with a single drive, you can obviously do a LOT more with powerful RAID modes (RAID-Z, striped or mirror mode, RAID10-like etc.). You can learn more here: http://www.zfsbuild.com/2010/05/26/zfs-raid-levels/
Local LVM HDD
As you can see and as expected, we are hitting HDD limits easily:
First line is sequential read and write speed. Thanks to read ahead, performance is good for an HDD. But as soon as you start to do random reads and writes with small blocks, a physical spinning disk will always have troubles.
Default settings
Let’s create the ZFS volume on partition:
Now, let’s create the XCP-ng SR (Storage Repository):
We disable sync because of a suspicion of cache poisoning with . This is something we are still investigating, and blktap issues are probably still impacting write speed even without sync. It’s likely that’ s not really «async» because we observed same speed in «sync» with the same hardware on a full non-virtualized host. See the conclusion for more details.
So let’s redo our tests this time:
That’s interesting: we got a better sequential read speed, but a worse write speed. ZFS seems constrained by the very low amount of RAM available.
In random read/write scenario, there is no miracle when you don’t have enough cache available, this is roughly the same speed as the physical device, a bit better but nothing huge.
LZ4 compression
Okay, let’s wipe this test VDI, enable compression and try the same tests again. Just doing will activate it. All new disks created after this command is ran will be compressed (not the previous one).
Why there is no change? Because the dataset here can’t be efficiently compressed, it’s fully random.
Indeed, we can see that the compress ratio is only 1.01x in ZFS, which means nothing.
Let’s switch to a non-randomized content and let’s redo the test:
Okay, that’s almost a caricature and not a realistic load, but as you can see, if you have compressible data, LZ4 compression will help you a LOT, for a very small CPU usage.
L2ARC SSD
«L2ARC» means «Level 2 ARC» (Level 1 is… RAM). So it’s a read cache, filling with a mix of the most recently read data, along with the most oftenly read data. Since we have a small SSD inside the machine, we’ll use it. It’s a Samsung EVO 850, not a big beast. In our system, it’s visible as :
That’s it! Is there any impact? As planned, read speed if far better, especially in random read, because the SSD provides a cache:
Note: that would be better with a real load, with some VMs reading the same blocks often, more data would have been promoted into the SSD, enhancing the read speed further.
Also, an L2ARC cache on a very limited amount of RAM won’t help you a lot. It could even be counterproductive (ZFS needs to store an index of cached data in RAM, so the larger your L2ARC disk, the more RAM space is used for these L2ARC headers). So it means less RAM for first level cache.
Linux benchmarks with FIO will give us the opportunity to warm up the cache, and see the result in better conditions.
More RAM in Dom0
Okay, let’s make one final change. ZFS is meant to run with a lot of RAM. I mean, a lot. 16GiB is the first decent minimum for very good performance. And at the very least to operate correctly — 2GiB, which wasn’t the case in our first bench. Because I have a 32GiB RAM host, I’ll extend the dom0 to 8GiB or RAM, and see if it’s better.
To do so:
Then reboot the host. And let’s do another benchmark:
The bottleneck in terms of sequential read speed is… the process (CPU bound), the component linking the VHD file to the VM. Obviously, this is something we could improve in the future of XCP-ng.
As you can see, we are almost beating the HDD sequential read while doing random read, which is very good.
In short, if your dataset can be cached in RAM, you’ll have RAM speed for your VMs read requests. Which can be very interesting for read intensive operations.
Regarding write speed, we can probably do better. I suspect a bottlneck in the / process with cache poisoning, which impacts how fast a write can be done inside ZFS.
# Linux
Xen guest drivers have been built-in in the Linux kernel for many years. All currently supported Linux distributions include them.
So all we need is to install the management agent, which comes either as a systemd or as a sysvinit service, depending on the Linux distribution. The service is usually named .
Those guest tools can be installed:
- from the target distribution’s online repositories if available
- from the Guest Tools ISO image that can be attached to any VM in XCP-ng
Install from the distro’s online repositories
Distros often have policies that forbid enabling new services by default, so most of the time the steps are:
- enable the appropriate repository
- install the package from it
- enable the service
Enable the EPEL repository in the VM, then:
The service is not enabled by default, so enable it and start it:
Enable the repository in , then:
The service is not enabled by default, so enable it and start it:
Ubuntu
Feel free to add other distros to the above list if they provide the tools in their repositories.
Install from the guest tools ISO
«Supported» Linux distributions
For distros that are supported by the script (Debian, CentOS, RHEL, SLES, Ubuntu…), the process is:
- Attach the guest tools ISO to the guest from Xen Orchestra or using .
- Then inside the VM, as root:
- No need to reboot the VM even if the script asks to. That’s an old message from back when it was needed to install a kernel module in addition to the management agent. We’ll get rid of it at some point.
- Eject the guest tools ISO
Derived Linux distributions
If your Linux distribution is not recognized by the installation script but derives from one that is supported by the script, you can override the detection and force the tools to install by using:
Examples:
The likeliness for the installation to work correctly will depend on how much those distros differ from their «parent».
Other Linux distributions
For the remaining Linux distributions, mount the guest tools ISO as described above, then look for the archive. Copy its contents on the system in and . It contains a System V init script by default but there’s also a systemd unit file available on the ISO ().
See also below.
openSUSE Leap 15.2 with transactional-updates
For the xe-daemon to start it is necessary that insserv is installed on the system. To make sure that is the case run
and as good measure reboot if they weren’t already installed.
To install the guest tools open up the chroot environment with
and mount the ISO like with every other derived distro
To exit the chroot cleanly you have to kill the process that may have been automatically started. Otherwise you end up with a corrupted snapshot and transactional-updates will fail.
And again reboot the system to go to your newest snapshot.
After the reboot enable the service and start it with
Update the guest tools
It’s a good habit, and may be even required in some cases (that would then be described in the , to update the guest tools to their latest version when your XCP-ng hosts are updated.
Depending on the situation, just update from your distribution’s online repositories, or follow the above installation process again.


