
Read-only domain controllers (RODCs)
In Windows Server 2008 and Windows Server 2008 R2, DNS servers running on read-only domain controllers (RODCs) host Active Directory-integrated copies of all zones. However, because the zone is read-only, the DNS server cannot make any updates to the zones that it hosts. Instead, updates occur on other DNS servers and are transferred to the RODC through Active Directory replication.
When an Active Directory-integrated zone is signed with DNSSEC, private keys are also replicated to all DNS servers running on domain controllers, with an exception: Private keys are not replicated to an RODC because RODCs are intended to operate in insecure environments.
In Windows Server 2012 and Windows Server 2012 R2, an RODC loads unsigned zones from Active Directory with no change in functionality from Windows Server 2008 R2. However, if the RODC finds a DNSSEC-signed zone in Active Directory, it does not load the zone as Active Directory-integrated. Instead, it creates a secondary copy of the zone, and then configures the closest writeable domain controller for the domain as the primary server. The RODC then attempts to perform a zone transfer. Zone transfers must be enabled on the primary DNS server for this transfer to succeed. If zone transfers are not enabled, the RODC logs an error event and takes no further action. In this scenario, you must manually enable zone transfers on the primary server that is selected by the RODC. Alternately, you can choose to reconfigure the RODC to point to a different primary DNS server that has zone transfers enabled.
Home DNS
I can’t be bothered maintaining hosts files on multiple devices, but I really do like to have name resolution working, and given that I currently have around 50 devices on my home network this is perhaps less of stupid idea than it sounds. I also run IPv6, and the one thing I maintain about IPv6 is that you had better have good DNS, because you’ll never want to type an IPv6 address out even if you can remember it.
To that end, I currently have three DNS servers active, all running Ubuntu server. They are configured like this:
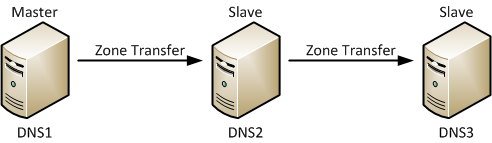
DNS1 is the zone master. DNS2 is set up as a secondary, slaved to DNS1. DNS3 is another secondary, but for fun, rather than getting zone transfers from DNS1, it instead gets a transfer from DNS2. There’s no particular reason for that in my environment other than that I wanted to configure it that way.
Step 4: Change the name servers at your domain’s current DNS hosting provider
Complete the following steps to transfer management of your domain’s DNS records to
Lightsail. To do this, you sign in to the website of your domain’s current DNS hosting
provider, and change your domain’s name servers to the Lightsail name servers.
For detailed steps to complete this process, see the documentation from your domain’s
current DNS hosting provider. The following steps are provided only for general guidance. If
your domain was registered using Amazon Route 53, see in the Route 53 Developer
Guide for detailed steps to change the name servers for your domain.
-
Write down the Lightsail name servers that are listed in on your domain’s DNS zone
management page. -
Sign in to your domain’s current DNS hosting provider’s website.
-
Find the page where you can edit your domain’s name servers.
For more information about locating this page, see the documentation from your
domain’s current DNS hosting provider. -
Enter the Lightsail name servers, and remove other name servers listed.
-
Save your changes.
Allow time for the name server change to propagate through the internet’s DNS, which
might take several hours. After that is completed, internet traffic for your domain should
begin routing through the Lightsail DNS zone.
Conclusion
DNS enumeration can be easily performed with terminal-based commands or web-based interfaces.
From an attacker’s point of view, finding DNS records is a critical part of the intel-reconnaissance process. It’s found in all penetration testing activities.
And from a blue team perspective, knowing what’s behind your DNS servers is a valuable piece of information for reducing your attack surface area before the bad guys start chasing you.
Get access to the ultimate enterprise-grade DNS reconnaissance tool and explore the #1 cyber security OSINT toolkit: SurfaceBrowser. Book a demo with our sales team today!
Sign up for our newsletter today!
Overview
This feature allows you to edit the records in a domain’s DNS (Domain Name System) zone file. DNS converts human-readable domain names (for example, ) to computer-readable IP addresses (for example, ). To perform this function, DNS relies on zone records that exist on your server to map domain names to IP addresses.
Important:
-
We deprecated the MyDNS and NSD nameserver software in cPanel & WHM version 78 and plan to remove them in a future release. If you use either of these nameservers, we strongly recommend that you migrate to either the PowerDNS or BIND namesevers. For more information, read our cPanel Deprecation Plan documentation.
-
DNS zones that reside on other Write-only DNS servers in a DNS cluster do not appear in this interface.
Before you begin
The Cloud DNS API requires that you create a Cloud DNS project and
enable the Cloud DNS API.
If you are creating an application that uses the REST API, you must also
create an OAuth 2.0 client ID.
- If you don’t already have one, sign up for a Google Account.
-
Enable the Cloud DNS API in the Cloud Console. You can
choose an existing Compute Engine or App Engine project, or you can
create a new project. - If you need to make requests to the REST API, you need to create an
OAuth 2.0 ID:
Setting up OAuth 2.0. - In the project, note the following information that you will need to input in
later steps:-
The client ID ().
-
The project ID that you want to use. You can find the ID at the
top of the Overview page in the
Cloud Console. You could also ask your user to provide the
project name that they want to use in your app.
-
If you have not run the command-line tool previously, you must
run the following command to specify the project name and authenticate with
the Cloud Console:
gcloud auth login
If you want to run a command on Google Cloud resources
in another project, specify the option for this command and for the
other commands throughout this page.
Modifying Zone Records
Each time you edit the zone by adding or removing records, it has to be signed to make it work. So we will create a script for this so that we don’t have to type long commands every time.
Save the file and make it executable.
Whenever you want to add or remove records, edit the and NOT the file. This file also takes care of incrementing the serial value, so you needn’t do it each time you edit the file. After editing it run the script by passing the domain name and zone filename as parameters.
You do not have to do anything on the slave nameserver as the incremented serial will ensure the zone if transferred and updated.
Slave of a Slave
It’s a bit meta, but in my case dns3 is a slave to dns2 (which is a slave to dns1). From dns3’s perspective, dns2 is its master. To that end, dns2 needs to be configured a little bit like a master too.
On DNS3, we follow the same steps we followed for DNS2 above.
Then on the DNS2 slave, we configure each secured zone in named.conf.local with the allow-transfer element:
allow-transfer {
 key "my-tsig";
};
…just like we did on the master (DNS1). DNS3’s configuration tells it that DNS2 is the master, so it will be looking in the right place for updates. Restart BIND on DNS2 and DNS3 so that the changes take effect, and we can now repeat the TSIG testing above, this time issuing the dig commands on DNS3, and using DNS2’s IP address as the target.
Автоматическое подписывание зоны
Каждый раз после редактирования зоны не очень удобно ее переподписывать командой dnssec-signzone.
Для автоматизации процесса в конфигурационном файле bind редактируем:
options {
…
key-directory «/var/named/keys»;
sig-validity-interval 20 10;
};
* где key-directory — каталог для хранения сгенерированных ключей, необходимо прописать тот, в котором мы формировали последние командой dnssec-keygen; sig-validity-interval — период действия ключей: дней / период обновления.
Для зоны редактируем:
zone «dmosk.ru» {
…
file «master/dmosk.ru»;
inline-signing yes;
auto-dnssec maintain;
};
* где inline-signing — включение или отключение прозрачного формирования подписей (без необходимости менять файл зоны); auto-dnssec — уровень автоматической настройки DNSSEC для зоны
Также обращаем внимание, что мы убрали в пути .signed
Проверяем, что у пользователя named/bind есть права на запись в каталог хранения зоны. При необходимости, меняем владельца, например:
chown -R named:named /var/named/master
Удаляем старый файл подписанной зоны:
rm -f /var/named/master/dmosk.ru.signed
Открываем на редактирование файл зоны и меняем серийный номер.
Перезапускаем bind.
На CentOS / Red Hat:
systemctl restart named
На Ubuntu / Debian:
systemctl restart bind
В каталоге зоны должны появиться дополнительные 3 файла: dmosk.ru.jbk, dmosk.ru.signed, dmosk.ru.signed.jnl
Готово. Проверяем настройку командой dig.
Introduction
A DNS zone is used to host the DNS records for a particular domain. To start hosting your domain in Azure DNS, you need to create a DNS zone for that domain name. Each DNS record for your domain is then created inside this DNS zone.
For example, the domain ‘contoso.com’ may contain several DNS records, such as ‘mail.contoso.com’ (for a mail server) and ‘www.contoso.com’ (for a web site).
When creating a DNS zone in Azure DNS:
- The name of the zone must be unique within the resource group, and the zone must not exist already. Otherwise, the operation fails.
- The same zone name can be reused in a different resource group or a different Azure subscription.
- Where multiple zones share the same name, each instance is assigned different name server addresses. Only one set of addresses can be configured with the domain name registrar.
Note
You do not have to own a domain name to create a DNS zone with that domain name in Azure DNS. However, you do need to own the domain to configure the Azure DNS name servers as the correct name servers for the domain name with the domain name registrar.
For more information, see Delegate a domain to Azure DNS.
DNSSEC support in Windows Server
DNSSEC support in Windows Server is greatly improved in Windows Server 2012 and Windows Server 2012 R2.
The following table provides a summary of DNSSEC support in Windows Server operating systems.
|
Operating system version |
DNSSEC support |
|---|---|
|
Windows Server 2003 and Windows Server 2008 |
DNSSEC is implemented on secondary zones as described in RFC 2535. RFC 2535 has been made obsolete by RFCs 4033, 4034, and 4035; therefore, this DNSSEC implementation is not interoperable with Windows Server 2008 R2 or any later operating systems. |
|
Windows Server 2008 R2 |
Limited DNSSEC support was added in Windows Server 2008 R2 to enable offline signing for static zones. DNSSEC in Windows Server 2008 R2 is not intended to be used with dynamic, Active Directory-integrated DNS zones. If a zone is DNSSEC-signed on a DNS server running Windows Server 2008 R2, all types of dynamic updates, secure and non-secure, are disabled on that zone. To support staged migration, you can deploy DNSSEC in a mixed environment with Windows Server 2008 R2 and Windows Server 2012 DNS servers. For more information, see the DNSSEC mixed-mode deployment topic in this section. |
|
Windows Server 2012 and Windows Server 2012 R2 |
DNSSEC support is significantly enhanced in Windows Server 2012 and Windows Server 2012 R2. Enhancements include online signing, DNS dynamic update support for signed zones, Windows PowerShell support, automated trust anchor distribution and rollover, support for NSEC3 and RSA/SHA-2 standards, and updated user interface deployment and management wizards. |
Note: The DNS client in Windows 7, Windows Server 2008 R2 and later versions of Windows is a non-validating DNSSEC-aware stub resolver. Earlier versions of the Windows DNS Client were not DNSSEC-aware. For more information about DNSSEC and DNS clients, see the DNS Clients topic in this guide.
For detailed information about DNSSEC in Windows Server 2008 R2, see Deploying DNS Security Extensions (DNSSEC) in the Secure DNS Deployment Guide for Windows Server 2008 R2.
Назначение зоны _msdcs.ForestName
Главным образом эта зона предназначена для определения расположения ключевых сервисов AD DS, таких как Глобальный каталог (см. Global catalog — Глобальный каталог), PDC (см. PDC emulator — Эмулятор первичного контроллера домена), Kerberos, LDAP, а также для определения GUID контроллеров домена AD (по записи GUID клиенты найдут контроллеры домена в случае переименования домена). В этой области каждый контроллер домена регистрирует SRV-записи собственных служб и отвечает за этот процесс служба Netlogon. Сама область является частью компонента Domain controller locator (Locator) , внедренного в Windows Server 2003:
Дело в том, что в норме для версий Windows Server 2003 и старше эта зона должна располагаться на том же уровне, что и зона корневого домена. Выглядит это примерно так (пример с моей тестовой инфраструктуры):
Но на серверах DNS в продакшене она являлась поддоменом корневого домена и отсутствовала на уровне раздела леса:
На самом деле в этом нет ничего плохого, поскольку во всем лесу у меня существует лишь один домен, но если доменов будет больше, это может вызвать проблемы. В BPA (Best Practices Analyzer) при этом вылезали ошибки отсутствия зоны (скриншоты для Windows Server 2012 R2 и 2008 R2 соответственно):
Почему так произошло? Дело в том, что в версиях Windows Server старше 2003 все устроено несколько иным образом и зона _msdcs действительно должна находиться на уровне поддомена корневого домена AD и при миграции с 2000 на 2003 должна быть перенастроена. По крайней мере это единственная известная мне причина .
Пришло время все привести к тому виду, в котором оно и должно быть.
Other considerations
Azure DNS has the following limitations:
- A specific virtual network can be linked to only one private zone if automatic registration of VM DNS records is enabled. You can however link multiple virtual networks to a single DNS zone.
- Reverse DNS works only for private IP space in the linked virtual network
- Reverse DNS for a private IP address in linked virtual network will return as the default suffix for the virtual machine. For virtual networks that are linked to a private zone with autoregistration enabled, reverse DNS for a private IP address returns two FQDNs: one with default the suffix and another with the private zone suffix.
- Conditional forwarding isn’t currently natively supported. To enable resolution between Azure and on-premises networks, see Name resolution for VMs and role instances.
Configuring The Secondary Server
On the secondary server, create the same keyfile you created on the master:
sudo vi /etc/bind/named.conf.tsigkeys
…and copy in the same content,
key "my-tsig" {
 algorithm HMAC-SHA512;
 secret "Ok1qR5IW1ajVka5cHPEJQIXfLyx5V3PSkFBROAzOn21JumDq6nIpoj6H8rfj5Uo+Ok55ZWQ0Wgrf302fDscHLw==";
};

server 192.168.2.254 {
 keys { my-tsig; };
};
Then go hook it into BIND in the same way as on the master, by editing named.conf:
sudo vi /etc/bind/named.conf
and adding this line:
include "/etc/bind/named.conf.tsigkeys";
Then restart BIND:
sudo /etc/init.d/bind9 restart
In theory, you’re now ready to roll.
DNSSEC in Windows Server 2012
Windows Server 2012 and Windows Server 2012 R2 provide many enhancements over Windows Server 2008 R2 that simplify DNSSEC deployment and administration, including online signing of dynamic, Active Directory-integrated DNS zones, Windows PowerShell support, and wizards that are integrated into the DNS Manager console. These key DNSSEC-related features are described in this topic and summarized in the table below.
The following table provides a summary of new DNSSEC features in Windows Server 2012.
|
Feature |
Description |
More information |
|---|---|---|
|
Dynamic online signing |
Online signing of dynamic, Active Directory-integrated zones is supported. |
|
|
DNSSEC and read-only domain controllers (RODCs) |
RODCs load signed zones as file-backed secondary zones. |
|
|
DNSSEC deployment wizards |
Zone signing and unsigning is greatly simplified. |
|
|
DNSSEC administration |
The Key Master is a DNS server that generates and manages signing keys for a zone. DNSSEC key management is greatly enhanced with automatic key rollover and trust anchor distribution. |
|
|
Standards |
Updated standards like NSEC3 and RSA/SHA-2 are supported. |
|
|
Windows PowerShell support |
Windows PowerShell has parity with dnscmd for management of DNSSEC-signed zones. |
Уведомления
Функция: problems
Результат: список элементов
Уведомления
Уровень доступа: reseller user
id — Id
dateinit — Дата появления
owner — Пользователь
type — Тип
problem_id — Идентификатор
description — Описание
properties — Свойства
dateautosolve — Последняя попытка
autosolvecount — Попытки
sameproblemcount — Количество
period — Период (мин.)
Настройки модуля уведомлений
Функция: problems.settings
Уровень доступа: reseller user
Данная функция одновременно используется для просмотра параметров объекта, изменения объекта и создания нового объекта.
Просмотр параметров объекта:
- Параметры:
- Результат: список параметров объекта
Создание объекта:
- Параметры:
- sok — значение параметра должно быть не пустым, обычно «ok».
- дополнительные параметры запроса …
- Результат: успешное выполнение операции или сообщение об ошибке
Изменение объекта
- Параметры:
- sok — значение параметра должно быть не пустым, обычно «ok».
- elid — уникальный идентификатор (элемент id из функции problems)
- дополнительные параметры запроса …
- Результат: успешное выполнение операции или сообщение об ошибке
Список параметров объекта или дополнительных параметров запроса (см.выше):
keep_old — Хранить старые уведомления (дней). Информация об уведомлениях, которые не повторялись в течение заданного промежутка времени, будет автоматически удаляться. По умолчанию, через 30 дней
keep_solved — Хранить решенные проблемы (дней). Информация о проблемах, которые были решены заданное количество дней назад, будет автоматически удаляться. По умолчанию, через неделю
show_userproblems — . (Необязательный параметр. Чтобы включить данную опцию используйте значение «on».) Если опция включена, в общем списке будут отображаться проблемы пользователей. По умолчанию отключено
smtpserver — SMTP-сервер. SMTP-сервер для отправки уведомлений
smtpport — Порт SMTP-сервера. Порт SMTP-сервера для отправки уведомлений
plang — Язык описания уведомлений. Язык, на котором будет генерироваться текст описания уведомления
Произвести попытку решения проблемы
Функция: problems.solve
Произвести попытку решения проблемы
Уровень доступа: reseller user
Параметры:
elid — один или несколько уникальных идентификаторов объекта, разделенных запятой и следующим за ней пробелом «, «. Уникальный идентификатор — это элемент id из функции problems.
Результат: успешное выполнение операции или сообщение об ошибке
Параметры уведомления
Функция: problems.edit
Уровень доступа: reseller user
Данная функция одновременно используется для просмотра параметров объекта, изменения объекта и создания нового объекта.
Просмотр параметров объекта:
- Параметры:
- Результат: список параметров объекта
Создание объекта:
- Параметры:
- sok — значение параметра должно быть не пустым, обычно «ok».
- дополнительные параметры запроса …
- Результат: успешное выполнение операции или сообщение об ошибке
Изменение объекта
- Параметры:
- sok — значение параметра должно быть не пустым, обычно «ok».
- elid — уникальный идентификатор (элемент id из функции problems)
- дополнительные параметры запроса …
- Результат: успешное выполнение операции или сообщение об ошибке
Список параметров объекта или дополнительных параметров запроса (см.выше):
id — Id. Идентификатор уведомления
type — Тип уведомления. Тип уведомления
date_init — Дата появления. Дата последнего появления уведомления в системе
description_local — Описание. Текстовое описание уведомления
level — Уровень. Уровень уведомления. Может принимать значения: сообщение, предупреждение, ошибка, критическая проблема
autosolve — . (Необязательный параметр. Чтобы включить данную опцию используйте значение «on».) Если данное поле отмечено, будут производиться попытки решения проблемы с заданной периодичностью
autosolve_period — Период (мин.). Период в минутах, через который будут осуществляться попытки решения проблемы
solvenow — . (Необязательный параметр. Чтобы включить данную опцию используйте значение «on».) Если поле активно, то при нажатии на кнопку «ОК» будет произведена попытка решения
params — Дополнительная информация. Дополнительная информация о проблеме
Удалить уведомление
Функция: problems.delete
Удалить уведомление
Уровень доступа: reseller user
Параметры:
elid — один или несколько уникальных идентификаторов объекта, разделенных запятой и следующим за ней пробелом «, «. Уникальный идентификатор — это элемент id из функции problems.
Результат: успешное выполнение операции или сообщение об ошибке
Наименование
Функция: problems.log
Результат: список элементов
Лог появления
Уровень доступа: reseller user
date — Дата появления
owner — Пользователь
duration — Продолжительность
Step 3: Add records to the DNS zone
Complete the following steps to add records to your domain’s DNS zone. DNS records specify
how internet traffic is routed for the domain. For example, you could route traffic for the
apex of your domain, such as , to one instance, and route traffic for
a subdomain, such as , to a different instance.
-
On the DNS zone management page, choose Add record.
Your DNS zones are listed in the Networking tab of the Lightsail console.
-
Choose one of the following record types:
-
When you’re done adding the record, choose the Save icon to save
your changes.The record is added to the DNS zone. Repeat the above steps to add multiple records to
your domain’s DNS zone.
Step 2: Create a DNS zone in the Lightsail console
Complete the following steps to create a DNS zone in Lightsail. When you create a DNS
zone, you must specify the domain name that the DNS zone will apply to.
-
Sign in to the Lightsail console.
-
Choose the Networking tab, and then choose Create DNS
zone. -
Enter your registered domain name, such as , into the text
box.It isn’t necessary to include when entering your domain name. You can
add the using an address (A) record as part of the section later in this guide. -
Choose one of the following options to add tags to your DNS zone:
-
Add key-only tags or Edit key-only tags
(if tags have already been added). Enter your new tag into the tag key text box, and
press Enter. Choose Save when you’re done
entering your tags to add them, or choose Cancel to not add
them. -
Create a key-value tag, then enter a key into the
Key text box, and a value into the Value
text box. Choose Save when you’re done entering your tags, or
choose Cancel to not add them.Key-value tags can only be added one at a time before saving. To add more than one
key-value tag, repeat the previous steps.
-
-
Choose Create DNS zone.
You are redirected to the DNS zone management page, where you can add DNS records or
delete the DNS zone. Note the Lightsail name servers that are listed on this page; you
need these later in this guide.
Настройка динамического обновления зоны на DNS-сервере Bind
Настройка будет производиться на сервере CentOS7. В качестве DNS-севрера используется Bind-9.9.4, а в качестве DHCP-сервера будем использовать isc-dhcp
Сгенирируем ключи для DDNS:
sudo dnssec-keygen -a HMAC-MD5 -b 128 -r /dev/urandom -n USER DDNS_UPDATE
- -a HMAC-MD5 — алгоритм;
- -b — длина ключа в байтах;
- -r /dev/urandom — файл, откуда будет браться случайная последовательность, для генерации ключа;
- -n USER — тип ключа;
- DDNS_UPDATE — имя ключа
Теперь у нас есть ключ, который будет использоваться для безопасного взаимодействия между DNS и DHCP-севрерами.
Из созданного файла с секретным ключем на необходимо взять значение в строке KEY:
cat Kddns_update.+157+39226.private
Private-key-format: v1.3
Algorithm: 157 (HMAC_MD5)
Key: uQ9UsfA+jqd/tsLt8d5moA==
Bits: AAA=
Created: 20181115103910
Publish: 20181115103910
Activate: 20181115103910
на основании этого ключа создаем файл ddns.key
cat ddns.key
key DDNS_UPDATE {
  algoritm HMAC-MD5.SIG-ALG.REG.INT;
  secret "uQ9UsfA+jqd/tsLt8d5moA==";

};
В строке secret помещаем значения KEY: ключа.
Копируем этот файл в директроии bind и dhcpd:
cp ddns.key /etc/named/
cp ddns.key /etc/dhcp/
Задаем следующие разрешения на эти файлы:
sudo chown root:named /etc/named/ddns.key
sudo chown root:root /etc/dhcp/ddns.key
sudo chmod 640 /etc/named/ddns.key
sudo chmod 640 /etc/dhcp/ddns.key
Настройка DNS-сервера:
Добавляем включение файла и производим настройку зоны, которую будем динамически обновлять
cat /etc/named.conf
include "/etc/named/ddns.key";

zone "tss.local" {
        type master;
        file "test.un";
        allow-update { key DDNS_UPDATE;};

};
Настройка DHCP-сервера:
Добавляем секции
cat /etc/dhcp/dhcpd.conf
authoritative;

option domain-name "test.un";
option domain-name-servers 192.168.1.14;

default-lease-time 3600;
max-lease-time 7200;
log-facility local6;

######### Секции настройки DDNS

ddns-updates           on; # включаем ddns
ddns-update-style      interim; # тип DDNS
ignore                 client-updates; # игнорировать попытки клиентов самим обновить зону
update-static-leases   on; # Включить добавление статических клиентов

include "/etc/dhcp/ddns.key"; # Указываем подключение файла с ключом

zone test.un {
        primary 127.0.0.1; # адрес севрера ответственного за зону
        key DDNS_UPDATE; # ключ для использования безопасного обновления зоны

}
###########

subnet 192.168.1.0 netmask 255.255.255.0 {
  range 192.168.1.100 192.168.1.200;
  option routers 192.168.1.1;

}
Перезапускаем демонов:
sudo systemctl restart named
sudo systemctl restart dhcpd
Step 1: Complete the prerequisites
Complete the following prerequisites if you haven’t already done so:
-
Register a domain name. Then confirm that you have administrative access to edit the
domain’s name servers.If you need a registered domain name, get one through a domain name registrar, such as
Amazon Route 53. For more information, see Registering a
New Domain in the Route 53 documentation. -
Confirm that the necessary DNS record types for your domain are supported by the
Lightsail DNS zone. The Lightsail DNS zone currently supports address (A), canonical
name (CNAME), mail exchanger (MX), name server (NS), service locator (SRV), and text (TXT)
record types. For NS records, you can use wildcard DNS record entries.If the DNS record types required for your domain are not supported by the Lightsail
DNS zone, you might want to use Route 53 as your domain’s DNS hosting provider because it
supports a greater number of record types. For more information, see Supported DNS Record Types and Making
Amazon Route 53 the DNS Service for an Existing Domain in the Route 53
documentation. -
Create a Lightsail instance to which you will point your domain. For more
information, see Create an
Amazon Lightsail instance. -
Create a static IP and attach it to your Lightsail instance. For more information,
see Create a static IP and attach it to an
instance in Amazon Lightsail.
Domain names
The Domain Name System is a hierarchy of domains. The hierarchy starts from the ‘root’ domain, whose name is simply ‘.’. Below this come top-level domains, such as ‘com’, ‘net’, ‘org’, ‘uk’ or ‘jp’. Below the top-level domains are second-level domains, such as ‘org.uk’ or ‘co.jp’. The domains in the DNS hierarchy are globally distributed, hosted by DNS name servers around the world.
A domain name registrar is an organization that allows you to purchase a domain name, such as . Purchasing a domain name gives you the right to control the DNS hierarchy under that name, for example allowing you to direct the name to your company web site. The registrar may host the domain in its own name servers on your behalf, or allow you to specify alternative name servers.
Azure DNS provides a globally distributed and high-availability name server infrastructure that you can use to host your domain. By hosting your domains in Azure DNS, you can manage your DNS records with the same credentials, APIs, tools, billing, and support as your other Azure services.
Azure DNS currently doesn’t support purchasing of domain names. If you want to purchase a domain name, you need to use a third-party domain name registrar. The registrar typically charges a small annual fee. The domains can then be hosted in Azure DNS for management of DNS records. See Delegate a Domain to Azure DNS for details.
Теги Etag
Предположим, что два человека или два процесса пробуют изменить запись DNS одновременно. У какого из них это получится? И будет ли этот человек или процесс знать, что они заменили изменения кого-то другого?
Служба Azure DNS использует теги Etag для безопасной обработки параллельных изменений одного ресурса. Теги ETag не связаны с . С каждым ресурсом DNS (зоной или набором записей) связан Etag. При извлечении ресурса также передается его значение Etag. При обновлении ресурса вы можете вернуть Etag, чтобы служба Azure DNS могла сопоставить его с Etag на сервере. Так как каждое обновление ресурса приводит к повторному созданию Etag, несовпадение Etag указывает на параллельное изменение. Теги Etag можно также использовать при создании ресурса для проверки того, что ресурс не существует.
По умолчанию PowerShell для Azure DNS использует теги Etag для блокировки одновременных изменений зон и наборов записей. С помощью необязательного параметра -Overwrite можно отключить проверки тегов Etag. В этом случае все одновременные изменения перезаписываются.
На уровне API REST службы Azure DNS теги Etag указываются с помощью заголовков HTTP. Их поведение описывается в следующей таблице:
| Заголовок | Поведение |
|---|---|
| None | PUT всегда завершается успешно (без проверки Etag) |
| If-match <etag> | PUT завершается успешно, только если ресурс существует и Etag соответствует |
| If-match * | PUT завершается успешно, только если ресурс существует |
| If-none-match* | PUT завершается успешно, только если ресурс не существует |


