
Введение
У меня уже есть статья про установку grafana и ее интеграцию с заббикс — Подключение Zabbix к Grafana. Со времен написания той статьи я немного расширил использование графаны. Стал больше и чаще делать дашборды для zabbix. Причем не для того, чтобы наводить красоту или кого то удивлять невероятными дашбордами. В графане просто их быстрее и удобнее делать.
И еще один весомый аргумент за Grafana — ее дашборды адаптированы для просмотра на смартфонах. Постоянно этим пользуюсь. Смотреть графики zabbix на смартфоне неудобно, а иногда и невозможно.
В дашборды Zabbix только недавно завезли copy-paste, да еще импорт и экспорт. Без этого раньше вообще мучение было дашборды делать. Очень много времени уходило. Сейчас команда Zabbix старается наверстать упущенное и немного развивает свою визуализацию, но лично я уже привык к Grafana, так что использую ее достаточно часто.
Недавно обновлял Grafana с версии 6 на 7, так что решил поделиться с вами информацией. Не сказать, что мне сильно нужны нововведения 7-й версии (совсем не нужны). Тем не менее, не хочется сильно отставать по релизам, так что я все равно периодически обновляюсь на новые версии.
Querying Logs
Querying and displaying log data from Elasticsearch is available in Explore, and in the logs panel in dashboards.
Select the Elasticsearch data source, and then optionally enter a lucene query to display your logs.
When switching from a Prometheus or Loki data source in Explore, your query is translated to an Elasticsearch log query with a correct Lucene filter.
Log Queries
Once the result is returned, the log panel shows a list of log rows and a bar chart where the x-axis shows the time and the y-axis shows the frequency/count.
Note that the fields used for log message and level is based on an .
Filter Log Messages
Optionally enter a lucene query into the query field to filter the log messages. For example, using a default Filebeat setup you should be able to use to only show error log messages.
Upgrading to v6.6
The Generic OAuth setting , used for supporting non-compliant providers, has been removed. From now on, Grafana will automatically detect if credentials should be sent as part of the URL or request body for a specific provider. The result will be remembered and used for additional OAuth requests for that provider.
Important changes regarding SameSite cookie attribute
Chrome 80 treats cookies as by default if no attribute is specified, see https://www.chromestatus.com/feature/5088147346030592.
Due to this change in Chrome, the setting configured to now renders cookies with attribute compared to before where no attribute was added to cookies. To get the old behavior, use value instead of , see for more information.
This version of Chrome also rejects insecure cookies. See https://www.chromestatus.com/feature/5633521622188032 for more information. Make sure that you
change the setting to and use HTTPS when is configured to , otherwise authentication in Grafana won’t work properly.
Provision a dashboard
Each dashboard config file contains a manifest that specifies the desired state of a set of dashboard providers.
A dashboard provider tells Grafana where to find the dashboard definitions and where to put them.
Grafana regularly checks for changes to the dashboard definitions (by default every 10 seconds).
Let’s define a dashboard provider so that Grafana knows where to find the dashboards we want to provision.
Define a dashboard provider
In the directory, create a file called with the following content:
For more information on how to configure dashboard providers, refer to .
Create a dashboard definition
-
In the dashboard definitions directory you specified in the dashboard provider, i.e. , create a file called with the following content:
-
Restart Grafana to provision the new dashboard or wait 10 seconds for Grafana to automatically create the dashboard.
-
In the sidebar, hover the cursor over Dashboards (squares) icon, and then click Manage. The dashboard appears in a Services folder.
Alert Notification Channels
Alert Notification Channels can be provisioned by adding one or more YAML config files in the directory.
Each config file can contain the following top-level fields:
- , a list of alert notifications that will be added or updated during start up. If the notification channel already exists, Grafana will update it to match the configuration file.
- , a list of alert notifications to be deleted before inserting/updating those in the list.
Provisioning looks up alert notifications by uid, and will update any existing notification with the provided uid.
By default, exporting a dashboard as JSON will use a sequential identifier to refer to alert notifications. The field can be optionally specified to specify a string identifier for the alert name.
Supported Settings
The following sections detail the supported settings and secure settings for each alert notification type. Secure settings are stored encrypted in the database and you add them to in the YAML file instead of .
| Name | Secure setting |
|---|---|
| apiToken | yes |
| userKey | yes |
| device | |
| priority | |
| okPriority | |
| retry | |
| expire | |
| sound | |
| okSound |
| Name | Secure setting |
|---|---|
| url | yes |
| avatar_url | |
| message |
| Name | Secure setting |
|---|---|
| url | yes |
| recipient | |
| username | |
| icon_emoji | |
| icon_url | |
| uploadImage | |
| mentionUsers | |
| mentionGroups | |
| mentionChannel | |
| token | yes |
| Name |
|---|
| url |
| autoResolve |
| Name |
|---|
| kafkaRestProxy |
| kafkaTopic |
| Name | Secure setting |
|---|---|
| token | yes |
| Name | Secure setting |
|---|---|
| integrationKey | yes |
| autoResolve |
| Name | Secure setting |
|---|---|
| url | |
| source | |
| handler | |
| username | |
| password | yes |
| Name | Secure setting |
|---|---|
| url | |
| apikey | yes |
| entity | |
| check | |
| handler | |
| namespace |
| Name | Secure setting |
|---|---|
| url | |
| basicAuthUser | |
| basicAuthPassword | yes |
| Name |
|---|
| singleEmail |
| addresses |
| Name |
|---|
| url |
| apikey |
| roomid |
| Name | Secure setting |
|---|---|
| apiKey | yes |
| apiUrl | |
| autoClose | |
| overridePriority | |
| sendTagsAs |
| Name | Secure setting |
|---|---|
| bottoken | yes |
| chatid | |
| uploadImage |
| Name | Secure setting |
|---|---|
| gateway_id | |
| recipient_id | |
| api_secret | yes |
| Name | Secure setting |
|---|---|
| url | |
| httpMethod | |
| username | |
| password | yes |
Provision a data source
Each data source provisioning config file contains a manifest that specifies the desired state of a set of provisioned data sources.
At startup, Grafana loads the configuration files and provisions the data sources listed in the manifests.
Let’s configure a TestData DB data source that you can use for your dashboards.
Create a data source manifest
-
In the directory, create a file called with the following content:
-
Restart Grafana to load the new changes.
-
In the sidebar, hover the cursor over the Configuration (gear) icon and click Data Sources. The TestData DB appears in the list of data sources.
Upgrading to v5.2
One of the database migrations included in this release will update all annotation timestamps from second to millisecond precision. If you have a large amount of annotations the database migration may take a long time to complete which may cause problems if you use systemd to run Grafana.
We’ve got one report where using systemd, PostgreSQL and a large amount of annotations (table size 1645mb) took 8-20 minutes for the database migration to complete. However, the grafana-server process was killed after 90 seconds by systemd. Any database migration queries in progress when systemd kills the grafana-server process continues to execute in database until finished.
If you’re using systemd and have a large amount of annotations consider temporary adjusting the systemd setting to something high like before upgrading.
Dashboards
You can manage dashboards in Grafana by adding one or more YAML config files in the directory. Each config file can contain a list of that load dashboards into Grafana from the local filesystem.
The dashboard provider config file looks somewhat like this:
When Grafana starts, it will update/insert all dashboards available in the configured path. Then later on poll that path every updateIntervalSeconds and look for updated json files and update/insert those into the database.
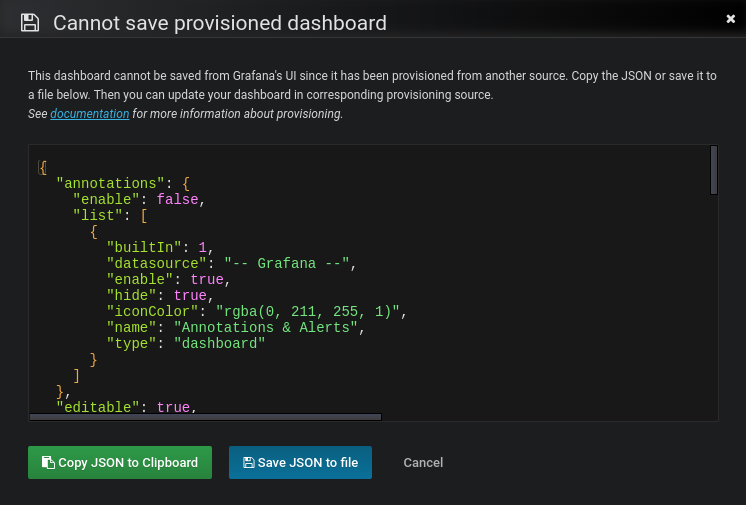
Making changes to a provisioned dashboard
It’s possible to make changes to a provisioned dashboard in the Grafana UI. However, it is not possible to automatically save the changes back to the provisioning source.
If is set to and you make changes to a provisioned dashboard, you can the dashboard then changes will be persisted to the Grafana database.
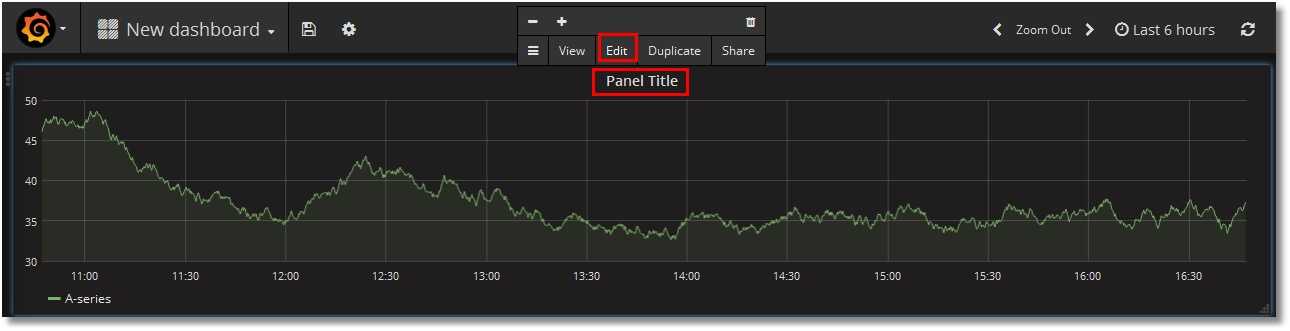
If is configured to , you are not able to make changes to a provisioned dashboard. When you click , Grafana brings up a Cannot save provisioned dashboard dialog. The screenshot below illustrates this behavior.
Grafana offers options to export the JSON definition of a dashboard. Either or can help you synchronize your dashboard changes back to the provisioning source.
Note: The JSON definition in the input field when using or will have the field automatically removed to aid the provisioning workflow.
Reusable Dashboard URLs
If the dashboard in the JSON file contains an UID, Grafana forces insert/update on that UID. This allows you to migrate dashboards between Grafana instances and provisioning Grafana from configuration without breaking the URLs given because the new dashboard URL uses the UID as identifier.
When Grafana starts, it updates/inserts all dashboards available in the configured folders. If you modify the file, then the dashboard is also updated.
By default, Grafana deletes dashboards in the database if the file is removed. You can disable this behavior using the setting.
Provision folders structure from filesystem to Grafana
If you already store your dashboards using folders in a git repo or on a filesystem, and also you want to have the same folder names in the Grafana menu, you can use option.
For example, to replicate these dashboards structure from the filesystem to Grafana,
you need to specify just this short provision configuration file.
and will become new folders in Grafana menu.
Authenticate using the data source proxy
Once the user has saved the configuration for a data source, any secret data source configuration will no longer be available in the browser. Encrypted secrets can only be accessed on the server. So how do you add them to you request?
The Grafana server comes with a proxy that lets you define templates for your requests. We call them proxy routes. Grafana sends the proxy route to the server, decrypts the secrets along with other configuration, and adds them to the request before sending it off.
Add a proxy route to your plugin
To forward requests through the Grafana proxy, you need to configure one or more proxy routes. A proxy route is a template for any outgoing request that is handled by the proxy. You can configure proxy routes in the plugin.json file.
-
Add the route to plugin.json. Note that you need to restart the Grafana server every time you make a change to your plugin.json file.
-
In the , extract the proxy URL from to a class property called .
-
In the method, make a request using . The first section of the URL path needs to match the of your proxy route. The data source proxy replaces with the of the route. The following request will be made to .
Add a dynamic proxy route to your plugin
Grafana sends the proxy route to the server, where the data source proxy decrypts any sensitive data and interpolates the template variables with the decrypted data before making the request.
To add user-defined configuration to your routes, add to the route, where is the name of a property in the object.
You can also configure your route to use sensitive data by using .
In addition to the URL, you can also add headers, URL parameters, and a request body, to a proxy route.
Add a request body to a proxy route
Add a OAuth 2.0 proxy route to your plugin
The data source proxy supports OAuth 2.0 authentication.
Since the request to each route is made server-side, only machine-to-machine authentication is supported. In order words, if you need to use a different grant than client credentials, you need to implement it yourself.
To authenticate using OAuth 2.0, add a object to the proxy route definition. If necessary, Grafana performs a request to the URL defined in to retrieve a token before making the request to the URL in your proxy route. Grafana automatically renews the token when it expires.
Any parameters defined in are encoded as and sent to the token URL.
Configuration Management Tools
Currently we do not provide any scripts/manifests for configuring Grafana. Rather than spending time learning and creating scripts/manifests for each tool, we think our time is better spent making Grafana easier to provision. Therefore, we heavily rely on the expertise of the community.
| Tool | Project |
|---|---|
| Puppet | https://forge.puppet.com/puppet/grafana |
| Ansible | https://github.com/cloudalchemy/ansible-grafana |
| Chef | https://github.com/JonathanTron/chef-grafana |
| Saltstack | https://github.com/salt-formulas/salt-formula-grafana |
| Jsonnet | https://github.com/grafana/grafonnet-lib/ |
Немного контекста
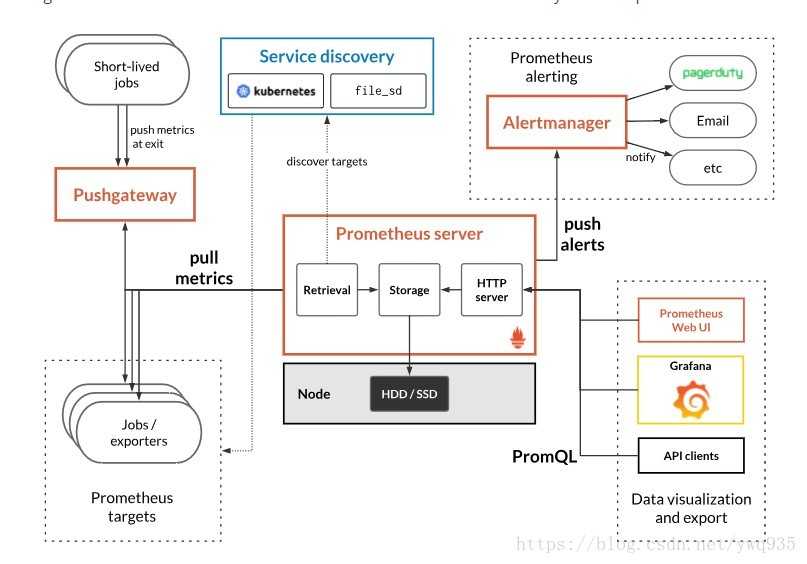
Инфраструктура проекта, в котором я сейчас работаю, очень разнородна: k8s-кластера, отдельные docker-хосты с контейнерами, сервисы в обычных systemd-демонах и т.д. Кроме этого, у нас есть PROD, STAGE и DEV-окружения, которые с точки зрения архитектуры могут отличаться. Все эти окружения очень динамичны, постоянно деплоятся новые машины и удаляются старые. К слову, эту часть мы выполняем с помощью Terraform и Ansible (возможно расскажу подробнее в своей очередной статье). Для каждого окружения у нас используется своя инфраструктура мониторинга.
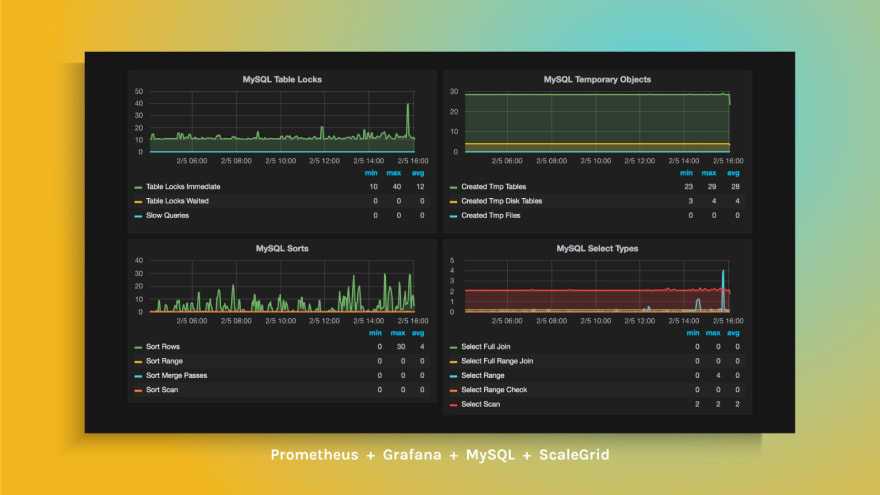
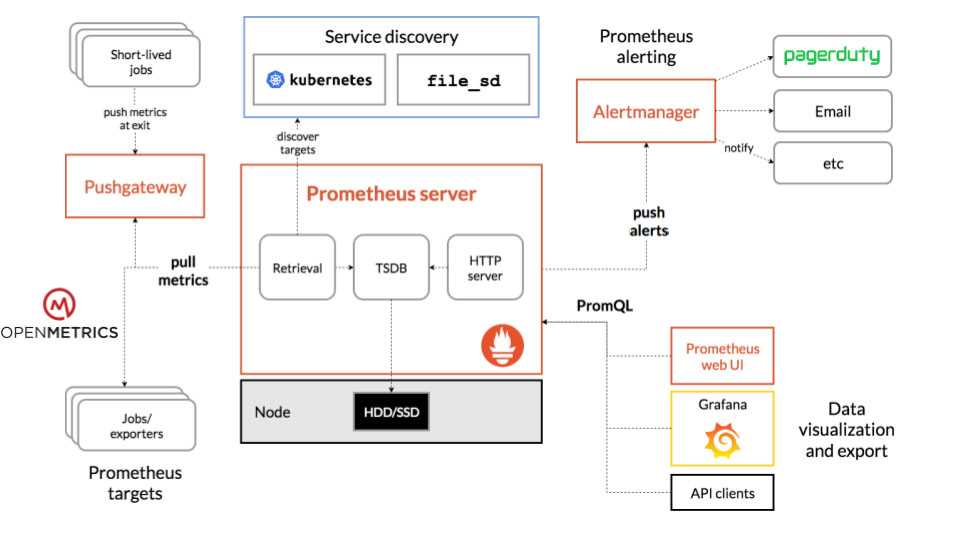
Исторически мы в проекте используем Prometheus-стек. Он отлично подходит для нашей динамической инфраструктуры. Если пройтись по отдельным компонентам, то получится следующий стандартный список компонентов:
-
Сбор и хранение метрик — Prometheus
-
Экспорт метрик — различные экспортеры (Node exporter, Postgres exporter, MongoDB exporter, …).
-
Визуализация — Grafana
-
Алертинг — Alertmanager
В какой-то момент мы заменили Prometheus на VictoriaMetrics (кластерную версию), благодаря чему сэкономили кучу ресурсов и начали хранить наши метрики глубиной в 1 год. Если кто-то еще не знаком с этим замечательным продуктом, советую почитать про него. Мы мигрировали на него практически безболезненно, даже не меняя свои конфиги. В результате Prometheus у нас был заменен на несколько компонентов: vmagent + amalert + vmselect + vminsert + vmstorage.
Большинство из описанных в статье конфигураций подходят как для VictoriaMetrics, так и для Prometheus.
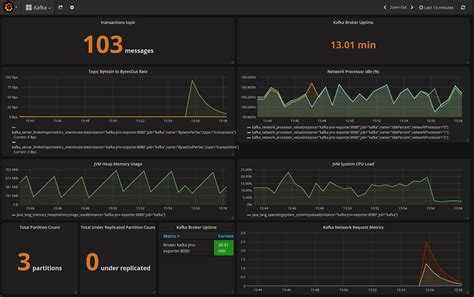
Пример некоторых дашбордов
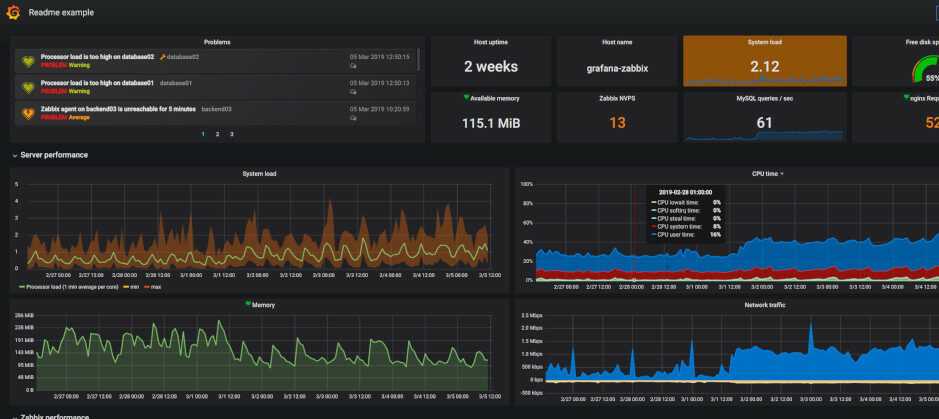
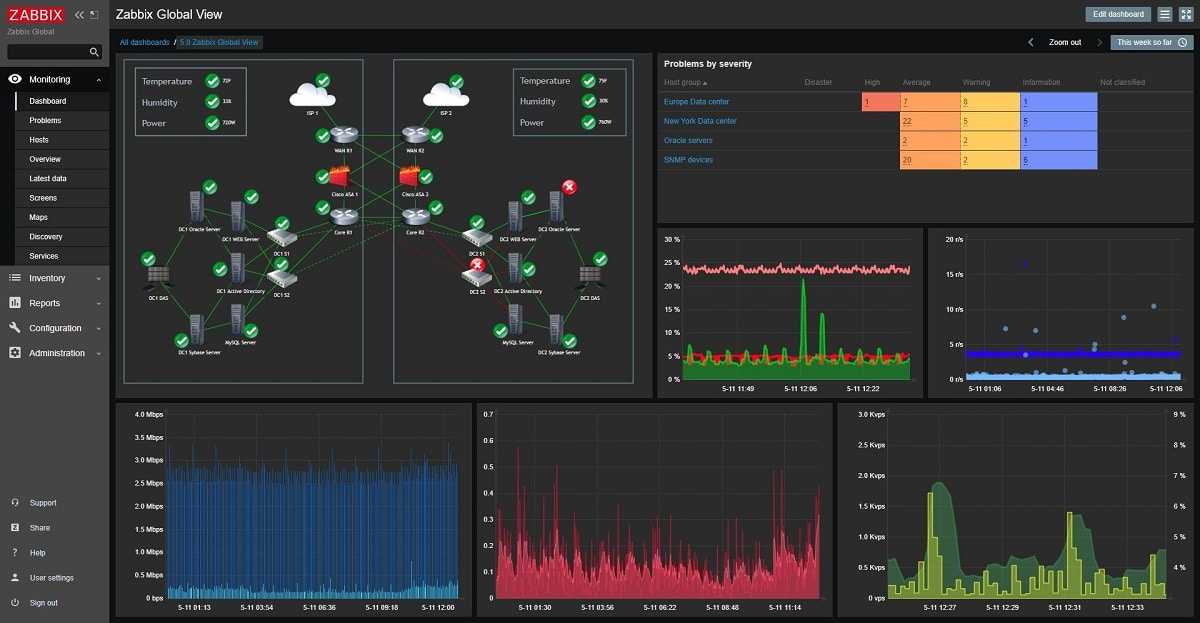
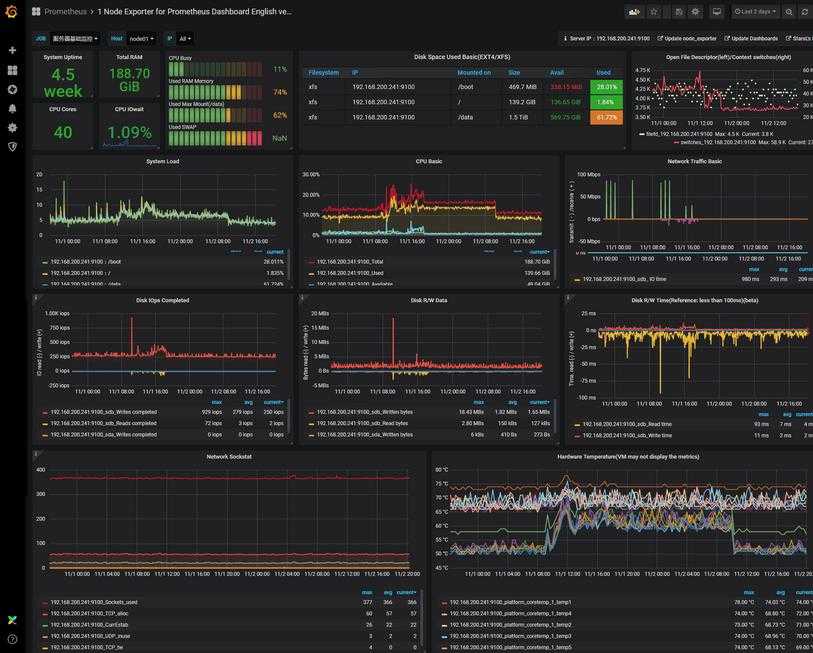
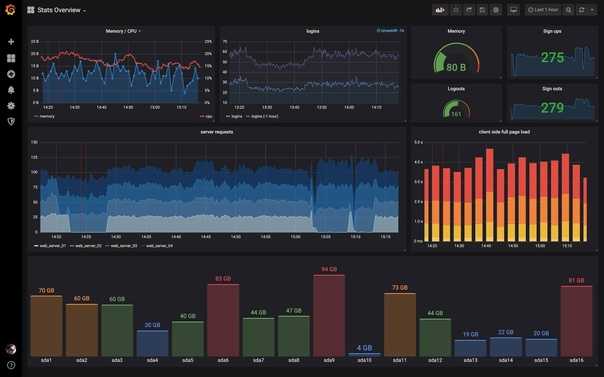
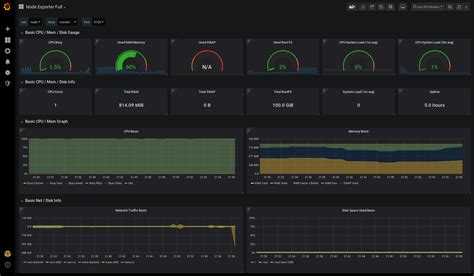
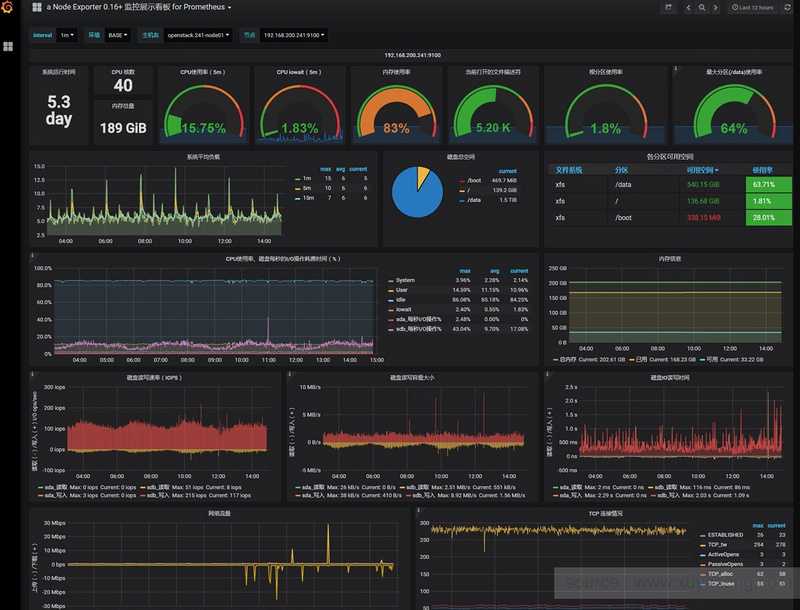
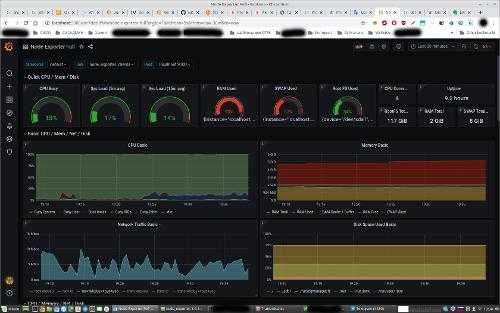
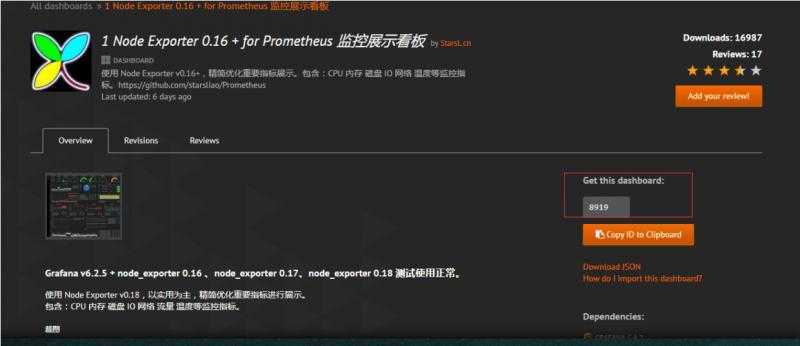
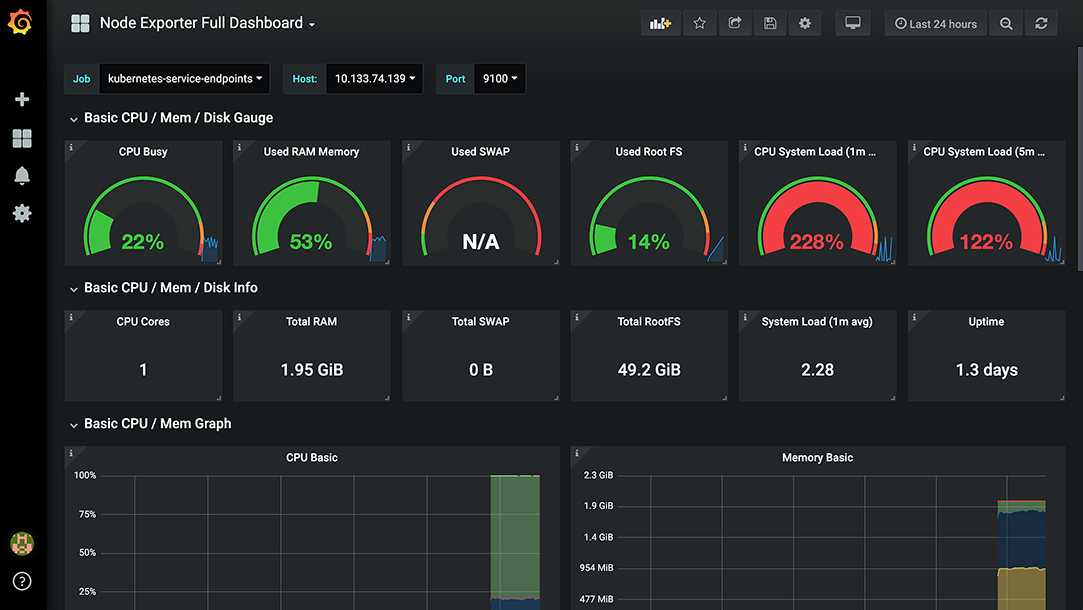
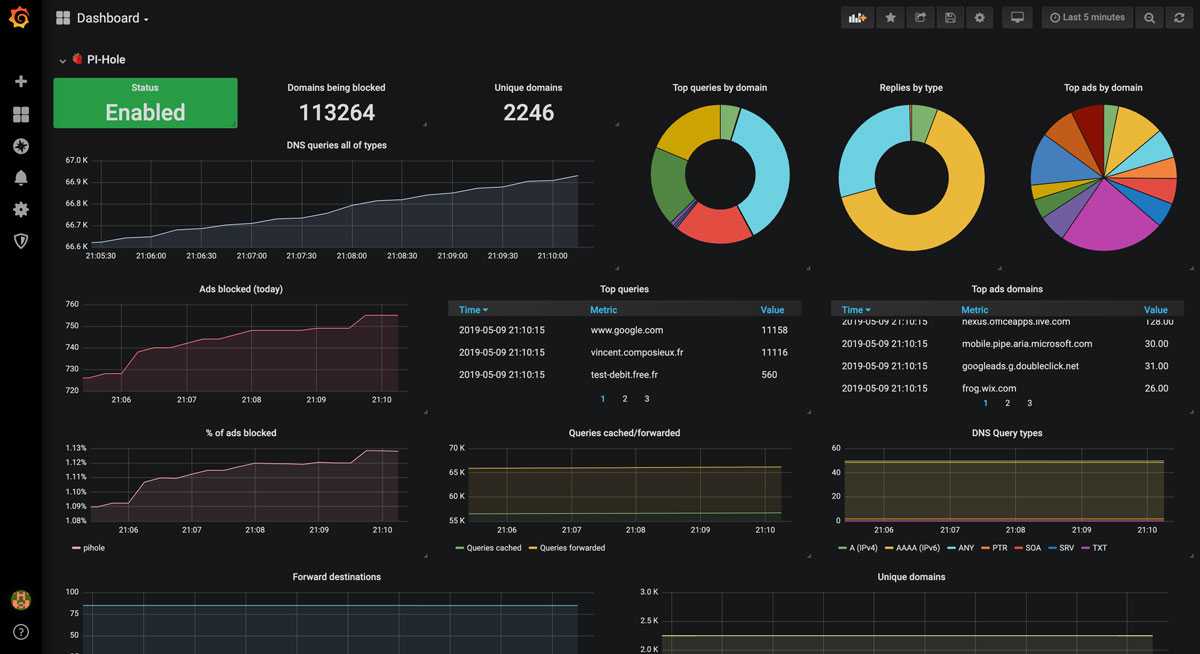
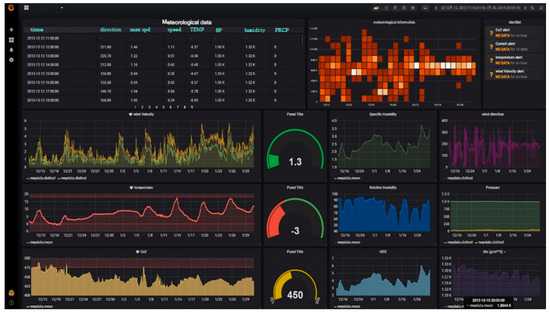
Я как-то заморочился и сделал обзорный дашборд в Grafana для Linux сервера. Работает с последними версиями стандартного шаблона Zabbix, который появился начиная с версии 4.4. Сам дашборд графаны переведен на русский язык, а шаблон Zabbix стандартный — английский. Получилось вот так:
За основу взял какой-то готовый дашборд, уже не помню где. Но сильно его переделал, так как он был под старую версию шаблонов заббикса. Сверху в выпадающем списке можно выбирать различные Data sources и сервера. Один дашборд для всех. В Zabbix такое сделать пока невозможно. Нужно потратить огромное количество времени, чтобы попытаться воспроизвести что-то подобное. Скачать панель можно отсюда — Zabbix-Server.json.
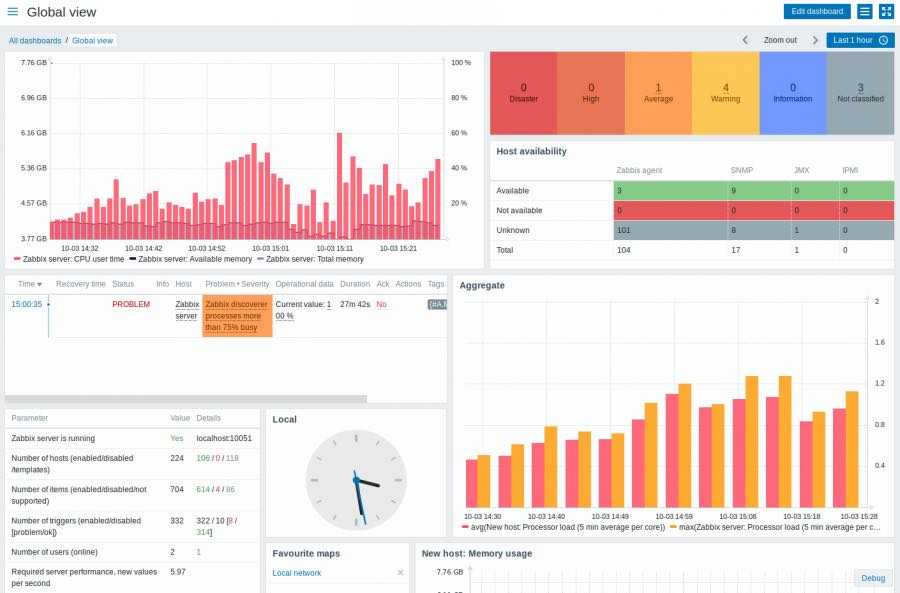
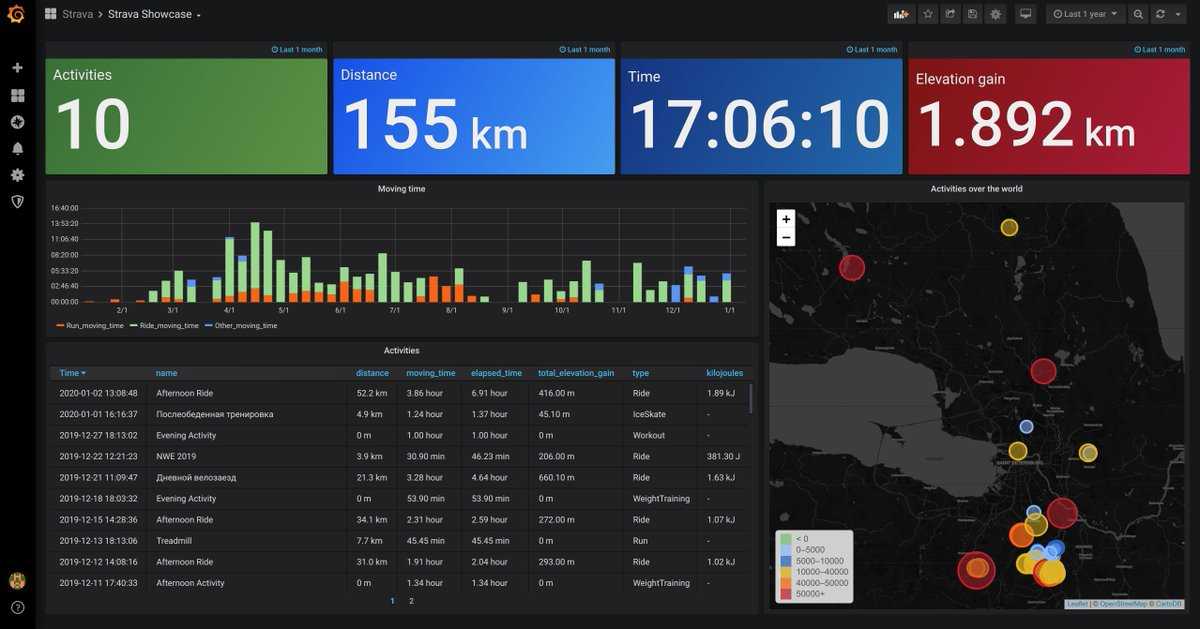
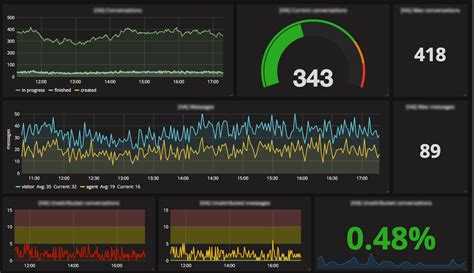
Вот еще один пример моего дашбода. Тут сводная информация по моим сайтам и группам, плюс доход в adsense.
Беглого взгляда на этот дашборд достаточно, чтобы оценить обстановку и не тратить время на ручную проверку всех этих метрик.
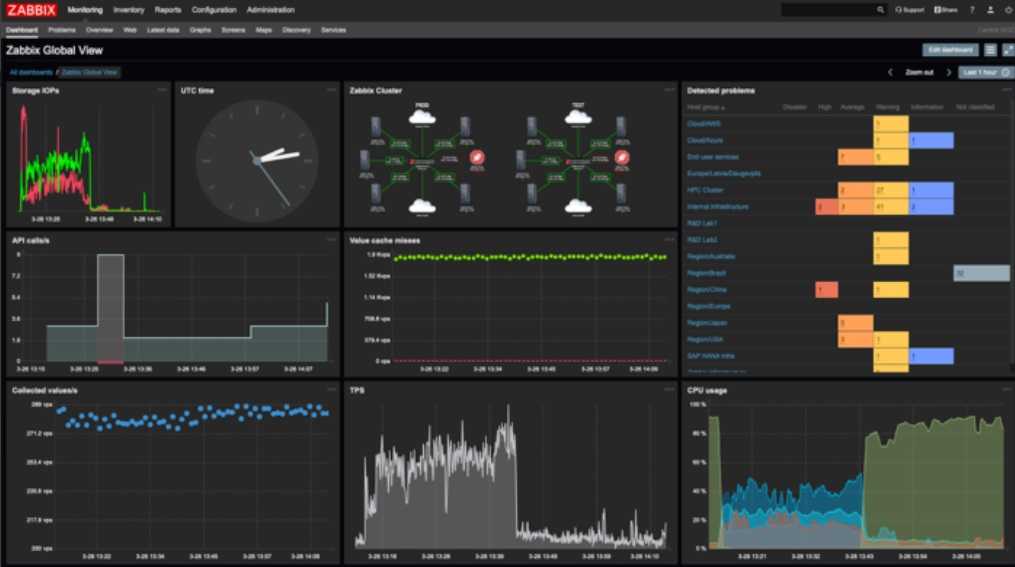
А это сводная картинка активных триггеров с нескольких серверов мониторинга.
Я показал несколько общих дашбордов, которые регулярно использую в Grafana. Остальное делается по месту разным заказчикам в случае необходимости. Все в связке с Zabbix. Отдельно графану или в связке с чем-то еще я не использую.

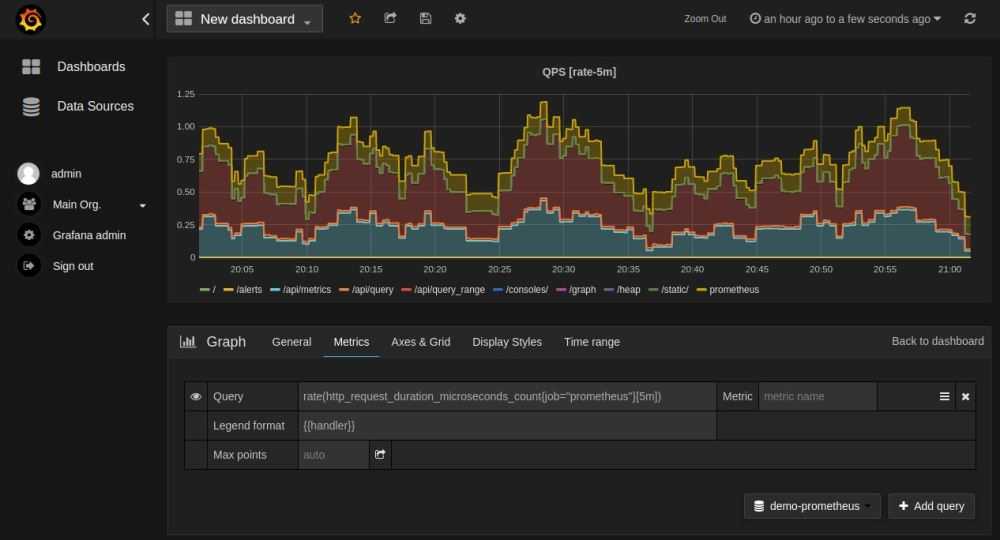
Импорт и экспорт Dashboard в Grafana
Перед обновлением grafana так же забираем из нее нужные дашборды. У меня обычно их не много, так как это больше вспомогательный инструмент для каких-то общих дашбордов, которые неудобно делать в Zabbix. Для оперативной работы чаще всего пользуешься самим заббиксом.
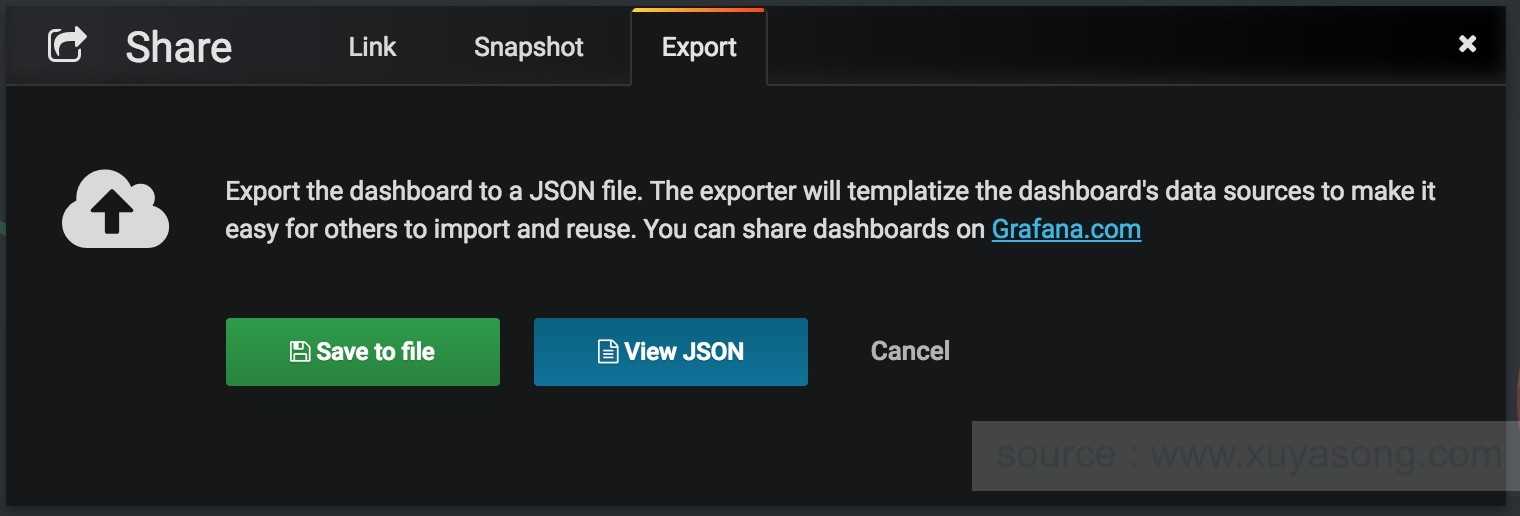
Для того, чтобы экспортировать dashboard из Grafana, открываем его и нажимаем на Share dashboard. Там переходим на вкладку Export и сохраняем в файл.
В новой версии импортируем штатно с главной страницы с дашбордами.
Если хотите автоматизировать экспорт и импорт дашбодров grafana с помощью curl, то никаких проблем. Делается это следующим образом. Сначала смотрим список всех дашбордов:
# curl -H "Content-Type: application/json" -s "https://gr.serveradmin.ru/api/search" -u admin:password | jq .
Выбираете нужный dashboard и экспортируете его, сохраняя сразу в файл:
# curl -H "Content-Type: application/json" -s "https://gr.serveradmin.ru/api/dashboards/db/zabbix-polnyi-status-servera" -u admin:password | jq . >> ~/zabbix-polnyi-status-servera.json
Импортировать dashboard можно следующим образом:
# cat ~/zabbix-polnyi-status-servera.json | jq '. + {overwrite: true}' | curl -X POST -H "Content-Type: application/json" -s "https://gr.serveradmin.ru/api/dashboards/db" -u admin:password /api/dashboards/db --data @-
Этой информации достаточно, чтобы автоматизировать процесс в случае необходимости. У меня такой необходимости не было, так что я не заморачивался этой темой. Но она легко гуглится. Готовых скриптов полно.
Обновление Grafana с 6 на 7
Я использую Grafana фактически как stateless приложение. Из всех настроек мне нужны только Data Sources и Dashboards. Меняются они не часто, храню их у себя в виде json конфигов, штатно выгруженных из графаны. Отредактирую что-то и сразу выгружаю в свое хранилище конфигов. При таком подходе идеально работает установка и запуск в Docker. Собственно, об этом я и рассказываю в своей статье — .
Перед графаной ставится реверс прокси nginx в режиме proxy_pass. Таким образом, обновление графаны сводится к выгрузке конфигов, запуску новой чистой графаны 7-й версии в docker и замене бэкенда в настройках nginx на новую версию. Вот конфиг nginx, который я использую для проксирования запросов в grafana.
server {
    listen 443 http2 ssl;
    server_name gr.serveradmin.ru;
    access_log /var/log/nginx/gr.serveradmin.ru-access.log full;
    error_log /var/log/nginx/gr.serveradmin.ru-error.log;

    ssl_certificate /etc/letsencrypt/live/gr.serveradmin.ru/fullchain.pem;
    ssl_certificate_key /etc/letsencrypt/live/gr.serveradmin.ru/privkey.pem;

    location /.well-known {
    root /tmp;
    }

    location / {
	allow 111.111.111.111;
	allow 222.222.222.222;
	allow 333.333.333.333;
	deny all;
        proxy_pass http://10.20.50.7:3001;
        proxy_set_header Host $host;
        proxy_set_header X-Forwarded-For $proxy_add_x_forwarded_for;
        proxy_set_header X-Real-IP $remote_addr;
        proxy_set_header X-Forwarded-Proto https;
    }
}

server {
    listen 80;
    server_name gr.serveradmin.ru;
    return 301 https://gr.serveradmin.ru$request_uri;
}
При желании, ограничение по ip заменяется на basic auth. Я непубличные сервисы стараюсь в интернет не показывать без крайней необходимости. Иногда это вызывает неудобства, но безопасность и спокойствие мне важнее.
Так что обновляя grafana, я просто запускаю последнюю версию в докере и направляю через nginx трафик на нее:
docker run -d -p 3001:3000 --name=grafana7 -e "GF_INSTALL_PLUGINS=grafana-clock-panel,grafana-simple-json-datasource,alexanderzobnin-zabbix-app" grafana/grafana:7.4.3-ubuntu
Чтобы не ставить вручную плагины, я сразу же их добавляю при первом запуске. Если вам нужен докер, то у меня есть статья про установку docker в centos.
Upgrading to v7.2
Ensure encryption of existing alert notification channel secrets
Before Grafana v7.2 alert notification channels did not store sensitive settings/secrets such as API tokens and password encrypted in the database. In Grafana v7.2, creating a new alert notification channel will store sensitive settings encrypted in the database.
The following alert notifiers have been updated to support storing their sensitive settings encrypted:
- Slack (URL and Token)
- Pagerduty (Integration Key)
- Webhook (Password)
- Prometheus Alertmanager (Basic Auth Password)
- Opsgenie (API Key)
- Sensu (Password)
- Telegram (BOT API Token)
- LINE (token)
- Pushover (API Token, User key)
- Threema Gateway (API Secret)
For existing alert notification channels, there is no automatic migration of storing sensitive settings encrypted, and they will continue to work as before. Migration must be done manually. Opening a configured alert notification channel in the UI and saving it will store sensitive settings encrypted and at the same time reset the historic unencrypted setting of that alert notification channel in the database.
For provisioning of alert notification channels, refer to .
Templating
Instead of hard-coding things like server, application and sensor name in your metric queries you can use variables in their place. Variables are shown as dropdown select boxes at the top of the dashboard. These dropdowns make it easy to change the data being displayed in your dashboard.
Check out the Templating documentation for an introduction to the templating feature and the different types of template variables.
Query variable
If you add a template variable of the type , you can write a MS SQL query that can
return things like measurement names, key names or key values that are shown as a dropdown select box.
For example, you can have a variable that contains all values for the column in a table if you specify a query like this in the templating variable Query setting.
A query can return multiple columns and Grafana will automatically create a list from them. For example, the query below will return a list with values from and .
Another option is a query that can create a key/value variable. The query should return two columns that are named and . The column value should be unique (if it is not unique then the first value is used). The options in the dropdown will have a text and value that allow you to have a friendly name as text and an id as the value. An example query with as the text and as the value:
You can also create nested variables. For example, if you had another variable named . Then you could have
the hosts variable only show hosts from the current selected region with a query like this (if is a multi-value variable, then use the comparison operator rather than to match against multiple values):
Using Variables in Queries
If the variable is a multi-value variable then use the comparison operator rather than to match against multiple values.
There are two syntaxes:
Example with a template variable named :
Example with a template variable named :
Disabling Quoting for Multi-value Variables
Grafana automatically creates a quoted, comma-separated string for multi-value variables. For example: if and are selected then it will be formatted as: . Do disable quoting, use the csv formatting option for variables:


Read more about variable formatting options in the documentation.
Query editor
You find the PostgreSQL query editor in the metrics tab in Graph or Singlestat panel’s edit mode. You enter edit mode by clicking the
panel title, then edit.
The query editor has a link named that shows up after a query has been executed, while in panel edit mode. Click on it and it will expand and show the raw interpolated SQL string that was executed.
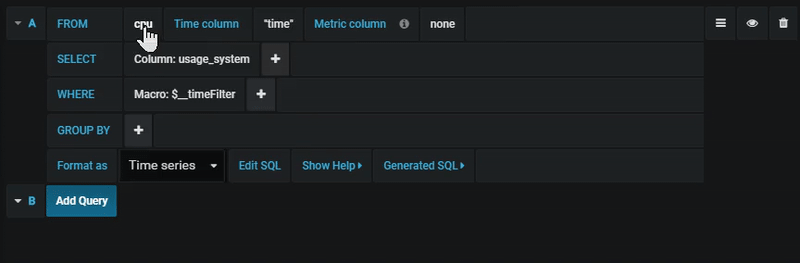
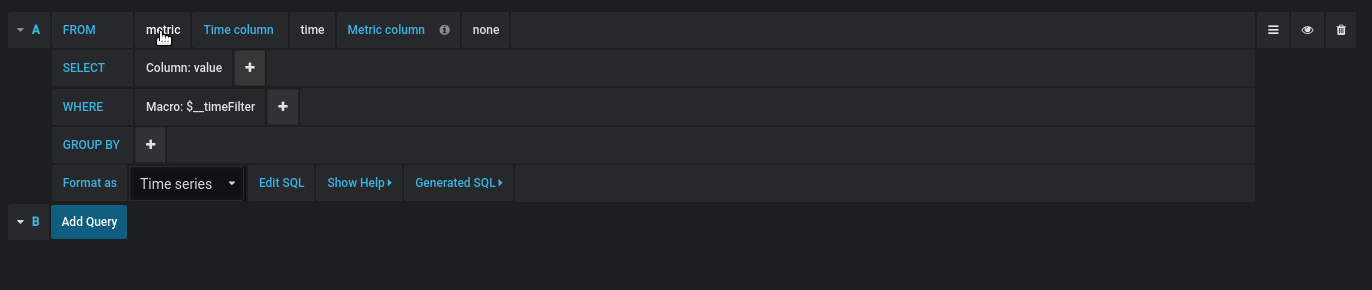
Select table, time column and metric column (FROM)
When you enter edit mode for the first time or add a new query Grafana will try to prefill the query builder with the first table that has a timestamp column and a numeric column.
In the FROM field, Grafana will suggest tables that are in the of the database user. To select a table or view not in your
you can manually enter a fully qualified name (schema.table) like .
The Time column field refers to the name of the column holding your time values. Selecting a value for the Metric column field is optional. If a value is selected, the Metric column field will be used as the series name.
The metric column suggestions will only contain columns with a text datatype (char,varchar,text).
If you want to use a column with a different datatype as metric column you may enter the column name with a cast: .
You may also enter arbitrary SQL expressions in the metric column field that evaluate to a text datatype like
.
Columns, window, and aggregation functions (SELECT)
In the row you can specify what columns and functions you want to use.
In the column field you may write arbitrary expressions instead of a column name like .
The available functions in the query editor depend on the PostgreSQL version you selected when configuring the data source.
If you use aggregate functions you need to group your resultset. The editor will automatically add a if you add an aggregate function.
The editor tries to simplify and unify this part of the query. For example:
The above will generate the following PostgreSQL clause:
You may add further value columns by clicking the plus button and selecting from the menu. Multiple value columns will be plotted as separate series in the graph panel.
Filter data (WHERE)
To add a filter click the plus icon to the right of the condition. You can remove filters by clicking on
the filter and selecting . A filter for the current selected timerange is automatically added to new queries.
Group by
To group by time or any other columns click the plus icon at the end of the GROUP BY row. The suggestion dropdown will only show text columns of your currently selected table but you may manually enter any column.
You can remove the group by clicking on the item and then selecting .
If you add any grouping, all selected columns need to have an aggregate function applied. The query builder will automatically add aggregate functions to all columns without aggregate functions when you add groupings.
Gap filling
Grafana can fill in missing values when you group by time. The time function accepts two arguments. The first argument is the time window that you would like to group by, and the second argument is the value you want Grafana to fill missing items with.
You can switch to the raw query editor mode by clicking the hamburger icon and selecting or by clicking below the query.
Config File
Check out the configuration page for more information on what you can configure in
Config File Locations
- Default configuration from
- Custom configuration from
- The custom configuration file path can be overridden using the parameter
Using Environment Variables
It is possible to use environment variable interpolation in all 3 provisioning configuration types. Allowed syntax
is either or and can be used only for values not for keys or bigger parts
of the configurations. It is not available in the dashboard’s definition files just the dashboard provisioning
configuration.
Example:
If you have a literal in your value and want to avoid interpolation, can be used.
Query Editor
You find the MySQL query editor in the metrics tab in a panel’s edit mode. You enter edit mode by clicking the
panel title, then edit.
The query editor has a link named that shows up after a query has been executed, while in panel edit mode. Click on it and it will expand and show the raw interpolated SQL string that was executed.
Select table, time column and metric column (FROM)
When you enter edit mode for the first time or add a new query Grafana will try to prefill the query builder with the first table that has a timestamp column and a numeric column.
In the FROM field, Grafana will suggest tables that are in the configured database. To select a table or view in another database that your database user has access to you can manually enter a fully qualified name (database.table) like .
The Time column field refers to the name of the column holding your time values. Selecting a value for the Metric column field is optional. If a value is selected, the Metric column field will be used as the series name.
The metric column suggestions will only contain columns with a text datatype (text, tinytext, mediumtext, longtext, varchar, char).
If you want to use a column with a different datatype as metric column you may enter the column name with a cast: .
You may also enter arbitrary SQL expressions in the metric column field that evaluate to a text datatype like
.
Columns and Aggregation functions (SELECT)
In the row you can specify what columns and functions you want to use.
In the column field you may write arbitrary expressions instead of a column name like .
If you use aggregate functions you need to group your resultset. The editor will automatically add a if you add an aggregate function.
You may add further value columns by clicking the plus button and selecting from the menu. Multiple value columns will be plotted as separate series in the graph panel.
Filter data (WHERE)
To add a filter click the plus icon to the right of the condition. You can remove filters by clicking on
the filter and selecting . A filter for the current selected timerange is automatically added to new queries.
Group By
To group by time or any other columns click the plus icon at the end of the GROUP BY row. The suggestion dropdown will only show text columns of your currently selected table but you may manually enter any column.
You can remove the group by clicking on the item and then selecting .
If you add any grouping, all selected columns need to have an aggregate function applied. The query builder will automatically add aggregate functions to all columns without aggregate functions when you add groupings.
Gap Filling
Grafana can fill in missing values when you group by time. The time function accepts two arguments. The first argument is the time window that you would like to group by, and the second argument is the value you want Grafana to fill missing items with.
You can switch to the raw query editor mode by clicking the hamburger icon and selecting or by clicking below the query.
Заключение
Я показал общий принцип работы с google api в Zabbix. Сам еще подробно не разбирался и дашборды не составлял. Остановился ровно на том, на чем закончил статью. Дальше буду все это разрабатывать и настраивать под конкретные задачи и нужды. Потом все это уедет вместе с остальными метриками в grafana для удобного дашборда. Возможно покажу все это уже в готовом виде.
Для более сложных и разнообразных запросов надо сделать один скрипт с передачей параметров даты, чтобы не плодить скрипты под каждый айтем. Хотелось бы получить какую-то обратную связь от тех, кто всем этим уже занимался. Тема вообще не гуглится, разбирался во всем сам. Думаю, что в основном для работы с api используются готовые библиотеки под различные языки программирования. Прямые запрос через curl больше на экзотику тянет.
И еще у меня есть некоторые подозрения, что я пошел по сложному пути, и есть способ доступа к api попроще, без протухающих токенов. Но я не понял, как сделать по-другому.
Онлайн курс Infrastructure as a code
Если у вас есть желание научиться автоматизировать свою работу, избавить себя и команду от рутины, рекомендую пройти онлайн курс Infrastructure as a code. в OTUS. Обучение длится 4 месяца.
Что даст вам этот курс:
- Познакомитесь с Terraform.
- Изучите систему управления конфигурацией Ansible.
- Познакомитесь с другими системами управления конфигурацией — Chef, Puppet, SaltStack.
- Узнаете, чем отличается изменяемая инфраструктура от неизменяемой, а также научитесь выбирать и управлять ей.
- В заключительном модуле изучите инструменты CI/CD: это GitLab и Jenkins
Смотрите подробнее программу по .


