
Encryption
Proxmox Backup supports client-side encryption with AES-256 in GCM
mode. To set this up, you first need to create an encryption key:
# proxmox-backup-client key create my-backup.key
Encryption Key Password: **************
The key is password protected by default. If you do not need this
extra protection, you can also create it without a password:
# proxmox-backup-client key create /path/to/my-backup.key --kdf none
Having created this key, it is now possible to create an encrypted backup, by
passing the parameter, with the path to the key file.
# proxmox-backup-client backup etc.pxar:/etc --keyfile /path/to/my-backup.key
Password: *********
Encryption Key Password: **************
...
Note
If you do not specify the name of the backup key, the key will be
created in the default location
.
will also search this location by default, in case the
parameter is not specified.
You can avoid entering the passwords by setting the environment
variables and .
Architecture
The Proxmox backup solution uses a client-server model. This separation allows multiple, unrelated hosts to use the backup server. While the server stores the backup data and provides an API to create and manage datastores, the client tool will work with most modern Linux distributions, allowing you to create and manage backups from all of your hosts. The software’s ability to encrypt data already on the client-side ensures that it is secure, before it even reaches the server.
Remote Synchronization
Proxmox Backup Server enables you to pull or synchronize datastores to other locations for redundancy. This is an efficient method to synchronize data to or from remote hosts. Only changes since the previous sync get transferred.
In Proxmox Backup, this works through the use of Remotes and Sync Jobs.
- The term Remote refers to a separate server, which has a datastore that can be synced to a local store.
- A Sync Job is the process which is used to pull the contents of a datastore from a Remote to a local datastore. You can schedule it to either run regularly or start a sync job manually via the web interface.
Central Management
The administration of Proxmox Backup Server is so simple that you don’t need to have a dedicated backup administrator. The integrated web-based configuration and management center enables you to set up and deploy backups, monitor tasks, logs and resource usage, and manage users, permissions, and datastores. It is so intuitive that even the helpdesk could perform recoveries.
Web-based user interface
Proxmox Backup Server comes with an integrated, graphical user interface (GUI) to manage the server. This means that you can carry out all administration tasks through your web browser (via https://youripaddress:8007). The web interface also provides a built-in console, so if you prefer the command line or need some extra control, you have a lot of options.


The user interface comes with an array of options for administrating the server:
- Get a quick overview of the most crucial information from the dashboard.
- Easily create and mange datastores.
- Browse file backups and select for restore.
- Monitor tasks, logs and resource usage.
- Manage users, access permissions, remote stores, and subscriptions.
- Access a secure HTML5 console.
- Manage network configuration and interfaces.
Command Line Interface (CLI)
For advanced users who are used to the comfort of the Unix shell, Proxmox provides a command line interface to accomplish special or very advanced tasks. The command line interface has intelligent tab completion and full UNIX man page documentation.
Step 1: Enable your disk to store backups
Normally your hardisk is enabled to be used for:
- Disk Image
- Iso Image
- Container Template
- Container
That means currently you can not store your virtual machine backup on your hardisk, so you need to make sure that your hard disk can store VZDump Backup File (file that is created after we initiate a virtual machine backup). Please follow the instruction in the image below:
- Click on Data Center
- Click on storage to list your server storage mediums.
- From list select the storage medium on which you need to store backups, we have only one so we selected it from the list.
- Once selected than click on Edit.
- You will than see that pop-up box that is currently displaced on the screen, from ‘Content’ drop down you can see that all other selections are highlighted blue, make sure VZDump Backup file is also highlighted in blue and click OK to save your changes.
Now your storage medium is ready to store backups.
Remote
A remote refers to a separate Proxmox Backup Server installation and a user on that
installation, from which you can sync datastores to a local datastore with a
Sync Job. You can configure remotes in the web interface, under Configuration
-> Remotes. Alternatively, you can use the subcommand. The
configuration information for remotes is stored in the file
.
To add a remote, you need its hostname or IP, a userid and password on the
remote, and its certificate fingerprint. To get the fingerprint, use the
command on the remote, or navigate to
Dashboard in the remote’s web interface and select Show Fingerprint.
# proxmox-backup-manager cert info |grep Fingerprint
Fingerprint (sha256): 64:d3:ff:3a:50:38:53:5a:9b:f7:50:...:ab:fe
Using the information specified above, you can add a remote from the Remotes
configuration panel, or by using the command:
# proxmox-backup-manager remote create pbs2 --host pbs2.mydomain.example --userid sync@pam --password 'SECRET' --fingerprint 64:d3:ff:3a:50:38:53:5a:9b:f7:50:...:ab:fe
Use the , , , subcommands of
to manage your remotes:
Proxmox VE Integration
Tight integration with the virtualization platform Proxmox VE makes Proxmox Backup Server a great choice for seamless backups of your virtual machines (supporting QEMU dirty bitmaps) and containers – even between remote locations. The intuitive web interface enables user-friendly management and makes it really easy to deploy, manage, and monitor backups.


After installing the Proxmox Backup Server on a dedicated host, simply add the backup storage as a new storage target on the Proxmox VE node (minimum pve-manager 6.2-9 installed). Then you can run backups the same way you would with any other Proxmox VE storage type. Security is ensured with a certificate fingerprint.
Подготовка к обновлению
Для начала информация для тех, у кого всё ещё 5-я версия. Обновите её по моей статье — Обновление Proxmox 5 до 6. После того, как сделаете это, возвращайтесь сюда. А мы готовимся обновить Proxmox 6 до 7. Я не буду заниматься самодеятельностью, а выполню то, что указано в официальном руководстве по обновлению — https://pve.proxmox.com/wiki/Upgrade_from_6.x_to_7.0. Если хорошо читаете по-английски, можете сразу переходить туда и делать по нему.
Перед обновлением важно ознакомиться со всеми нюансами:
- Версия Proxmox должна быть 6.4.
- Перед обновлением Proxmox нужно обязательно обновить Ceph до версии 15.2.
- Если используете Proxmox Backup Server, то не обновляйтесь до тех пор, пока не выйдет версия 2.0.
- У вас должны быть доступны все хранилища на момент обновления.
- На всякий случай должны быть сделаны бэкапы всех виртуальных машин и контейнеров.
- Должно быть доступно не менее 4GiB свободного места на корневом разделе.
- У вас изменится MAC адрес на сетевых бриджах vmbr. Подготовьтесь к этому заранее.
Перед обновлением обновим систему и перезагрузимся. Перезагружаться не обязательно, но я на всякий случай делаю это.
# apt update && apt dist-upgrade
# reboot
Теперь запускаем утилиту pve6to7, чтобы проверить готовность вашего гипервизора к обновлению.
# pve6to7
Я получил одно предупреждение. У одного контейнера отсутствует указанный в конфигурации диск. Это очень старый контейнер, который не нужен. Я просто удалил его. Запустил еще раз утилиту, предупреждений не было. После этого можно двигаться дальше.
Как я уже сказал ранее, после обновления у вас изменится MAC адрес сетевого бриджа vmbr. Если для вас это может сулить проблемы, то заранее укажите постоянный MAC. Для начала посмотрите текущие адреса:
# ip -c link
Затем укажите текущий MAC адрес бриджа в конфигурации сетевых интерфейсов /etc/network/interfaces.
auto vmbr0
iface vmbr0 inet static
    address 10.20.1.2/24
    hwaddress ae:9d:46:49:4d:23
    # ... остальные настройки
Клонирование виртуальной машины
Для примера, предположим, что в компании требуется внести изменения в какой-либо критичный сервис. Такое изменение реализуется через внесение множества правок в конфигурационные файлы. Результат при этом непредсказуем и любая ошибка способна вызвать сбой сервиса. Чтобы подобный эксперимент не затронул работающий сервер, рекомендуется выполнить клонирование виртуальной машины.


Механизм клонирования создаст точную копию виртуального сервера, с которой допустимо проводить любые изменения, при этом не затрагивая работу основного сервиса. Затем, если изменения будут успешно применены, новая VM запускается в работу, а старая выключается. В этом процессе есть особенность, о которой всегда следует помнить. На клонированной машине IP-адрес будет точно таким же, как и у исходной VM, то есть при ее запуске возникнет конфликт адресов.
Расскажем, как избежать такой ситуации. Непосредственно перед выполнением клонирования, следует внести изменения в конфигурацию сети. Для этого необходимо временно изменить IP-адрес, но не перезапускать сетевой сервис. После выполнения клонирования на основной машине следует вернуть настройки обратно, а на клонированной машине задать любой другой IP-адрес. Тем самым мы получим две копии одного и того же сервера на разных адресах. Это позволит быстро ввести новый сервис в работу.
Если этим сервисом является веб-сервер, то достаточно только изменить А-запись у Вашего DNS-провайдера, после чего запросы клиентов по этому доменному имени будут направляться уже на адрес клонированной виртуальной машины.
Клонирование VM в Proxmox является очень простой задачей. Для ее выполнения необходимо выполнить следующие действия:
- Перейти на нужную нам машину.
- Выбрать из меню More пункт Clone.
-
В открывшемся окне заполнить параметр Имя.
- Выполнить клонирование нажатием кнопки Clone.
Этот инструмент позволяет сделать копию виртуальной машины не только на локальном сервере. Если несколько серверов виртуализации объединить в кластер, то с помощью этого инструмента можно сразу переместить созданную копию на нужный физический сервер. Полезной функцией является выбор дискового хранилища (параметр Target Storage), что очень удобно при перемещении виртуальной машины с одного физического носителя на другой.
Что нового в Proxmox 7
Не хочется в рамках данной статьи подробно останавливаться на всех нововведениях 7-й версии, так как это всё можно посмотреть в официальном документе — https://forum.proxmox.com/threads/proxmox-ve-7-0-released.92007/. Плюс, было много переводов на популярных IT порталах. Скажу только, что каких-то кардинальных и революционных изменений в функционале не было. Обновление больше техническое. Вот краткий список основного, что поменялось:
- Proxmox 7 перешел на кодовую базу Debian 11. Немного странно, что сделано это раньше выхода релиза 11-й версии Дебиан.
- Обновилась версия Цеф — Ceph Pacific 16.2, обновилась QEMU до 6.0, LXC до 4.0.
- Появилась встроенная поддержка файловой системы btrfs. По мне, это наиболее интересное изменение.
- Следом за добавлением btrfs изменился и установщик.
- Появилась новая панель в веб интерфейсе для управления репозиториями.
- Добавлена поддержка авторизации с помощью OpenID Connect.
Там еще много менее значительных обновлений. Не стану все перечислять. Переходим лучше к самому обновлению.
The Open-Source Platform for Backup & Restore
Lost or corrupted data due to deletion, ransomware, or other dangers can occur at any time. Therefore, regular backup of important data is crucial. To increase productivity and meet your operational goals, the user friendly Proxmox Backup solution lets you back up your data in a space efficient manner, restore it in a flash, and effectively reduce work hours, thanks to simplified management.
Open-Source
Proxmox Backup is a stand-alone solution. The open-source nature of the Proxmox software stack means that you get a secure, flexible product that you can trust. The source code is free and open-source, licensed under the GNU Affero General Public License, v3 (GNU AGPL, v3). Thus, you are free to use the software, inspect the source code at any time, or contribute to the project yourself.
Incremental & Deduplication
Backups are sent incrementally from the client to the Proxmox Backup Server, where data is then deduplicated. Typically, changes between periodic backups are low. Reading and sending only the changes reduces the storage space used and the network impact.
Periodic backups usually produce large amounts of duplicate data. The deduplication layer in the Proxmox Backup solution reduces the amount of duplicate data, reducing the physical space required for data storage.


When doing deduplication, there are different strategies to get optimal results in terms of performance and/or deduplication rates. Depending on the type of data, data can be split into fixed or variable sized chunks; Proxmox Backup Server supports both strategies.
Performance
The whole Proxmox Backup software stack is written in Rust, a modern, fast, and memory-efficient language. Rust provides high speed and memory efficiency, due in part to its lack of runtime and garbage collector. It’s rich type system and ownership model guarantee memory-safety and thread-safety.
Step 4: Restore the backup
Final step is to restore the backup, you can restore backup via command line or GUI.
Restore backup from command line
Restoring backup files are pretty easy through command line:
cd /var/lib/vz/dump
qmrestore vzdump-qemu-122-2016_09_13-14_12_32.vma 500
|
1 |
cdvarlibvzdump qmrestore vzdump-qemu-122-2016_09_13-14_12_32.vma500 |
qmrestore is the command to restore VM, next is the virtual machine name “vzdump-qemu-122-2016_09_13-14_12_32.vma” and the last argument is the VM id (500), you can choose any VM ID that is not being used earlier.
Restore backup from Proxmox GUI
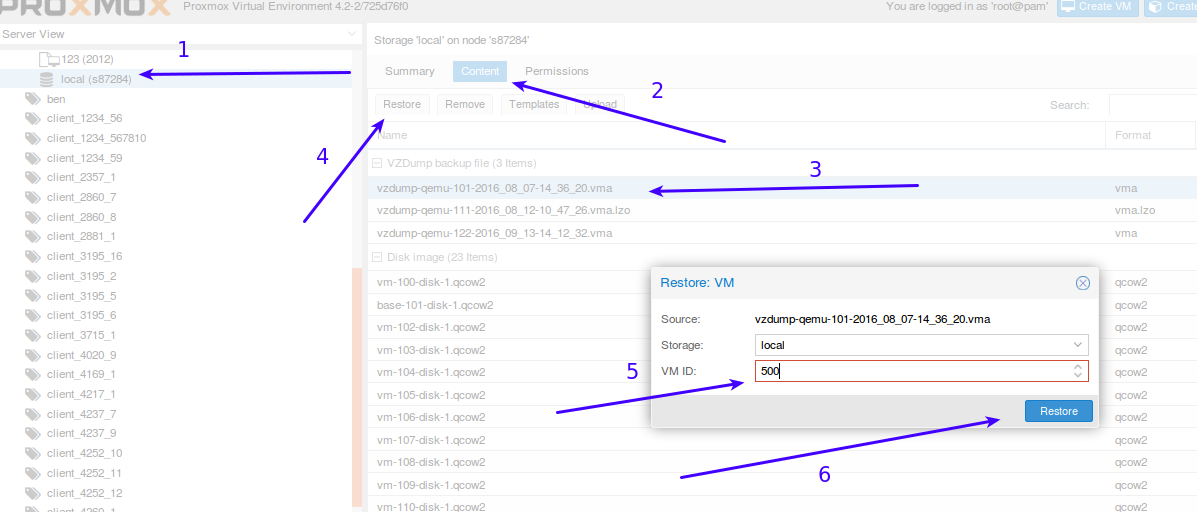
- Select local storage (normally here the transferred backup will be stored)
- Select “Content”.
- You will see the list of backups, select the one you just transferred.
- Once the backup is selected click Restore.
- Input the VM ID:500, or any other ID you want to give to the restored VM.
- Finally click Restore.
It will take some time and your VM will be restored to the VM ID you gave at step 5. That’s all to transfer virtual machine from one promox node to another, you can choose either the GUI or command line version but command line version have less head ache.
Заключение
Я выполнил обновление Proxmox VE до 7-й версии на своем домашнем тестовом гипервизоре. Никаких проблем в процессе не возникло. Тем не менее, не рекомендую обновлять прод, пока не выйдет хотя бы версия 7.1. Торопиться в таких делах нет никакого смысла. Можно вообще не обновляться, если вам не нужны нововведения. Никаких проблем не будет, если вы останетесь на старой версии, пока она еще поддерживается.
Онлайн курс «DevOps практики и инструменты»
Если у вас есть желание научиться строить и поддерживать высокодоступные и надежные системы, научиться непрерывной поставке ПО, мониторингу и логированию web приложений, рекомендую познакомиться с онлайн-курсом «DevOps практики и инструменты» в OTUS. Курс не для новичков, для поступления нужны базовые знания по сетям и установке Linux на виртуалку. Обучение длится 5 месяцев, после чего успешные выпускники курса смогут пройти собеседования у партнеров.


Проверьте себя на вступительном тесте и смотрите программу детальнее по .


