
How to update objects
You can also use to update all objects defined in a directory, even
if those objects already exist. This approach accomplishes the following:
- Sets fields that appear in the configuration file in the live configuration.
- Clears fields removed from the configuration file in the live configuration.
Here’s an example configuration file:
Create the object using :
Print the live configuration using :
The output shows that the annotation
was written to the live configuration, and it matches the configuration file:
Directly update the field in the live configuration by using .
This does not use :
Print the live configuration using :
The output shows that the field has been set to 2, and the
annotation does not contain a field:
Update the configuration file to change the image from
to , and delete the field:
Apply the changes made to the configuration file:
Print the live configuration using :
The output shows the following changes to the live configuration:
- The field retains the value of 2 set by .
This is possible because it is omitted from the configuration file. - The field has been updated to from .
- The annotation has been updated with the new image.
- The field has been cleared.
- The annotation no longer contains the field.
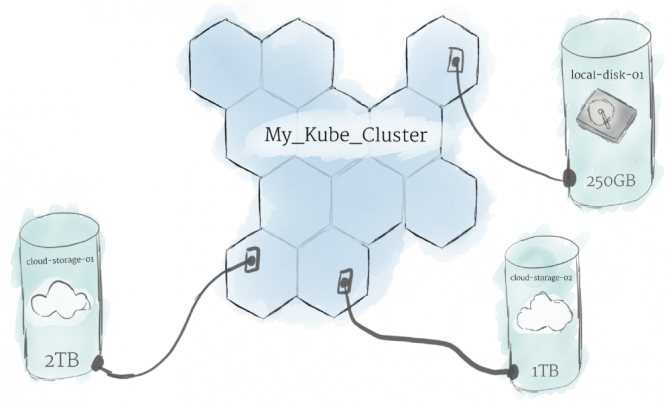
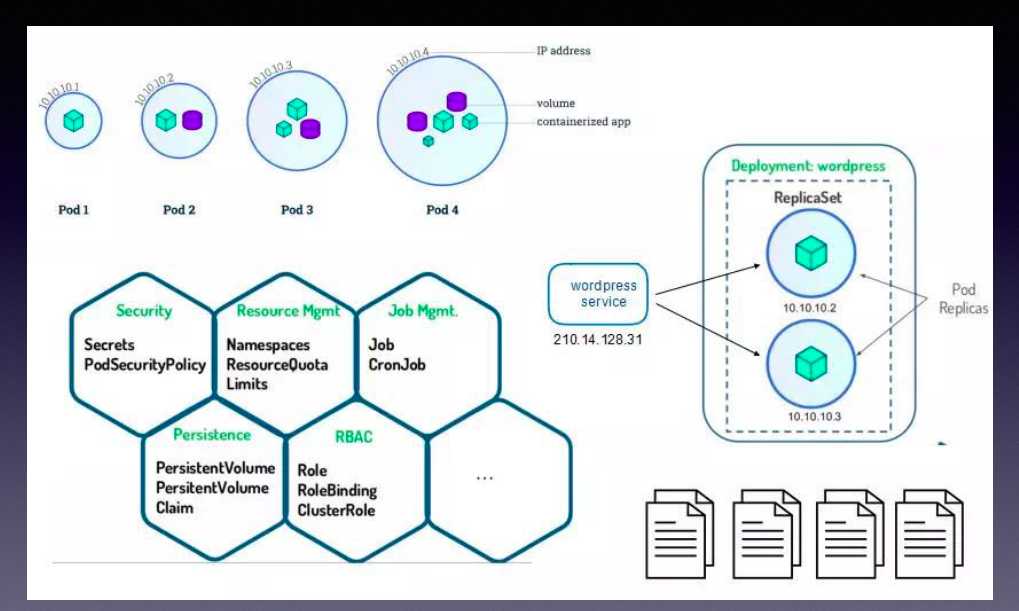
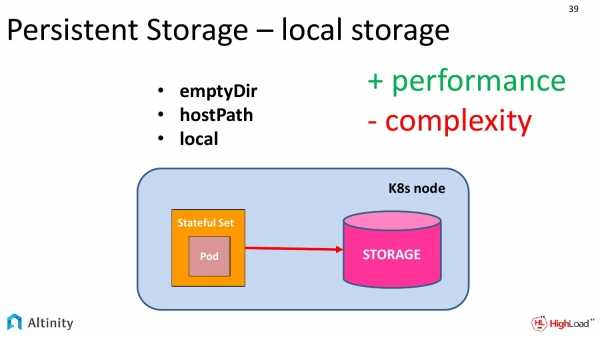
Local Persistent Volume — хранилище Kubernetes на локальных дисках
Локальные тома, как и nfs, не имеют встроенного провизионера, так что нарезать их можно только вручную, создавая PV. Есть внешний provisioner — https://github.com/kubernetes-sigs/sig-storage-local-static-provisioner, но лично я его не проверял.
Создаем SC sc-local.yaml.
YAML
kind: StorageClass
apiVersion: storage.k8s.io/v1
metadata:
name: local-storage
provisioner: kubernetes.io/no-provisioner
volumeBindingMode: WaitForFirstConsumer
|
1 |
kind: StorageClass apiVersion: storage.k8s.io/v1 metadata name: local-storage provisioner: kubernetes.io/no-provisioner volumeBindingMode: WaitForFirstConsumer |
Создаем вручную PV pv-local-node-1.yaml, который будет располагаться на kub-node-1 в /mnt/local-storage. Эту директорию необходимо вручную создать на сервере.
YAML
apiVersion: v1
kind: PersistentVolume
metadata:
name: pv-local-node-1
spec:
capacity:
storage: 10Gi
volumeMode: Filesystem
accessModes:
— ReadWriteOnce
persistentVolumeReclaimPolicy: Retain
storageClassName: local-storage
local:
path: /mnt/local-storage
nodeAffinity:
required:
nodeSelectorTerms:
— matchExpressions:
— key: kubernetes.io/hostname
operator: In
values:
— kub-node-1
|
1 |
apiVersion: v1 kind: PersistentVolume metadata name: pv-local-node-1 spec capacity storage: 10Gi volumeMode: Filesystem accessModes -ReadWriteOnce persistentVolumeReclaimPolicy: Retain storageClassName: local-storage local path: /mnt/local-storage nodeAffinity required nodeSelectorTerms — matchExpressions — key: kubernetes.io/hostname operator: In values -kub-node-1 |
Создаем PVC pvc-local.yaml для запроса сторейджа, который передадим поду.
YAML
—
kind: PersistentVolumeClaim
apiVersion: v1
metadata:
name: local-volume
spec:
storageClassName: «local-storage»
accessModes:
— ReadWriteOnce
resources:
requests:
storage: 10Gi
|
1 |
— kind: PersistentVolumeClaim apiVersion: v1 metadata name: local-volume spec storageClassName: «local-storage» accessModes -ReadWriteOnce resources requests storage: 10Gi |
И в завершении создадим тестовый POD pod-with-pvc-local.yaml для проверки работы local storage.
YAML
kind: Pod
apiVersion: v1
metadata:
name: pod-with-pvc-local
spec:
containers:
— name: app
image: alpine
volumeMounts:
— name: data
mountPath: /mnt
command: [«/bin/sh»]
args:
volumes:
— name: data
persistentVolumeClaim:
claimName: local-volume
|
1 |
kind: Pod apiVersion: v1 metadata name: pod-with-pvc-local spec containers — name: app image: alpine volumeMounts — name: data mountPath: /mnt command: [«/bin/sh»] args: [«-c»,»sleep 500000″ volumes — name: data persistentVolumeClaim claimName: local-volume |
Применяем все вышеперечисленное в строго определенном порядке:
- SC
- PV
- PVC
- POD
YAML
# kubectl apply -f sc-local.yaml
# kubectl apply -f pv-local-node-1.yaml
# kubectl apply -f pvc-local.yaml
# kubectl apply -f pod-with-pvc-local.yaml
|
1 |
# kubectl apply -f sc-local.yaml # kubectl apply -f pv-local-node-1.yaml # kubectl apply -f pvc-local.yaml # kubectl apply -f pod-with-pvc-local.yaml |
После этого посмотрите статус всех запущенных абстракций.
Проверим, что Local Persistent Volume правильно работает. Зайдем в под и создадим тестовый файл.
# kubectl exec -it pod-with-pvc-local sh
# echo «local srorage test» >> /mnt/local.txt
Теперь идем на сервер kub-node-1 и проверяем файл.
YAML
# cat /mnt/local-storage/local.txt
local srorage test
|
1 |
# cat /mnt/local-storage/local.txt localsroragetest |
Все в порядке. Файл создан.
Если у вас возникли какие-то проблемы с POD, то в PVC будет ошибка:
YAML
waiting for first consumer to be created before binding
| 1 | waitingforfirstconsumertobecreatedbeforebinding |
И в это же время в поде:
YAML
0/6 nodes are available: 1 node(s) didn’t find available persistent volumes to bind, 5 node(s) had taints that the pod didn’t tolerate.
| 1 | 0/6nodesareavailable: 1 node(s) didn’t find available persistent volumes to bind,5node(s)hadtaintsthatthepoddidn’ttolerate. |
Возникли ошибки из-за того, что в описании PV я ошибся в названии сервера, где будет доступен local storage. В итоге pod запускался, проверял pvc, а pvc смотрел на pv и видел, что адрес ноды с pv не соответствует имени ноды, где будет запущен pod. В итоге все висело в ожидании разрешения этих несоответствий.
How is it different from a HostPath Volume?
To better understand the benefits of a Local Persistent Volume, it is useful to
compare it to a .
HostPath volumes mount a file or directory from
the host node’s filesystem into a Pod. Similarly a Local Persistent Volume
mounts a local disk or partition into a Pod.
The biggest difference is that the Kubernetes scheduler understands which node a
Local Persistent Volume belongs to. With HostPath volumes, a pod referencing a
HostPath volume may be moved by the scheduler to a different node resulting in
data loss. But with Local Persistent Volumes, the Kubernetes scheduler ensures
that a pod using a Local Persistent Volume is always scheduled to the same node.
While HostPath volumes may be referenced via a Persistent Volume Claim (PVC) or
directly inline in a pod definition, Local Persistent Volumes can only be
referenced via a PVC. This provides additional security benefits since
Persistent Volume objects are managed by the administrator, preventing Pods from
being able to access any path on the host.
Additional benefits include support for formatting of block devices during
mount, and volume ownership using fsGroup.
Complementary features
Pod priority and preemption is another Kubernetes feature that is complementary to local persistent volumes. When your application uses local storage, it must be scheduled to the specific node where the local volume resides. You can give your local storage workload high priority so if that node ran out of room to run your workload, Kubernetes can preempt lower priority workloads to make room for it.
Pod disruption budget is also very important for those workloads that must maintain quorum. Setting a disruption budget for your workload ensures that it does not drop below quorum due to voluntary disruption events, such as node drains during upgrade.
ensures that your workloads stay either co-located or spread out across failure domains. If you have multiple local persistent volumes available on a single node, it may be preferable to specify an pod anti-affinity policy to spread your workload across nodes. Note that if you want multiple pods to share the same local persistent volume, you do not need to specify a pod affinity policy. The scheduler understands the locality constraints of the local persistent volume and schedules your pod to the correct node.
Data source references
The field behaves almost the same as the field. If either one is
specified while the other is not, the API server will give both fields the same value. Neither
field can be changed after creation, and attempting to specify different values for the two
fields will result in a validation error. Therefore the two fields will always have the same
contents.
There are two differences between the field and the field that
users should be aware of:
- The field ignores invalid values (as if the field was blank) while the
field never ignores values and will cause an error if an invalid value is
used. Invalid values are any core object (objects with no apiGroup) except for PVCs. - The field may contain different types of objects, while the field
only allows PVCs and VolumeSnapshots.
Users should always use on clusters that have the feature gate enabled, and
fall back to on clusters that do not. It is not necessary to look at both fields
under any circumstance. The duplicated values with slightly different semantics exist only for
backwards compatibility. In particular, a mixture of older and newer controllers are able to
interoperate because the fields are the same.
Using volume populators
Volume populators are controllers that can
create non-empty volumes, where the contents of the volume are determined by a Custom Resource.
Users create a populated volume by referring to a Custom Resource using the field:
Because volume populators are external components, attempts to create a PVC that uses one
can fail if not all the correct components are installed. External controllers should generate
events on the PVC to provide feedback on the status of the creation, including warnings if
the PVC cannot be created due to some missing component.
You can install the alpha volume data source validator
controller into your cluster. That controller generates warning Events on a PVC in the case that no populator
is registered to handle that kind of data source. When a suitable populator is installed for a PVC, it’s the
responsibility of that populator controller to report Events that relate to volume creation and issues during
the process.
Установка Helm 3
Установить Helm можно различными способами, но самый простой и быстрый — скачать и использовать готовый бинарник. Не так давно увидел свет свежий релиз Helm 3. Мы будем использовать именно его. В связи с этим многие приложения из репозиториев могут не устанавливаться или устанавливаться с ошибками, так как еще не поддерживают 3-ю версию. Проще было бы пока использовать 2-ю, но мне не хочется разбирать старую версию. Надо учиться работать с новой. Переход все равно неизбежен.
Идем на страницу загрузок и копируем ссылку на последнюю стабильную версию. Качаем, распаковываем и устанавливаем в систему. В моем случае я ставлю на master-1, так как все управление кластером веду с него.
# wget https://get.helm.sh/helm-v3.0.0-linux-amd64.tar.gz
# tar xzvf helm-v3.0.0-linux-amd64.tar.gz
# mv linux-amd64/helm /usr/local/bin/helm
Проверяем установленную версию.
# helm version
После установки самого helm, надо подключить репозиторий. По-умолчанию ни один из них не подключен. Поставим самый популярный дефолтный репозиторий.
# helm repo add stable https://kubernetes-charts.storage.googleapis.com/
Проверяем.
# helm search repo stable
Вы должны увидеть список всех чартов (charts), которые могут быть установлены из этого репозитория. По сути это набор приложений, которые может развернуть в kubernetes helm.
Обновить репозиторий можно командой.
# helm repo update
Все как в привычных пакетных менеджерах. Рекомендуется обновлять репозиторий перед установкой, чтобы забрать самую свежую версию приложения, которое будет развернуто в кластере с помощью Helm 3.
Искать в репозиториях helm можно ключом search (вот это да 
# helm search hub wordpress
Restoring an etcd cluster
etcd supports restoring from snapshots that are taken from an etcd process of
the major.minor version. Restoring a version from a
different patch version of etcd also is supported. A restore operation is
employed to recover the data of a failed cluster.
Before starting the restore operation, a snapshot file must be present. It can
either be a snapshot file from a previous backup operation, or from a remaining
.
Here is an example:
For more information and examples on restoring a cluster from a snapshot file, see
.
If the access URLs of the restored cluster is changed from the previous
cluster, the Kubernetes API server must be reconfigured accordingly. In this
case, restart Kubernetes API servers with the flag
instead of the flag
. Replace and
with the respective IP addresses. If a load balancer is
used in front of an etcd cluster, you might need to update the load balancer
instead.
If the majority of etcd members have permanently failed, the etcd cluster is
considered failed. In this scenario, Kubernetes cannot make any changes to its
current state. Although the scheduled pods might continue to run, no new pods
can be scheduled. In such cases, recover the etcd cluster and potentially
reconfigure Kubernetes API servers to fix the issue.

Feedback
Was this page helpful?
Yes
No
Thanks for the feedback. If you have a specific, answerable question about how to use Kubernetes, ask it on
Stack Overflow.
Open an issue in the GitHub repo if you want to
report a problem
or
suggest an improvement.
Last modified
March 30, 2021 at 9:30 PM PST
: Corrected a clarification based on the review (e6e3f00a4)
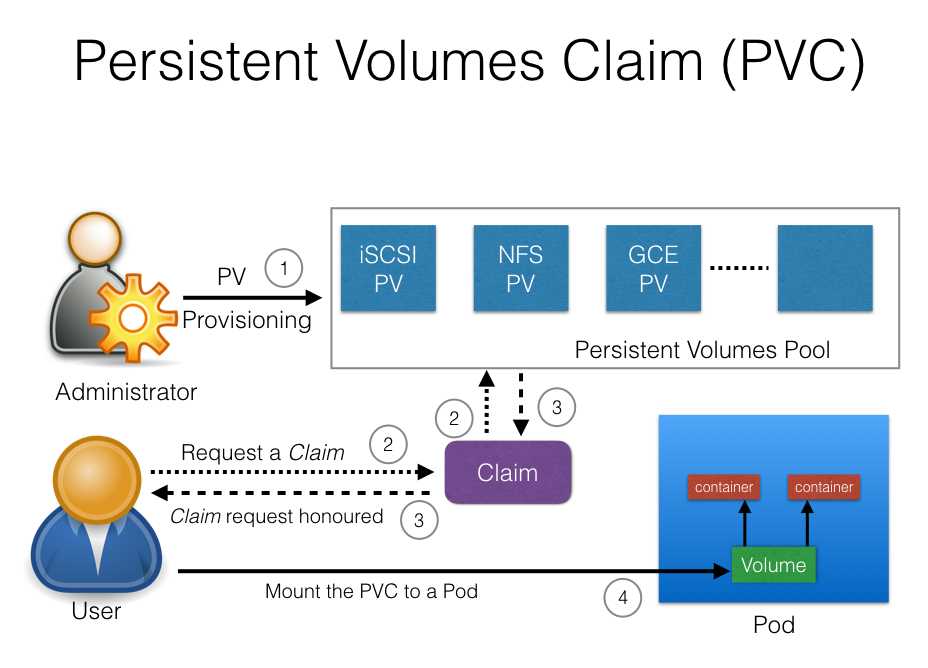
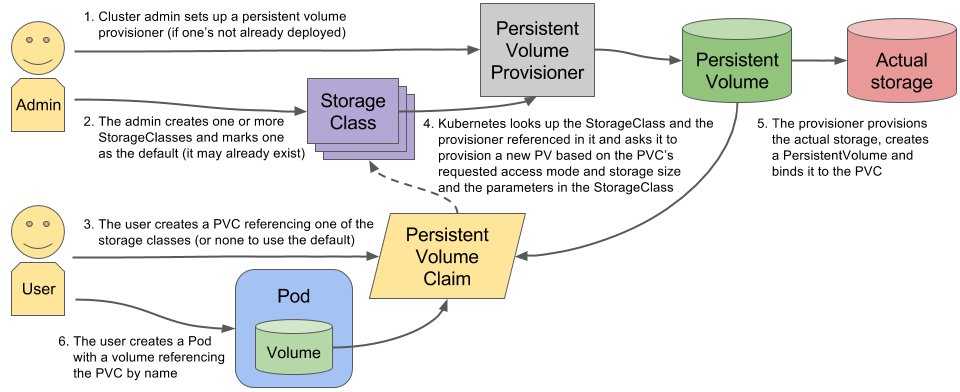
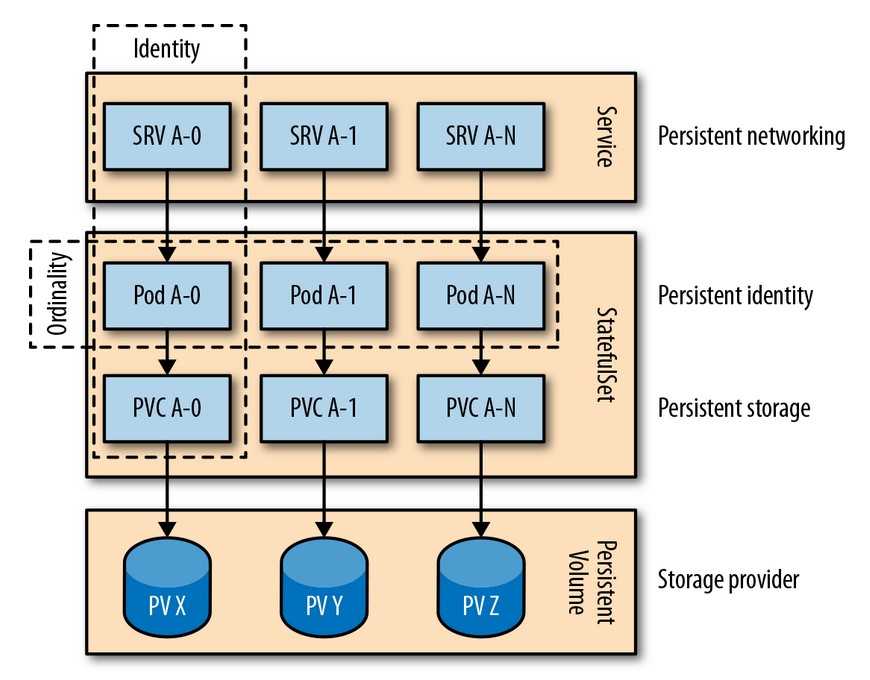
A (very) short introduction to Persistent Volumes and Persistent Volume Claims
Kubernetes provides an API to separate storage from computation, i.e., a pod can perform computations while the files in use are stored on a separate resource. The API introduces 2 types of resources:
- PersistentVolumes are used to define a storage volume in the system, but their lifecycle is independant of the ones of the pods that use them. PersistentVolumes are Volume plugins and the API supports a large variety of implementation, including NFS, Glusterfs, CephFS, as well as cloud-providers such as GCEPersistentDisk, AWSElasticBlockStore, AzureFile and AzureDisk, amongst others.
- PersistentVolumeClaims are requests emitted by pods to obtain a volume. Once obtained, the volume is mounted on a specific path in the pod, while providing an abstraction to the underlying storage system. A claim may specify a attribute to obtain a PersistentVolume that satisfies the specific needs of the pod.
Note that if no PersistentVolume matches the attribute of the requesting PersistentVolumeClaim, the cluster will attempt to create a new one dynamically.
What Are Suitable Use Cases?
The primary benefit of Local Persistent Volumes over remote persistent storage
is performance: local disks usually offer higher IOPS and throughput and lower
latency compared to remote storage systems.
However, there are important limitations and caveats to consider when using
Local Persistent Volumes:
- Using local storage ties your application to a specific node, making your
application harder to schedule. Applications which use local storage should
specify a high priority so that lower priority pods, that don’t require local
storage, can be preempted if necessary. - If that node or local volume encounters a failure and becomes inaccessible, then
that pod also becomes inaccessible. Manual intervention, external controllers,
or operators may be needed to recover from these situations. - While most remote storage systems implement synchronous replication, most local
disk offerings do not provide data durability guarantees. Meaning loss of the
disk or node may result in loss of all the data on that disk
For these reasons, local persistent storage should only be considered for
workloads that handle data replication and backup at the application layer, thus
making the applications resilient to node or data failures and unavailability
despite the lack of such guarantees at the individual disk level.
Examples of good workloads include software defined storage systems and
replicated databases. Other types of applications should continue to use highly
available, remotely accessible, durable storage.
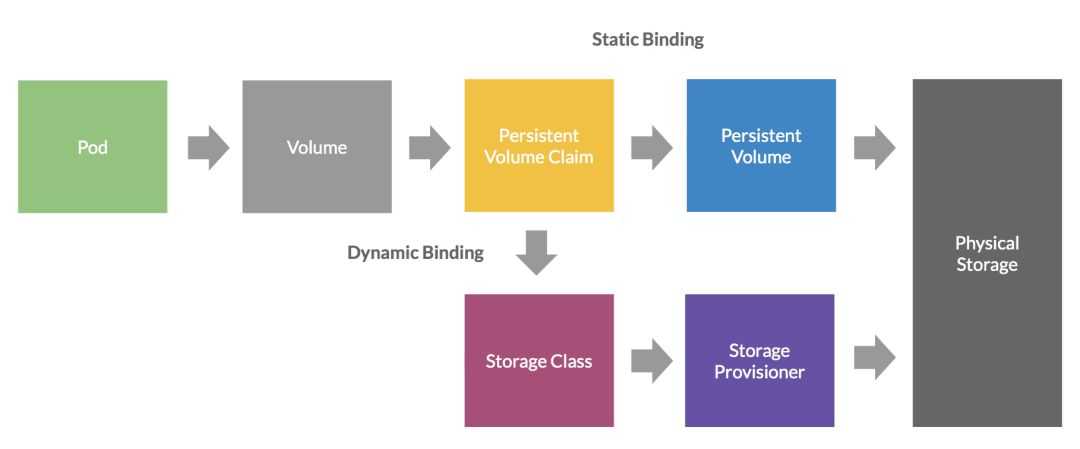
Background
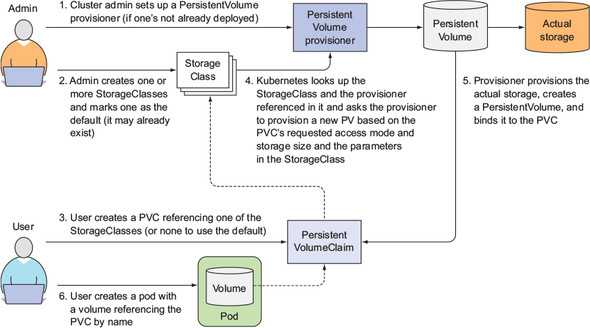
The implementation of dynamic volume provisioning is based on the API object
from the API group . A cluster administrator can define as many
objects as needed, each specifying a volume plugin (aka
provisioner) that provisions a volume and the set of parameters to pass to
that provisioner when provisioning.
A cluster administrator can define and expose multiple flavors of storage (from
the same or different storage systems) within a cluster, each with a custom set
of parameters. This design also ensures that end users don’t have to worry
about the complexity and nuances of how storage is provisioned, but still
have the ability to select from multiple storage options.
More information on storage classes can be found
here.
How to delete objects
There are two approaches to delete objects managed by .
Recommended:
Manually deleting objects using the imperative command is the recommended
approach, as it is more explicit about what is being deleted, and less likely
to result in the user deleting something unintentionally:
Alternative:
Only use this if you know what you are doing.
As an alternative to , you can use to identify objects to be deleted after their
configuration files have been removed from the directory. Apply with
queries the API server for all objects matching a set of labels, and attempts
to match the returned live object configurations against the object
configuration files. If an object matches the query, and it does not have a
configuration file in the directory, and it has a annotation,
it is deleted.
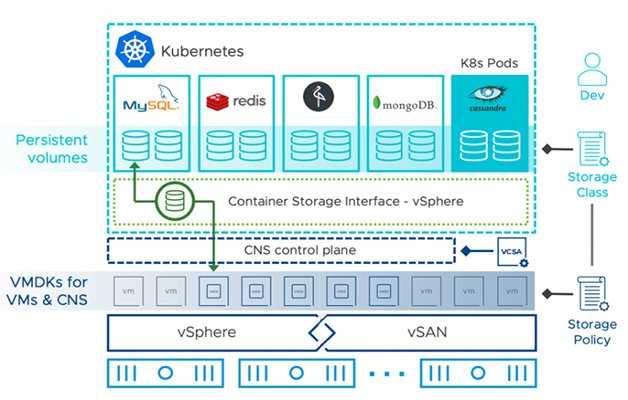
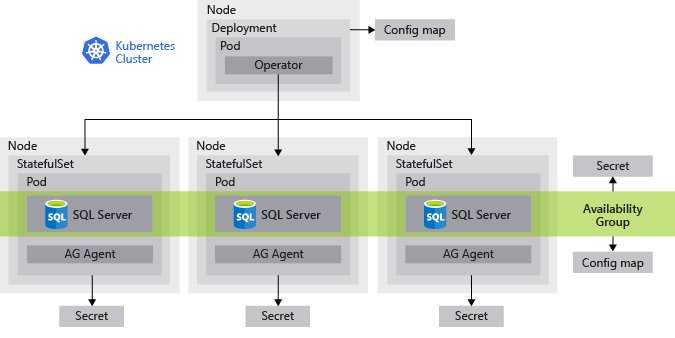
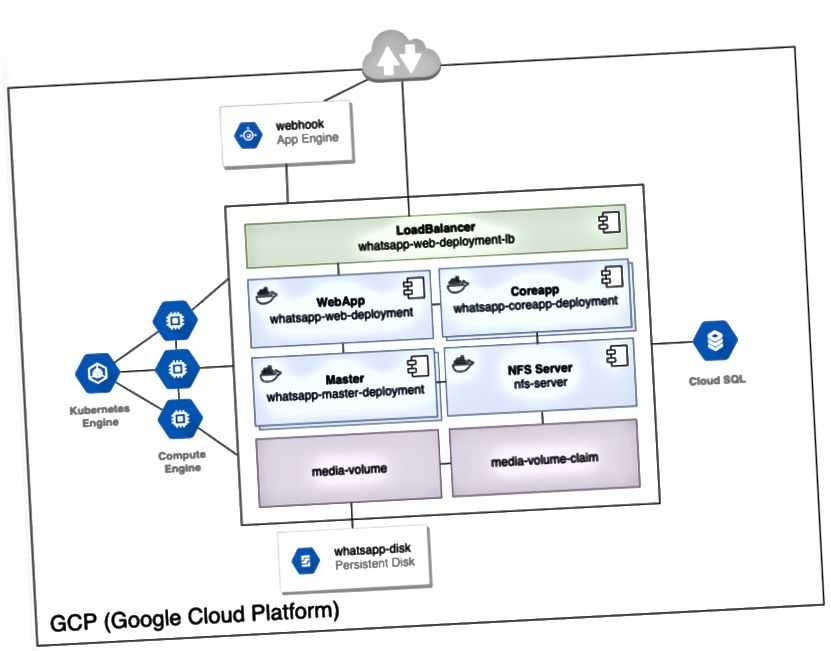
Как Kubernetes работает с базами данных
Kubernetes изначально разработали для stateless-приложений, которые обрабатывают данные, но ничего не хранят, например, микросервисы или веб-приложения. Базы данных находятся на другом конце спектра, то есть это — stateful-приложения. И Kubernetes для таких приложений изначально был не предназначен.
Однако есть фичи, которые появились в Kubernetes в последнее время и позволяют использовать базы данных и другие stateful-приложения:
- Концепт StatefulSet — целая серия примитивов для обработки событий об остановке работы подов и осуществления Graceful Shutdown (предсказуемого завершения работы приложения).
- Persistent Volumes — хранилища данных, которые связаны с подами, объектами управления Kubernetes.
- Operator Framework — то есть возможность создавать компоненты для управления базами данных и другими stateful-приложениями, распределенными на многих узлах.
Уже сейчас в публичных облаках есть крупные Database as a Service, в бэкенде которых Kubernetes, например: CockroachCloud, InfluxDB, PlanetScale. То есть база данных на Kubernetes — это не только то, что теоретически возможно, но и то, что работает на практике.
У Percona есть два open source решения для Kubernetes:
- Kubernetes Operator for Percona Server for MongoDB.
- Kubernetes Operator for XtraDB CLUSTER — сервис, который совместим с MySQL, обеспечивает высокую доступность и консистентность. Также можно использовать single node, если высокая доступность не нужна, например для dev database.
Пользователей Kubernetes можно разделить на две группы. Одни используют Kubernetes Operators напрямую — это, в основном, продвинутые пользователи, которые хорошо понимают, как работает технология. Другие запускают его на бэкенде — таким пользователям интересно что-то вроде Database as a Service, они не хотят вникать в нюансы работы Kubernetes. Для второй группы пользователей у нас есть еще одно open source решение — Percona DBaaS CLI Tool. Это экспериментальное решение для тех, кто хочет получить open source DBaaS на основе Kubernetes без глубокого понимания технологии.
Установка WordPress в Kubernetes
Скачать чарт для изучения или изменения можно следующей командой на примере чарта c установкой wordpress.
# helm fetch bitnami/wordpress --untar
В директорию wordpress будет скачан полностью chart, который вы можете изучить. О структуре helm чартов я рассказывать не буду. Есть хорошая статья на хабре на эту тему. Давайте отредактируем манифест чарта и установим wordpress в кластер Kubernetes с помощью Helm.
# helm inspect values bitnami/wordpress > wordpress.yaml
В манифесте вы можете изменить данные пользователя wordpress, который будет создан автоматически, а так же некоторые другие параметры. Меня тут больше всего интересуют настройки ingress, который по-умолчанию не используется. Я это изменяю, включаю ingress и назначаю имя для сайта — kuber.serveradmin.ru. Оно нам пригодится в других статьях. Например, при получении сертификатов от let’s encrypt. Можно тут же включить certManager, но это не тема данной статьи, поэтому не буду этого делать.


ingress:
  enabled: true
  hostname: kuber.serveradmin.ru
Так же в манифесте указаны PVC для самого сайта и базы mariadb с характеристиками ReadWriteOnce, 10Gi и 8Gi. Подробно о pvc и работе с дисками я рассказывал в статье по работе с volumes в kubernetes. Если у вас нет provisioner, который автоматически создаст PV, то сделайте это сами. Если не хотите, то просто отключите эти запросы. Для теста можно и без них обойтись.
Устанавливаем wordpress в kubernetes через helm 3 в отдельный namespace.
# kubectl create namespace wordpress
# helm install wordpress --namespace wordpress bitnami/wordpress -f wordpress.yaml
Наблюдать в реальном времени за созданием подов можно с помощью команды.
# kubectl get pod -w -o wide --namespace wordpress
Убедитесь, что у вас работает настройка ingress для wordpress.
# kubectl get ingress -o wide --namespace wordpress
NAME        HOSTS                  ADDRESS     PORTS   AGE
wordpress   kuber.serveradmin.ru   10.1.4.39   80      54s
Добавляйте этот адрес и имя сайта в hosts и идите проверять работу блога.
Пароль пользователя wordpress хранится в secret. Инструкция о том, как его посмотреть будет дана в консоли после установки.
# kubectl get secret --namespace wordpress wordpress -o jsonpath="{.data.wordpress-password}" | base64 --decode
После того, как наиграетесь, удалить установленный через helm софт можно командой.
# helm uninstall wordpress --namespace wordpress
Не забывайте указывать namespace. Я периодически забываю и не понимаю сразу, почему команда helm не отрабатывает. Например, посмотреть список установленных чартов можно командой.
# helm ls --namespace wordpress
NAME     	NAMESPACE	REVISION	UPDATED                              	STATUS  	CHART          	APP VERSION
wordpress	wordpress	1       	2019-11-25 17:06:11.3688785 +0300 MSK	deployed	wordpress-8.0.1	5.3.0
Указание namespace обязательно. Без него будет выведена пустота.
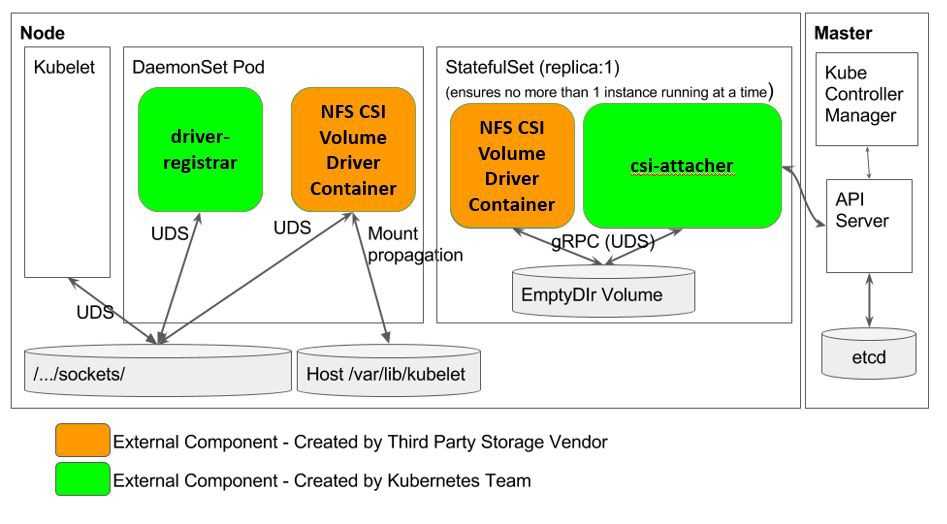
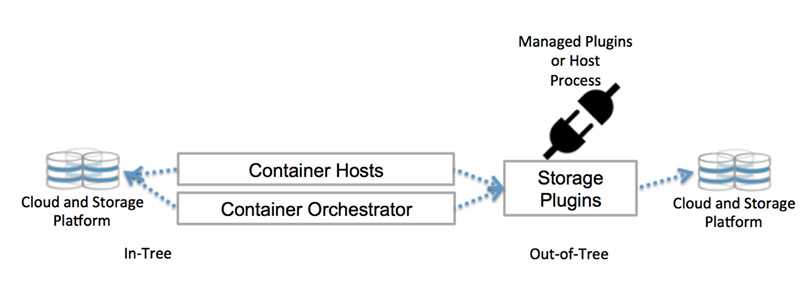
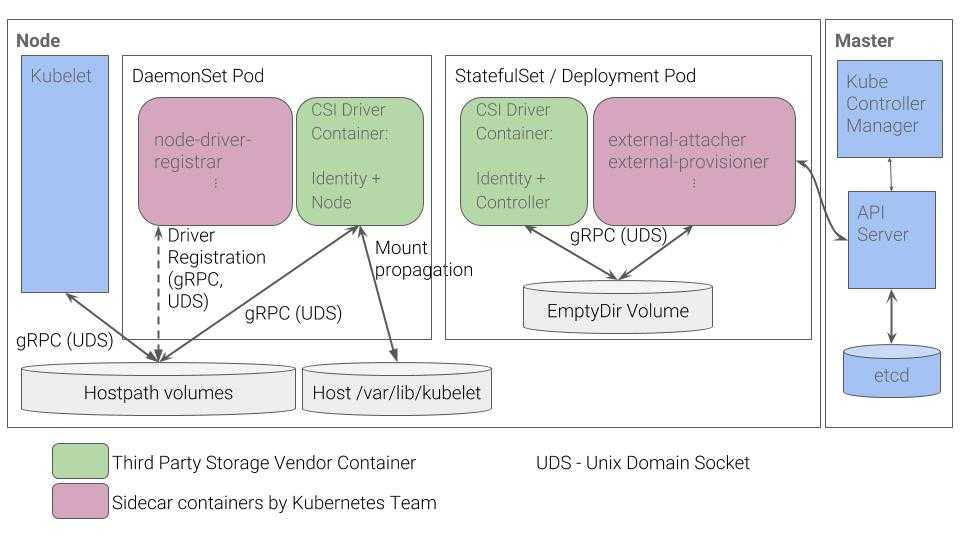
Хранение — перемещаем CSI и локальное хранилище в бета
Это важнейший релиз для групп по конкретной проблеме (SIG), венчающий их работу над многочисленными функциями. Реализация Kubernetes интерфейса хранения контейнеров (Container Storage Interface (CSI)) переходит в бета-версию релиза: установить новые плагины тома так же просто, как развернуть pod. Это позволяет сторонним провайдерам хранилищ развивать свои решения независимо от основного кода Kubernetes. Так мы расширяем экосистему Kubernetes.
Надежное управление локальным (non-shared) хранилищем в этом релизе дошло до беты, что позволяет создать постоянный том на локально подключенном (не подключенном к сети) хранилище. Так мы получаем более высокую производительность и меньшую стоимость распределенных файловых систем и баз данных.
В этом релизе много обновлений для постоянных томов (Persistent Volumes). Kubernetes может автоматически предотвратить удаление как Persistent Volume Claims, используемых подом (бета), так и Persistent Volume, связанного с Persistent Volume Claim (бета). Так мы гарантируем, что объекты API-хранилищ будут удаляться в правильном порядке.
Для старта понадобятся время, деньги и администраторы, разбирающиеся в Kubernetes
Первая статья расходов — на специалистов, которые умеют работать с этой системой и смогут обслуживать кластер. Это дорогие ребята, на рынке их немного, и нанять трудно.
Почему Kubernetes сильно увеличивает расходы на специалистов? Вроде бы развернуть кластер несложно, для этого есть официальная документация и инсталляторы, например или Kubeadm. Однако если в компании есть инженер, который может прочитать строчку документации и разобраться, как поставить Kubernetes на серверы с помощью одной команды, это еще не все, этим его работа не ограничится.
В реальности развернуть кластер только половина дела. В таком виде он будет работать до первой проблемы, которая неизбежно возникнет через неделю или месяц. Например, перестанут создаваться поды из-за неверной конфигурации ресурсов на controller-manager. Или кластер начнет работать нестабильно из-за проблем с дисками у etcd. Или запущенные СronJob из-за ошибок controller-manager начнут бесконечно плодить новые поды. Или в кластере будут возникать сетевые ошибки из-за неправильного выбора конфигурации DNS.
В общем, проблем может быть много, поэтому нужен отдельный человек, знающий, как развернуть кластер, как дебажить, как запускать приложения в производственной среде.
Кроме того, вместе с Kubernetes в компании появляются новые потребности, например мониторинг для выявления ошибок, система хранения данных, сбор логов. Кластер нужно развивать, чтобы получить от технологии ожидаемый профит. Это требует времени, поэтому даже опытному администратору не получится выделить неделю для настройки кластера и какие-то часы для администрирования.
Скорее всего, понадобится человек на фултайм, который будет заниматься только Kubernetes, поддержкой и развитием кластера. В большой компании может родиться отдел для поддержки инфраструктуры.
По этой причине Self-Hosted Kubernetes в большинстве случаев могут успешно запустить только крупные компании, где есть возможность выделить сотрудников для обслуживания кластера и нет потребности экономить ресурсы.
Кроме того, самостоятельное развертывание кластера — дело небыстрое. Если понадобится запустить кластер в короткие сроки для проекта или тестовых сред, то на Self-Hosted это не выйдет: развертывание займет несколько часов, а то и недель. К этому стоит быть готовыми. Для сравнения: в облаке вы запустите кластер KaaS за 10 минут и сможете сразу его использовать, но это получается потому, что над инфраструктурной частью уже заранее поработали специалисты провайдера.
Главные фичи Kubernetes на платформе MCS
- Интерфейс управления для создания кластера в несколько кликов, масштабирования и настройки.
- Автоматическое масштабирование узлов кластера в большую или меньшую сторону, то есть добавление или удаление нод (Cluster Autoscaler).
- Встроенный мониторинг на основе Prometheus Operator и Grafana. Многие наши пользователи начинают с базовых инсталляций, где запускается приложение. Когда оно выходит в продуктив, это позволяет им мониторить сервисы и сам кластер.
- Свой Terraform-провайдер для Kubernetes. Он полностью поддерживает API MCS.
- Интеграция с Docker Registry для хранения и управления образами.
- Автоматизированное развёртывание федеративных кластеров Kubernetes на базе AWS и Mail.ru Cloud Solutions (о чём мы писали тут).
- Возможность сделать Start/Stop для кластера целиком — экономия для тестовых сред. Вы можете выключить кластер одним кликом в интерфейсе и платить только за диски в случае остановленных кластеров.
- Поддержка создания Node Pools, пулов виртуальных машин разных размеров: можно запускать тяжелые задачи на больших машинах, веб-приложения на маленьких. Масштабировать группы можно независимо и размещать их в разных регионах либо зонах доступности (для большей надежности и доступности).
- Persistent Volumes интегрированы с системой хранения OpenStack.
- Поддержка приватных кластеров, доступных только через VPN-соединение.
- Поддерживается Cluster Policy: Local, которая позволяет получать реальные IP пользователей внутри кластеров.
- Создание и масштабирование кластеров Kubernetes с помощью UI или API MCS, управление сущностями через Kubernetes dashboard и kubectl.
- Плавное обновление (rolling update) в один клик без простоя как для минорных, так и для мажорных версий. Обновления кластеров до 1.16.
- На момент написания статьи мы поддерживаем Kubernetes вплоть до версии 1.17.
Создание кластера Kubernetes в несколько кликов
- CI/CD aaS, интегрированный с Kubernetes и другими сервисами платформы: дополнительные сервисы, которые обеспечивают CI/CD, на базе наших собственных доработок OpenStack.
- Логирование aaS для приложений приложений, которые работают в нашем Kubernetes. Логирование будет реализовано на базе нескольких решений OpenStack.
- Service mesh: у нас появятся плагины для Kubernetes, которые в рамках реализации service mesh будут выполнять шифрование, бэкапирование и другие функции.
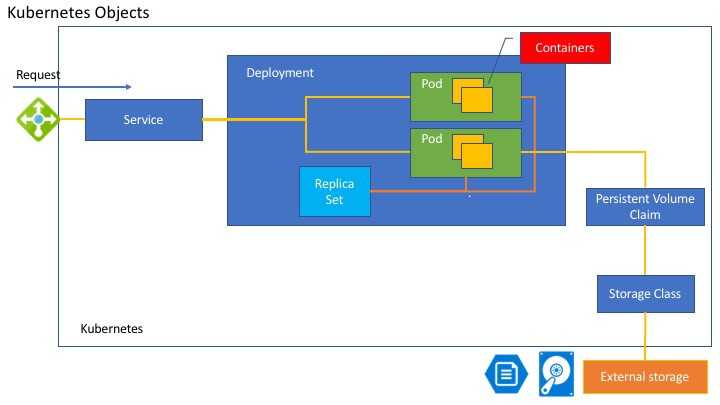
Storage Classes
StorageClass позволяет описать классы хранения, которые предлагают хранилища. Например, они могут отличаться по скорости, по политикам бэкапа, либо какими-то еще произвольными политиками. Каждый StorageClass содержит поля provisioner, parameters и reclaimPolicy, которые используются, чтобы динамически создавать PersistentVolume.

Можно создать дефолтный StorageClass для тех PVC, которые его вообще не указывают. Так же storage class хранит параметры подключения к реальному хранилищу. PVC используют эти параметры для подключения хранилища к подам.
Важный нюанс. PVC зависим от namespace. Если у вас SC будет с секретом, то этот секрет должен быть в том же namespace, что и PVC, с которого будет запрос на подключение.
Defaulting Behavior
Dynamic provisioning can be enabled on a cluster such that all claims are
dynamically provisioned if no storage class is specified. A cluster administrator
can enable this behavior by:
- Marking one object as default;
- Making sure that the
is enabled on the API server.
An administrator can mark a specific as default by adding the
annotation to it.
When a default exists in a cluster and a user creates a
with unspecified, the
admission controller automatically adds the
field pointing to the default storage class.
Note that there can be at most one default storage class on a cluster, or
a without explicitly specified cannot
be created.
Getting involved
If you have feedback for this feature or are interested in getting involved with the design and development, join the Kubernetes Storage Special-Interest-Group (SIG). We’re rapidly growing and always welcome new contributors.
Special thanks to all the contributors from multiple companies that helped bring this feature to beta, including Cheng Xing (verult), David Zhu (davidz627), Deyuan Deng (ddysher), Dhiraj Hedge (dhirajh), Ian Chakeres (ianchakeres), Jan Šafránek (jsafrane), Matthew Wong (wongma7), Michelle Au (msau42), Serguei Bezverkhi (sbezverk), and Yuquan Ren (nickrenren).
← Previous
Step 7.2: Attach a new POD to the existing local volume
Let us try to attach a new POD to the existing local volume. For that, we create a new POD with reference to the same persistent volume claim (named „my-claim“ in our case).
cat <<EOF | kubectl create -f -
apiVersion: v1
kind: Pod
metadata:
  name: centos-local-volume
  labels:
    name: centos-local-volume
spec:
  containers:
  - name: centos
    image: centos
    command: ["/bin/sh"]
    args: ["-c", "while true; do cat /data/index.html; sleep 10; done"]
    volumeMounts:
      - name: my-reference-to-the-volume
        mountPath: /data
  volumes:
    - name: my-reference-to-the-volume
      persistentVolumeClaim:
        claimName: my-claim
EOF
This will an output
pod/centos-local-volume created
It is just a simple CentOS container that is sending the content of the data to the log every 10 sec. Let us retrieve the log now:
# kubectl logs centos-local-volume
Hello local persistent volume
Hello local persistent volume
Hello local persistent volume
Cool, that works fine.
How to change ownership of a field between the configuration file and direct imperative writers
These are the only methods you should use to change an individual object field:
- Use .
- Write directly to the live configuration without modifying the configuration file:
for example, use .
Changing the owner from a direct imperative writer to a configuration file
Add the field to the configuration file. For the field, discontinue direct updates to
the live configuration that do not go through .
Changing the owner from a configuration file to a direct imperative writer
As of Kubernetes 1.5, changing ownership of a field from a configuration file to
an imperative writer requires manual steps:
- Remove the field from the configuration file.
- Remove the field from the annotation on the live object.
Uber’s Operational Experience
As mentioned above, while Local Persistent Volumes provide many benefits, they
also require careful planning and careful consideration of constraints before
committing to them in production. When thinking about our local volume strategy
for M3DB, there were a few things Uber had to consider.
For one, we had to take into account the hardware profiles of the nodes in our
Kubernetes cluster. For example, how many local disks would each node cluster
have? How would they be partitioned?
The local static provisioner provides
guidance
to help answer these questions. It’s best to be able to dedicate a full disk to each local volume
(for IO isolation) and a full partition per-volume (for capacity isolation).
This was easier in our cloud environments where we could mix and match local
disks. However, if using local volumes on-prem, hardware constraints may be a
limiting factor depending on the number of disks available and their
characteristics.
When first testing local volumes, we wanted to have a thorough understanding of
the effect
disruptions
(voluntary and involuntary) would have on pods using
local storage, and so we began testing some failure scenarios. We found that
when a local volume becomes unavailable while the node remains available (such
as when performing maintenance on the disk), a pod using the local volume will
be stuck in a ContainerCreating state until it can mount the volume. If a node
becomes unavailable, for example if it is removed from the cluster or is
drained,
then pods using local volumes on that node are stuck in an Unknown or
Pending state depending on whether or not the node was removed gracefully.
Recovering pods from these interim states means having to delete the PVC binding
the pod to its local volume and then delete the pod in order for it to be
rescheduled (or wait until the node and disk are available again). We took this
into account when building our operator
for M3DB, which makes changes to the
cluster topology when a pod is rescheduled such that the new one gracefully
streams data from the remaining two peers. Eventually we plan to automate the
deletion and rescheduling process entirely.
Alerts on pod states can help call attention to stuck local volumes, and
workload-specific controllers or operators can remediate them automatically.
Because of these constraints, it’s best to exclude nodes with local volumes from
automatic upgrades or repairs, and in fact some cloud providers explicitly
mention this as a best practice.


