
Вычисление Placement Groups (PG)
Самая большая трудность в вычислении PG это необходимость соблюсти баланс между количеством групп на OSD и их размером. Чем больше PG на одной OSD, тем больше вам надо памяти для хранения информации об их расположении. А чем больше размер самой PG, тем больше данных будет перемещаться при балансировке.
Получается, что если у вас мало PG, они у вас большого размера, надо меньше памяти, но больше трафика уходит на репликацию. А если больше, то все наоборот. Теоретически считается, что для хранения 1 Тб данных в кластере надо 1 Гб оперативной памяти.
Как я уже кратко сказал выше, примерная формула расчета PG такая — Total PGs = (Number OSD * 100) / max_replication_count. Конкретно в моей установке по этой формуле получается цифра 100, которая округляется до 128. Но если задать такое количество pg, то роль ansible отработает с ошибкой:
Error ERANGE: pg_num 128 size 3 would mean 768 total pgs, which exceeds max 750 (mon_max_pg_per_osd 250 * num_in_osds 3)
Суть ошибки в том, что максимальное количество pg становится больше, чем возможно, исходя из параметра mon_max_pg_per_osd 250. То есть не более 250 на один OSD. Я не стал менять этот дефолтный параметр, а просто установил количество pg_num 64. Более подробная формула есть на официальном сайте — https://ceph.com/pgcalc/.
Существует проблема выделения pg и состоит она в том, что у нас в кластере обычно несколько пулов. Как распределить pg между ними? В общем случае поровну, но это не всегда эффективно, потому что в каждом пуле может храниться разное количество и типов данных. Поэтому для распределения pg по пулам стараются учитывать их размеры. Для этого тоже есть примерная формула — pg_num_pool = Total PGs * % of SizeofPool/TotalSize.
Количество PG можно изменять динамически. К примеру, если вы добавили новые OSD, то вы можете увеличить и количество PG в кластере. В последней версии ceph, которая еще не lts, появилась возможность уменьшения Placement Groups.
Нужно понимать одну важную вещь — изменение количества PG приводит к ребалансингу всего кластера. Нужно быть уверенным, что он к этому готов.
Search query analysis
The forecited report devoted to the frequency of use of search query can be used by web-optimizers during construction of semantic kernel of the website and web content development or development of so called landing pages.
Search query statistics is summarized information grouped by keywords. Generally, our service displays grouped information, which contains not only most popular words and phrases, but words combinations, and synonyms as well. Statistics provided in this section shows keywords (search queries), that people use to follow the website observium.org.
Search query is a word or a word combination that a user puts on a search form of a search engine taking into account an autofit and automatic error correction in a search bar.
PostgreSQL
Description
The Postgresql application monitor uses a Perl script to collect stats from Postgresql Server, and hooks into the Unix Agent application structure.
The script supports only postgresql version:
9.0 and above.
Instructions
In order to get working postgresql stats in Observium, you need to install the Unix Agent system and setup your poller.
After this is done, you can go to your file and edit it with the correct , and .
To test if the script is working correctly, you can execute it. The output should be like:
Debug
If there is no output, than something went wrong and you have to fix your installation. To find out what went wrong, you can enable debug by editing and putting a value greater than to
with
Than execute the script again to see what went wrong.
Netscaler Services
Metrics
| Metric Name | Type | Description | Examples |
|---|---|---|---|
| Text | The service’s state from SNMP | ||
| Numeric | Incoming traffic in bits/sec | ||
| Numeric | Outgoing traffic in bits/sec | ||
| Numeric | Currently active connections | ||
| Numeric | Currently active transactions | ||
| Microseconds | Average transaction time in microseconds between netscaler and the service behind it. | ||
| Milliseconds | Average TTFB between the NetScaler appliance and the server. TTFB is the time interval between sending the request packet to a service and receiving the first response from the service | ||
| Numeric | Current client connections |
Attributes
| Attribute | Type | Description | Examples |
|---|---|---|---|
| Text | The unique name from SNMP often not human readable | ||
| Text | The configured name from SNMP | ||
| Text | The name used in the UI | ||
| IP | The configured IP address | ||
| Numeric | The configured port | ||
| Text | The configured type |
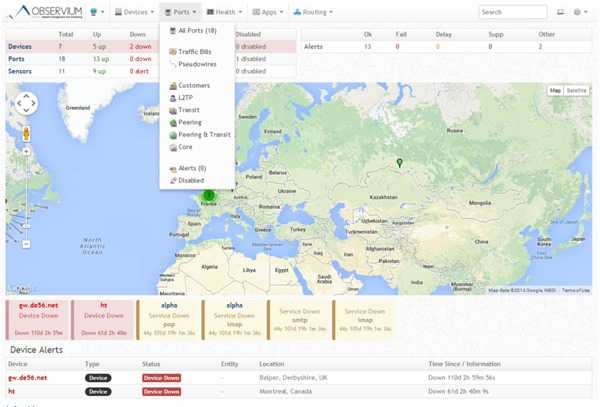
Настраиваем Observium и добавляем узлы мониторинга
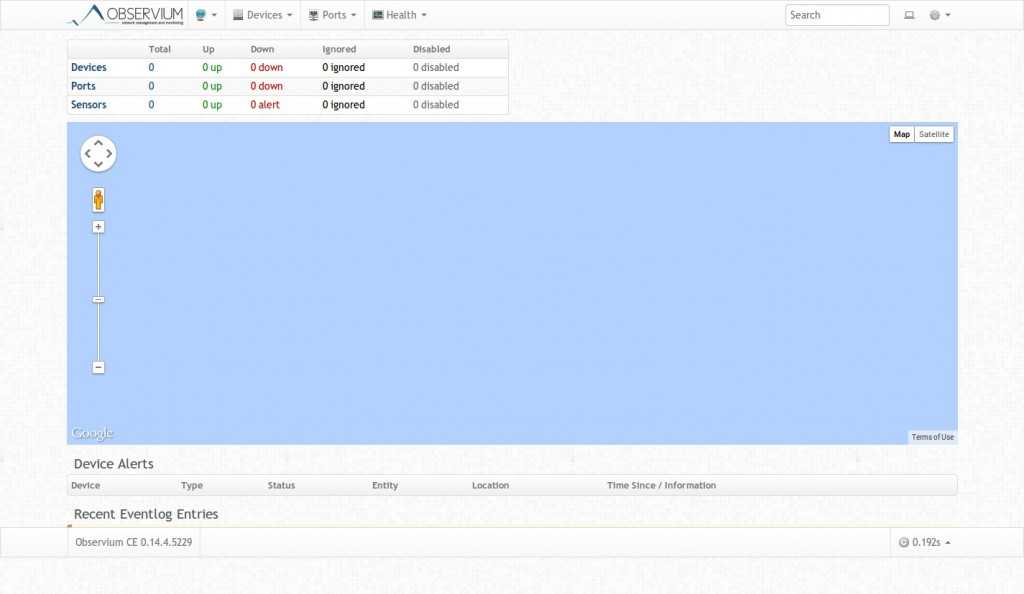
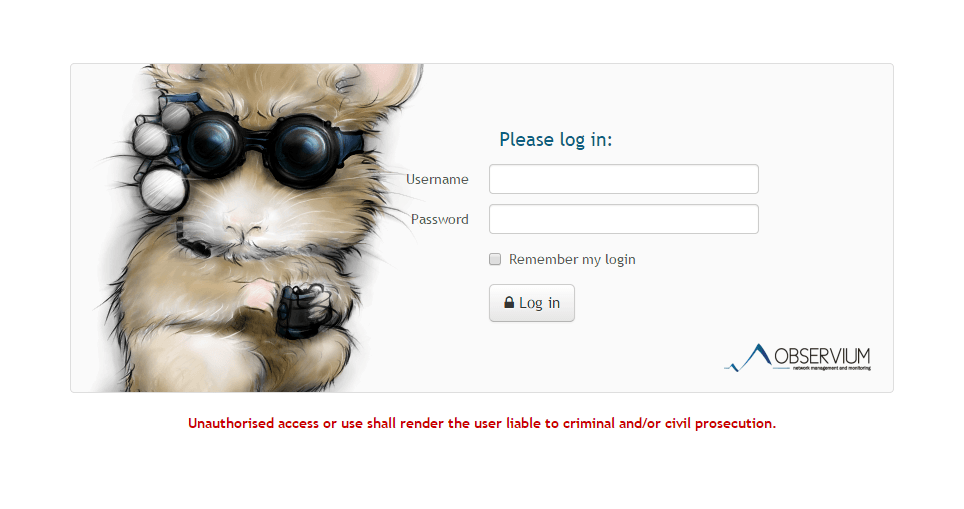
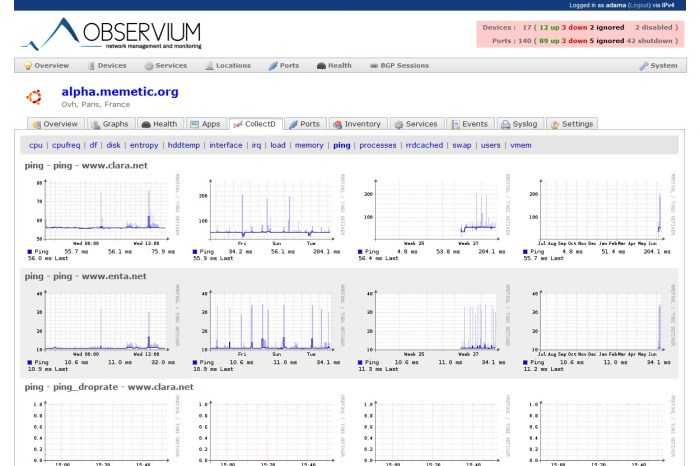
Заходим на страницу мониторинга по адресу http://IP-адрес/ Нас встречает экран приветствия. Логинимся созданной учетной записью администратора.

 Добавим в систему локальный сервер, на котором установлен наш мониторинг. Observium осуществляет сбор данных по snmp. Так что сконфигурируем snmp сервер. У него много настроек, я для примера буду использовать самую простую и быструю конфигурацию. Итак, открываем файл /etc/snmp/snmp.conf и приводим его к следующему виду:
rocommunity  public
syslocation  "local-server"
syscontact  root@localhost
Запускаем и добавляем в автозагрузку snmpd:
# systemctl start snmpd
# systemctl enable snmpd
Проверим, все ли нормально запустилось:
# snmpwalk -v 2c -c public -O e 127.0.0.1
Должно вывести кучу строк с информацией.
Теперь добавляем новое устройство в Observium через web интерфейс. Для этого выбираем Devices -> Add Device. Добавляем наш сервер: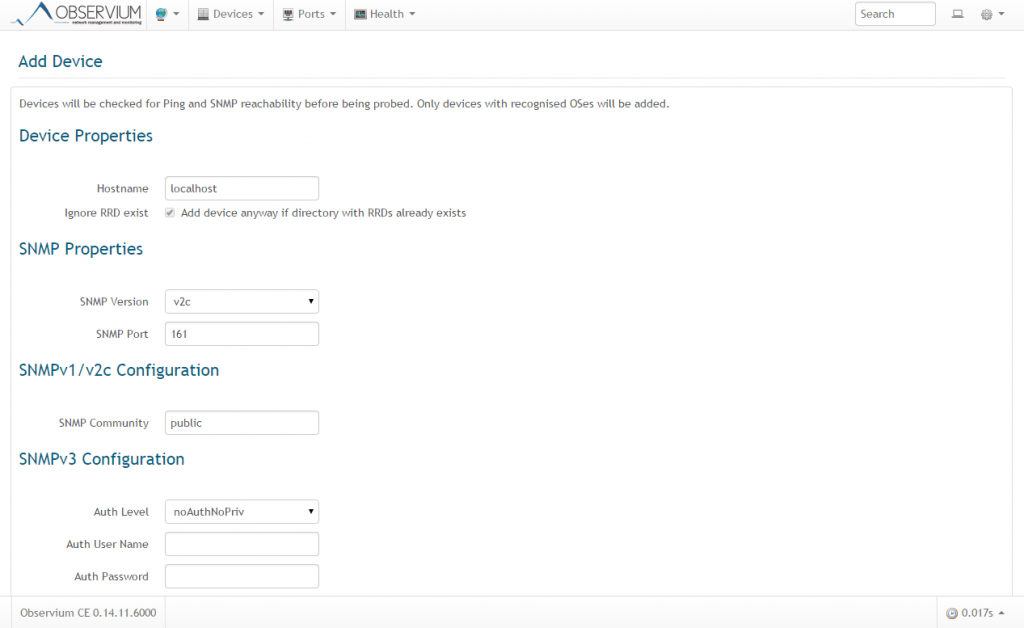
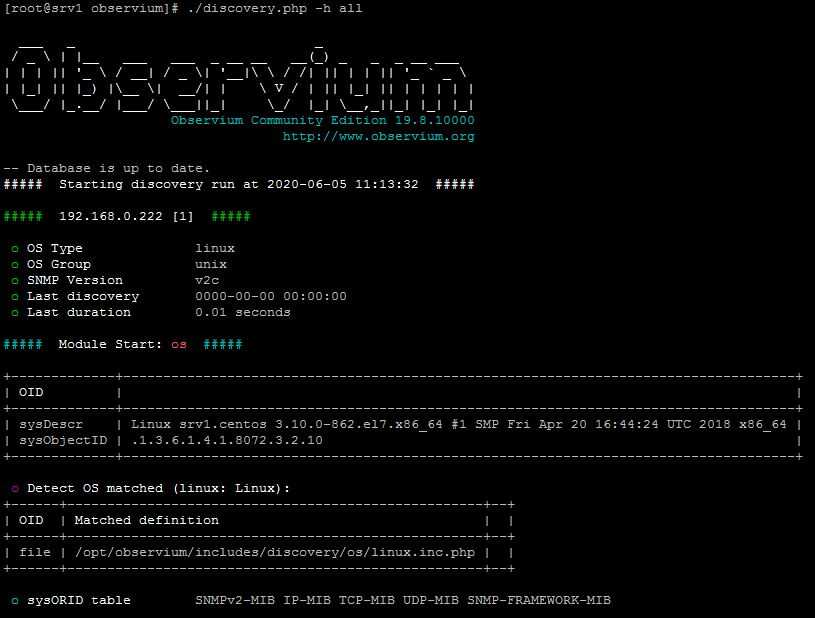
Теперь в списке устройств будет локальный сервер. Можно либо подождать, пока по крону будет произведен опрос сервера, либо сделать это вручную в консоли:
# cd /opt/observium
# ./discovery.php -h all
# ./poller.php -h all
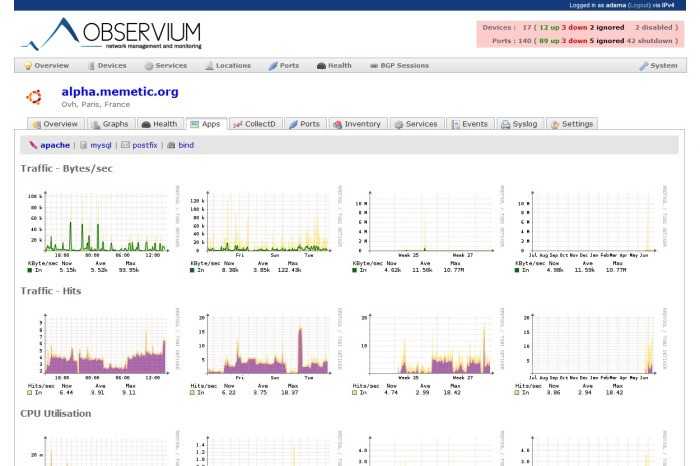
Информация с сервера собрана, можно проверять через web интерфейс. Графики пока будут пустыми, но со временем заполнятся. Таким образом можно добавлять любые поддерживаемые устройства, не забывая включать и настраивать на них snmp. Список поддерживаемых устройств есть тут
На этом установка и настройка закончены, пользуйтесь удобной и информативной системой мониторинга Observium.
Онлайн курс «DevOps практики и инструменты»
Если у вас есть желание научиться строить и поддерживать высокодоступные и надежные системы, научиться непрерывной поставке ПО, мониторингу и логированию web приложений, рекомендую познакомиться с онлайн-курсом «DevOps практики и инструменты» в OTUS. Курс не для новичков, для поступления нужны базовые знания по сетям и установке Linux на виртуалку. Обучение длится 5 месяцев, после чего успешные выпускники курса смогут пройти собеседования у партнеров.
Проверьте себя на вступительном тесте и смотрите программу детальнее по .
Apache
Description
The Apache application monitor uses a Perl script to collect stats from Apache’s output, and hooks into the Unix Agent application structure.
Instructions
First you need enabled. On Debian/Ubuntu, you can do this by typing
and restarting apache2. You need to allow connections from localhost so that the agent script can query it for data. It will differ based on your configuration, but something like this :
Don’t forget the line (it’s not there on a default Debian installation in ) if you want the first three graphs to work, otherwise you only get the Scoreboard graph.
Copy the script from in your observium install to the server you wish to monitor, and place it in the unix agent folder.
The application will then be automatically detected by Observium on the next poll.
Instructions — FreeBSD
Uncomment this line in
Add and (if using IPv6) to the portion of the sections of:
Add the apache script to the unix agent local scripts directory.
Restart Apache:
Instructions — cPanel Server
Locate and open the file to verify is enabled, as well as . You should see something similar to this:
Open and edit the agent script (on the monitored system), and edit line 29 from:
And change it to match below ( instead of ):
Скачайте и установите Observium
У Observium есть две версии: версия с открытым исходным кодом и версия по подписке. Версия с открытым исходным кодом может быть загружена бесплатно, с меньшим количеством функций и меньшими исправлениями безопасности, в то время как версия с подпиской поставляется с дополнительными функциями и поддержкой оборудования. Вы можете загрузить версию Observium с открытым исходным кодом с официального сайта, используя следующую команду:
wget http//www.observium.org/observium-community-latest.tar.gz
После загрузки используйте следующую команду для извлечения загруженного архива:
tar -xvzf observium-community-latest.tar.gz
Затем скопируйте извлеченный каталог в корневой веб-каталог Apache:
cp -ar observium varwwwhtml
Затем переименуйте образец файла конфигурации и внесите некоторые изменения:
cd varwwwhtmlobservium
cp config.php.default config.php
nano config.php
Измените файл следующим образом:
// Database config ---  This MUST be configured
    $config'db_extension'='mysqli';
    $config'db_host'='localhost';
    $config'db_user'='observium';
    $config'db_pass'='password';
    $config'db_name'='observiumdb';
Сохраните файл, а затем используйте следующую команду, чтобы установить режим по умолчанию для базы данных MySQL:
discovery.php -u
Если все в порядке, вы должны увидеть следующий результат:
  ___   _                              _
  _ \ ||__   ___   ___  _ __ __   __(_) _   _  _ __ ___
|||||'_ \ / __| / _ \| '__|\ \ / /|||||||'_ ` _ \
| |_| || |_) |\__ \|  __/||    \ V ||||_||||||||
 \___|_.__|___ \___||_|     \_|_| \__,_||_||_||_|ObserviumCommunityEdition17.9.
                                   http//www.observium.orgInstall initial database schema ...done.--Updating databasefile schema
310->311# (db) . Done (0s).311->312# (db) .... Done (0s).312->313# (db)  Done (0s).313->314# (db)  Done (0s).314->315# (php) . Done (0s).315->316# (db) . Done (0s).316->317# (db) .. Done (0s).317->318# (db) . Done (0s).318->319# (db) ....... Done (2s).319->320# (db) . Done (0s).320->321# (db) . Done (0s).321->322# (db) . Done (0s).322->323# (db) ... Done (1s).323->324# (db) ... Done (0s).324->325# (db) .... Done (1s).325->326# (db) . Done (0s).326->327# (db) . Done (0s).327->328# (db) . Done (0s).328->329# (db) . Done (0s).329->330# (db) . Done (0s).330->331# (db) . Done (0s).331->332# (db) ... Done (1s).332->333# (php)  Done (0s).333->334# (db) . Done (0s).334->335# (php)  Done (0s).335->336# (db) . Done (0s).336->337# (db) . Done (1s).337->338# (db) . Done (0s).338->339# (db) ... Done (0s).339->340# (db) ... Done (0s).340->341# (db) ........ Done (1s).341->342# (db) ............... Done (0s).342->343# (db) ... Done (0s).343->344# (db) .... Done (1s).344->345# (db) .. Done (0s).345->346# (db) . Done (0s).346->347# (db) . Done (0s).347->348# (db) F Done (0s, 1 errors).348->349# (db) .. Done (0s).349->350# (php)  Done (0s).350->351# (db) ..... Done (1s).351->352# (db) .. Done (0s).--Done.
Далее вам нужно будет создать каталог для хранения RRD и журналов:
mkdir rrd logs
Используйте следующую команду, чтобы изменить владельца каталога observium:
chown -R www-datawww-data varwwwhtmlobservium
Затем вам нужно будет создать файл виртуального хоста Apache для Observium. Для этого создайте новый файл конфигурации observium.conf:
nano etcapache2sites-availableobservium.conf
Добавьте следующую строку:
ServerAdmin .com
     ServerName example.com
    DocumentRootvarwwwhtmlobserviumhtml

     OptionsFollowSymLinksAllowOverrideNoneOptionsIndexesFollowSymLinksMultiViewsAllowOverrideAllRequire all granted

     ErrorLogvarlogapache2error.log
     LogLevel warn
     CustomLogvarlogapache2access.log combined
     ServerSignatureOn
Сохраните файл, затем включите файл виртуального хоста observium и используйте следующую команду, чтобы отключить файл виртуального хоста по умолчанию:
a2ensite observium
a2dissite 000-default
Затем вам также необходимо включить модуль перезаписи Apache и модуль PHP mcrypt. Вы можете сделать это, выполнив следующую команду:
a2enmod rewrite
phpenmod mcrypt
Наконец, перезапустите веб-сервер Apache, используя следующую команду:
systemctl restart apache2
Затем используйте следующую команду, чтобы создать своего первого пользователя-администратора:
/var/wwwhtmlobserviumadduser.php admin yourpassword 10
Если все в порядке, вы должны увидеть следующий результат:
Observium CE 0.17.7.8697AddUserUser admin added successfully.
HTML coding and web content analysis
Information shown in this section is used by optimizers to control a home page verbiage, the amount of links, frames, widgets, text, keyword density. The report contains an analysis of using Flash elements, and allows to control web layout (microformat and Doctype).
IFrame – floating frames located inside the ordinary document. They allow to download any other independent document in the range of set rates.
Flash is a multimedia platform for building web-based applications or multimedia presentations. It is widely used for developing of advertising banners, animation, games, and playing audio and video files on web pages.

Microformat is a method of word sense tagging of information on different subjects (events, companies, people, goods, etc.) with the use of ordinary HTML or XHTML elements.
Подключение Cephfs
Как я уже сказал ранее, для работы cephfs у нас уже есть pool, который можно использовать для хранения данных. Я сейчас подключу его к одной из нод кластера, где у меня есть административный доступ к нему и создам в пуле отдельную директорию, которую мы потом смонтируем на другой сервер.
Монтируем pool.
# mount.ceph 10.1.4.32:/ /mnt/cephfs -o name=admin,secret=`ceph auth get-key client.admin`
В данном случае 10.1.4.32 адрес одного из мониторов. Их надо указывать все три, но сейчас я временно подключаю пул просто чтобы создать в нем каталог. Достаточно и одного монитора. Я использую команду:
# ceph auth get-key client.admin
для того, чтобы получить ключ пользователя admin. С помощью такой конструкции он нигде не засвечивается, а сразу передается команде mount. Проверим, что у нас получилось.
 # df -h | grep cephfs
10.1.4.32:/ 47G 0 47G 0% /mnt/cephfs
Смонтировали pool. Его размер получился 47 Гб. Напоминаю, что у нас в кластере 3 диска по 50 Гб, фактор репликации 3 и 3 гб заняты под служебные нужды. По факту у нас есть 47 Гб свободного места для использования в кластере ceph. Это место делится поровну между всеми пулами. К примеру, когда у нас появятся rbd диски, они будут делить этот размер вместе с cephfs.
Создаем в cephfs директорию data1, которую будем монтировать к другому серверу.
# mkdir /mnt/cephfs/data1
Теперь нам нужно создать пользователя для доступа к этой директории.
# ceph auth get-or-create client.data1 mon 'allow r' mds 'allow r, allow rw path=/data1' osd 'allow rw pool=cephfs_data'

	key = AQBLRDBePhITJRAAFpGaJlGmqOj9RCXhMdIQ+w==
На выходе получите ключ от пользователя. Что я сделал в этой команде:
- Создал клиента data1;
- Выставил ему права к разным сущностям кластера (mon, mds, osd);
- Дал права на запись в директорию data1 в cephfs.
Если забудете ключ доступа, посмотреть его можно с помощью команды:
# ceph auth get-key client.data1
Теперь идем на любой другой сервер в сети, который поддерживает работу с cephfs. Это практически все современные дистрибутивы linux. У них поддержка ceph в ядре. Монтируем каталог кластера ceph, указывая все 3 монитора.
# mount -t ceph 10.1.4.32,10.1.4.33,10.1.4.39:/ /mnt -o name=data1,secret='AQBLRDBePhITJRAAFpGaJlGmqOj9RCXhMdIQ+w=='
Проверяем, что получилось.
# df -h | grep mnt
10.1.4.32,10.1.4.33,10.1.4.39:/   47G     0   47G   0% /mnt
Каталог data1 на файловой системе cephfs подключен. Можете попробовать на него что-то записать. Этот же файл вы должны увидеть с любого другого клиента, к которому подключен этот же каталог.
Теперь настроим автомонтирование диска cephfs при старте системы. Для этого надо создать конфиг файл /etc/ceph/data1.secret следующего содержания.
AQBLRDBePhITJRAAFpGaJlGmqOj9RCXhMdIQ+w==
Это просто ключ пользователя data1. Добавляем в /etc/fstab подключение диска при загрузке.
10.1.4.32,10.1.4.33,10.1.4.39:/ /mnt ceph name=data1,secretfile=/etc/ceph/data1.secret,_netdev,noatime 0 0
Не забудьте в конце файла fstab сделать переход на новую строку, иначе сервер у вас не загрузится. Теперь проверим, все ли мы сделали правильно. Если у вас уже смонтирован диск, отмонтируйте его и попробуйте автоматически смонтировать на основе записи в fstab.
# umount /mnt
# mount -a
На этом по поводу cephfs все. Можно пользоваться. Переходим к блочным устройствам rbd.


Configuring WMI Security to Allow a User to Poll WMI
There are a few ways to go about this:
- Create a domain user and put them in the Administrator group for all of the servers you wish to poll with WMI
- Use a Domain Administrator account
- Create a dedicated domain user with Read permissions for WMI
Choice (1) or (2) is preferred for testing WMI since it’s the fastest. By default, WMI security allows control by any Administrator of the system. If you’re a Domain Administrator you can test to make sure WMIC is working properly immediately after you install (instructions below).
Choice (3), on the other hand, is the more secure but more complex option. It’s recommended you take this route to reduce security risks.
Set WMI user access permissions
- Select Start > Run.
- On the Run dialog, type wmimgmt.msc in the Open field.
- Click OK to display the Windows Management Infrastructure (WMI) Control Panel.
- In the left pane of the WMI Control Panel, highlight the WMI Control (local) entry, right-click, and select the Properties menu option. This displays the WMI Control (Local) Properties dialog box.
- Select the Security tab in the WMI Control (Local) Properties dialog box.
- In the namespace tree within the Security tab, expand the Root folder. This action lists the available WMI name spaces.
- Click the CIMV2 namespace to highlight it.
- Click Security to display the Security for ROOT\CIMV2 dialog box.
- Click Add in the Security for ROOT\CIMV2 dialog box to display the Select Users or Groups dialog box.
- Add the domain user account that will be used as your proxy data collection user account. This should be a domain account (not a local computer account), but it does not need to be an account with administrative access.
- Click OK to close the Select Users or Groups dialog box and return to the Security for ROOT\CIMV2 dialog box. The user account you selected should now be listed in the Name list at the top of the dialog box.
- Select the newly added user (if it is not already selected) and enable the following permissions:
- Enable Account
-
Remote Enable.
Enable the permissions by clicking the Allow box, if it is not already checked for that permission. The Enable Account permission should already be selected, but the Remote Enable permission will need to be selected.
13. Click OK to close the Security for ROOT\CIMV2 dialog box.
The permissions should now be properly set for the proxy data collection user account.
Device
Metrics
| Metric Name | Type | Description / Examples |
|---|---|---|
| Boolean | = down, = up | |
| Text | Reason for being marked down | |
| Milliseconds | PING response time in ms | |
| Milliseconds | SNMP response time in ms | |
| Seconds | Device uptime in seconds | |
| Boolean | Is the device recently rebooted: = not rebooted, = rebooted | |
| Seconds | Device poll duration in seconds | |
| Float | Device 5 minute load average (duplicate of ) UNIX/Linux only | |
| Float | Device 1 minute load average UNIX/Linux only | |
| Float | Device 5 minute load average UNIX/Linux only | |
| Float | Device 15 minute load average UNIX/Linux only |
Attributes
| Attribute | Type | Description / Examples |
|---|---|---|
| Text | Device’s hostname as known by Observium | |
| Text | Device’s Observium OS type | |
| Text | Automatically assigned type based on OS | |
| Text | The sysName reported by the device | |
| Text | The sysDescr reported by the device | |
| OID | The sysObjectID returned by the device | |
| Text | The sysContact reported by the device | |
| Text | The hardware string of the device | |
| Text | The serial number of the device | |
| Text | User-defined description field | |
| Text | The sysLocation returned by the device | |
| Text | A group name the device must belong to | |
| Numeric | A group id the device must belong to |
Entity match should be for devices, as they are already matched in the device association.
Device attributes can be seen by checking the ‘data’ tab on the device page in the web interface.
Counters
Minimum version
This feature available since version 19.5.9890
Counters within Observium are things that give an instantaneous numerical value of something wich have some trending in a time (grow up/down or something like pages count and lifetime). This includes some common counter classes (charge, energy and lifetime) but not limited with class. Counter have additional metrics with rates (per second, minute, 5 minutes and hour).
Metrics
| Metric Name | Type | Description / Examples |
|---|---|---|
| Numeric | The counter value, ie: , , | |
| Numeric | The counter value rate per second | |
| Numeric | The counter value rate per minute | |
| Numeric | The counter value rate per 5 minutes (this is common poll period) | |
| Numeric | The counter value rate per hour | |
| Text | Counter status based on thresholds , , , |
Attributes
| Attribute Name | Type | Description / Examples |
|---|---|---|
| Text | Counter description/name as used in the UI, ie: | |
| Text | Counter class (can used any class name, but we have some common nmaes defined): , , , , , | |
| Text | String identifying the source OID/Index: , | |
| OID | The sensor’s OID, ie: | |
| Numeric | Measured port IDs, if counter linked with measured entity, ie: | |
| Numeric | Measured port group IDs, if counter linked with measured entity, ie: | |
| Numeric | Measured printer supply IDs, if counter linked with measured entity, ie: | |
| Numeric | Measured printer supply group IDs, if counter linked with measured entity, ie: | |
| Text | String identifying the source protocol: , , | |
| Numeric | A group id, ie: |
Thresholds
Thresholds for the entity type are often provided by the device itself. Counter thresholds can used for value or any of provided value rate. These thresholds can be customised on the sensor tab of the device settings page.
| Metric Name | Type | Description / Examples |
|---|---|---|
| Numeric | Device-provided, calculated or custom upper limit | |
| Numeric | Device-provided, calculated or custom lower limit | |
| Numeric | Device-provided, calculated or custom upper warning | |
| Numeric | Device-provided, calculated or custom lower warning |
Overview
The authentication mechanism Observium uses is configured via a parameter in
Currently supported mechanisms are mysql, ldap, radius and http-auth. If you want to change the authentication mechanism, you have to change this setting!
If the system you are using is not supported and you want to develop your own, see Developing Authentication Modules for developer information.
Debugging
By default debugging is disabled before the user is logged in to prevent exposing data. This can make diagnosing authentication problems difficult. You can enable debugging output during login by adding the following to
Debugging will then be enabled if you add /debug/ to the end of the URL.
poller.php
is Observium’s main poller script. It performs all of the tasks involved in collecting data from monitored devices and storing it in RRD and in the database. should usually be executed automatically by , but can be run manually for various reasons, including debugging.
Running poller.php from cron
On old installations may be run directly by cron. This is deprecated and should be replaced with
Usage
| Option | Description |
|---|---|
| Poll a single device by device_id | |
| Poll devices matching the hostname wildcard | |
| Poll all odd numbered devices | |
| Poll all even numbered devices | |
| Poll all devices | |
| Poll all new devices which have never been polled | |
| Poll as instance of . Deprecated in favour of . | |
| Quiet output | |
| Show globally enabled/disabled modules and exit | |
| Show version and exit | |
| Do not create or update RRDs. This is useful during debugging and development to not pollute RRDs | |
| Enable debugging output | |
| More verbose debugging output | |
| Specify poller module(s) (separated by commas) to be run |
Заключение
Надеюсь, моя статья про описание, установку и эксплуатацию ceph была полезна. Постарался объяснять все простым языком для тех, кто как и я, только начинает знакомство с ceph. Мне система очень понравилась именно тем, что ее можно так легко разворачивать и масштабировать. Берешь обычные серверы, раскатываешь ceph, ставишь фактор репликации 3 и не переживаешь за свои данные. Думаю, использовать его под бэкапы, docker registry или некритичное видеонаблюдение.
Переживать начинаешь, когда в кластер идет непрерывная высокая нагрузка. Но тут, как и в любых highload проектах, нет простых решений. Надо во все вникать, во всем разбираться и быть всегда на связи. Меня не привлекают такие перспективы 
Онлайн курс Infrastructure as a code
Если у вас есть желание научиться автоматизировать свою работу, избавить себя и команду от рутины, рекомендую пройти онлайн курс Infrastructure as a code. в OTUS. Обучение длится 4 месяца.
Что даст вам этот курс:
- Познакомитесь с Terraform.
- Изучите систему управления конфигурацией Ansible.
- Познакомитесь с другими системами управления конфигурацией — Chef, Puppet, SaltStack.
- Узнаете, чем отличается изменяемая инфраструктура от неизменяемой, а также научитесь выбирать и управлять ей.
- В заключительном модуле изучите инструменты CI/CD: это GitLab и Jenkins
Смотрите подробнее программу по .
Онлайн курс «DevOps практики и инструменты»
Если у вас есть желание научиться строить и поддерживать высокодоступные и надежные системы, научиться непрерывной поставке ПО, мониторингу и логированию web приложений, рекомендую познакомиться с онлайн-курсом «DevOps практики и инструменты» в OTUS. Курс не для новичков, для поступления нужны базовые знания по сетям и установке Linux на виртуалку. Обучение длится 5 месяцев, после чего успешные выпускники курса смогут пройти собеседования у партнеров.
Проверьте себя на вступительном тесте и смотрите программу детальнее по .


