
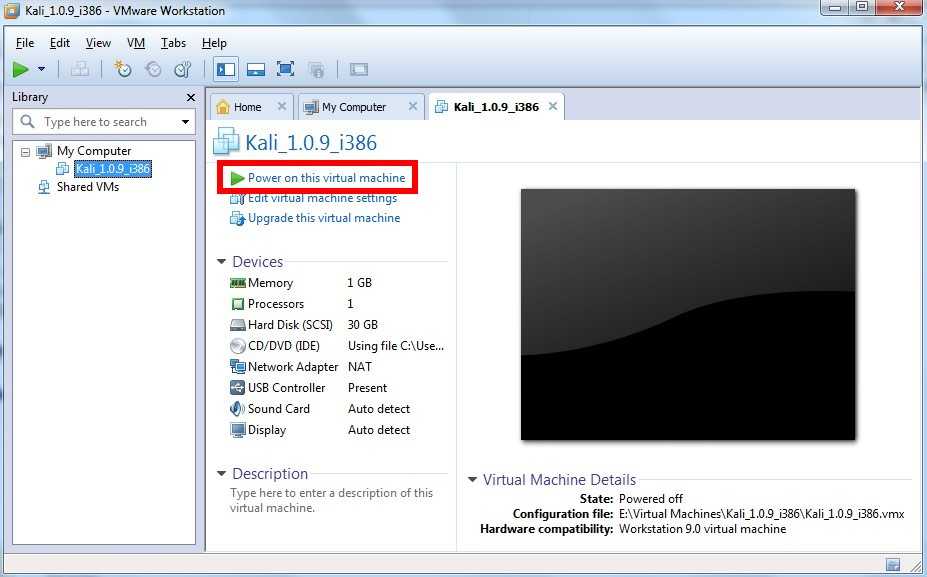
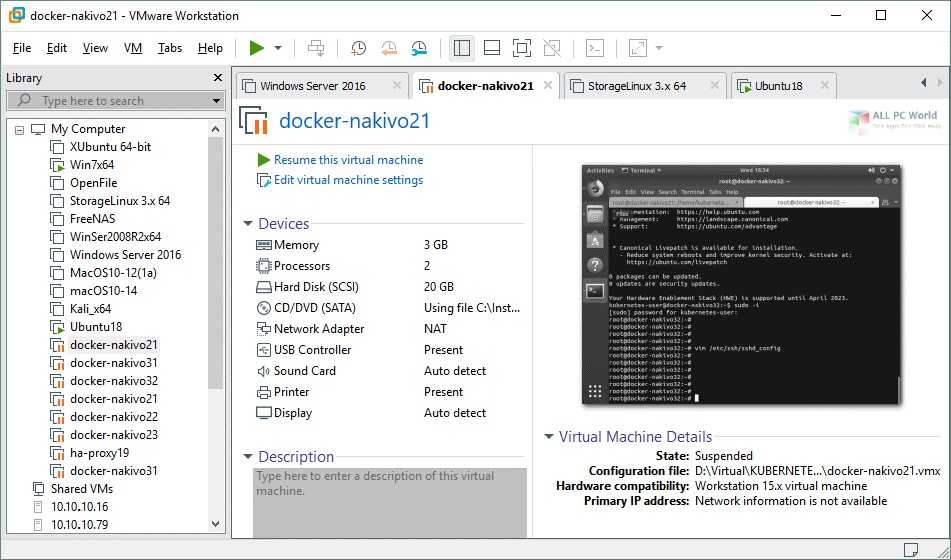
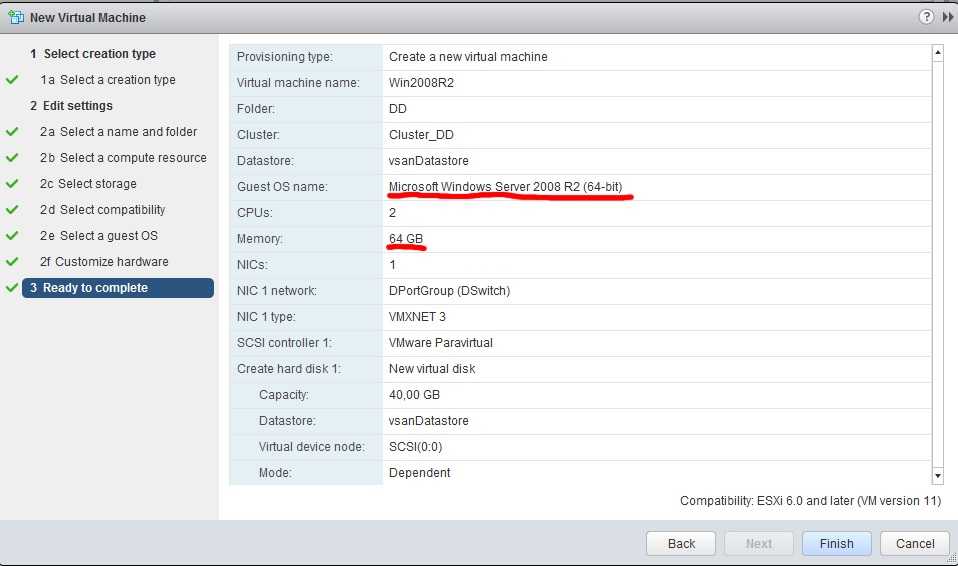
Basic Information
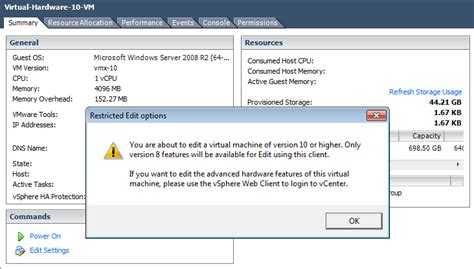
VMware offers a rich selection of devices, options, resources, etc. to configure or add to your VM. You should pay attention to compatibility, as some of the hardware devices cannot be added to certain VMs. Both the physical machine the VM is running on and this VM’s operating system are meant to support the devices or configurations that you are going to add. Moreover, you can add or configure virtual hardware only if you are running the latest available VMware VM version.
Some of the basic VM hardware devices are outlined below:
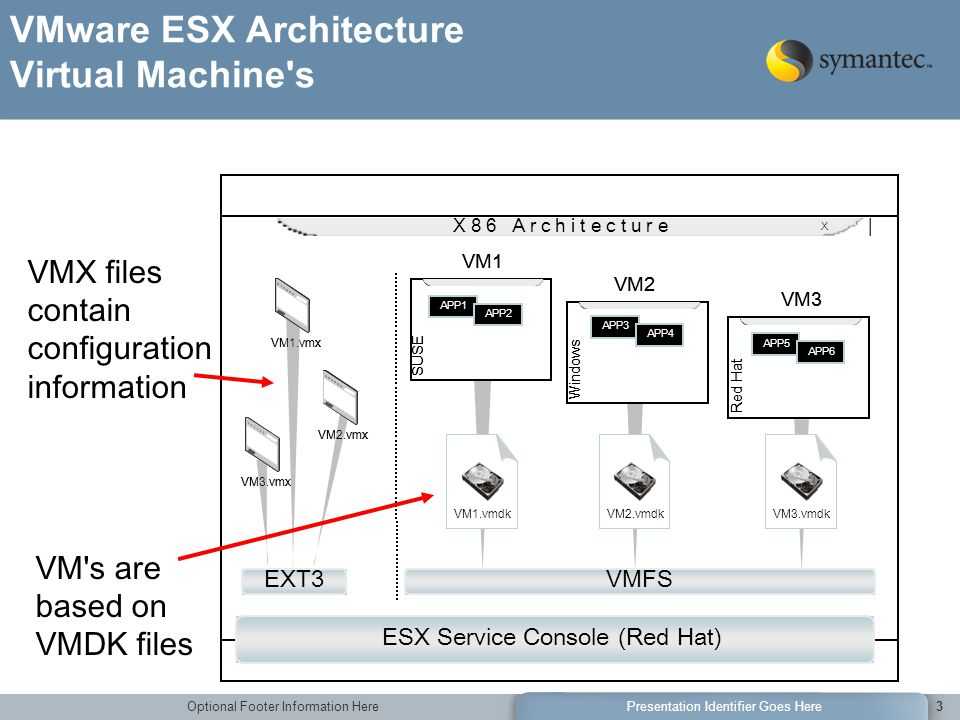
| CPU | A VM that runs on an ESXi host can be configured to have multiple processors, but not more than the number of CPUs on the physical host. |
| Network adapter | ESXi networking functionality enables communication between VMs on the same host, on different hosts, and with other virtual and physical machines. |
| DVD/CD-ROM drive | When a new vSphere VM is created, the drive is installed by default. The drive can be configured to connect to client and host devices, as well as Datastore ISO files. DVD/CD-ROM devices can be added, removed, or configured. |
| Hard disk | A large physical file (or a set of files), the virtual disk stores data associated with a VM’s activities, including its OS, program files, etc. This file can be copied, moved, backed up, or archived. |
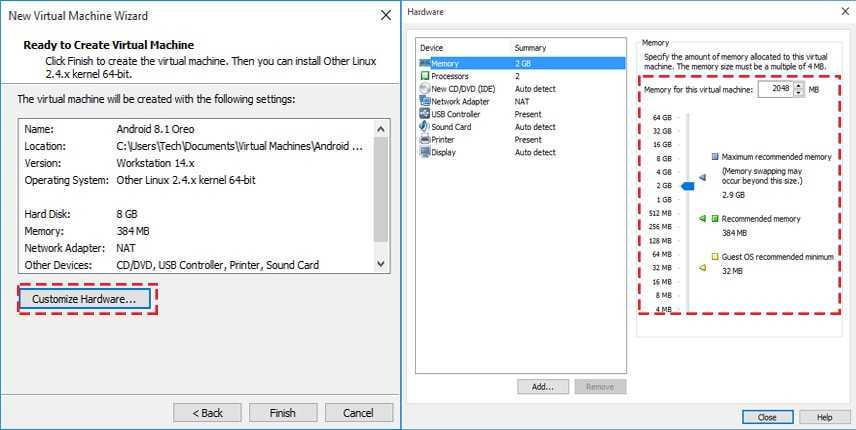
| Memory | The memory size of virtual hardware determines how much memory is available to applications running on a VM. |
Virtual hardware includes BIOS and Extensible Firmware Interface (EFI), while its version determines the amount of virtual PCI slots, maximum number of virtual cores, maximum memory size, and other characteristics typical for a physical machine. As an example, the maximum memory size in ESXi 6.0 (hardware version 11) is 4,080 GB, while in ESXi 6.5 (hardware version 13), it is as much as 6,128 GB.
A VMware product is unable to power on a VM if its hardware version is higher than this product supports. For example, VMware Fusion 6.x (VMware hypervisor for Macintosh) can only run a VM on a VMware hardware version 10 or lower. In order to run a VM on hardware version 11, you need VMware Fusion 7.x.

Virtual hardware upgrading can be compared with the process of when you take out the hard drive and then place it into a new machine. In a virtual environment, the success of the upgrade procedure depends upon the guest OS’s resiliency in the event of hardware updates. In view of this, VMware recommends upgrading virtual machine hardware only in case you need extra functionality added in a new version. If you want to preserve compatibility with older hosts, or standardize testing and deployment in your environment, it is better to stay with an earlier VMware hardware version.
Resource Monitoring
Following are some useful tools to monitor resources when employing graphics acceleration.
gpuvm
To better manage the GPU resources available on an ESXi host, examine the current GPU resource allocation. The ESXi command-line query utility lists the GPUs installed on an ESXi host and displays the amount of GPU memory that is allocated to each VM on that host.
nvidia-smi
To get a summary of the vGPUs currently running on each physical GPU in the system, run without additional arguments.
To monitor vGPU engine usage across multiple vGPUs, run with the or option:
For each vGPU, the usage statistics in the following table are reported once every second.
Table 3: Example of Usage Statistics for vGPUs
Using VMware CBT in NAKIVO Backup & Replication
To speed up incremental backup performed with NAKIVO Backup & Replication, CBT is enabled by default in any new backup job.
There are several cases when NAKIVO Backup & Replication, as any other VMware backup solutions, cannot use VMware CBT:
- VMware CBT is not supported by a VM: Possible cause – ESXi host is lower than v4.1, or Virtual Hardware version is lower than v7;
- VMware CBT data was not provided: Possible cause – ESXi host power outage and CBT lost track of VM incremental changes.
In the additional Change tracking settings, you can find the On error actions.
Let’s take a closer look at these On error actions:
- Switch to proprietary method: NAKIVO Backup & Replication proprietary change tracking method will be used, which is slower than VMware CBT and consumes more host’s resources;
- Reset CBT: CBT will be reset for the virtual machine in case of CBT failure;
- Fail VM processing: VM processing will be stopped.
Also, you can specify when to apply the selected On error action:
- Immediately: On error action will be applied immediately (except for the Reset CBT action);
- On the next retry: On error action will be applied on the next retry;
- On the last retry: On error action will be applied on the last retry.
You can also check the Double-check changed blocks provided by CBT checkbox. In this case, data provided by VMware Changed Block Tracking will be additionally checked against NAKIVO Backup & Replication proprietary CBT. This approach is more reliable, but may be slower than the ordinary VMware CBT.
Upgrade VMware virtual hardware version ^
You should always check whether the VM is in a healthy state. Ensure there are no inaccessible devices, such as CD-ROMs or hard drives.
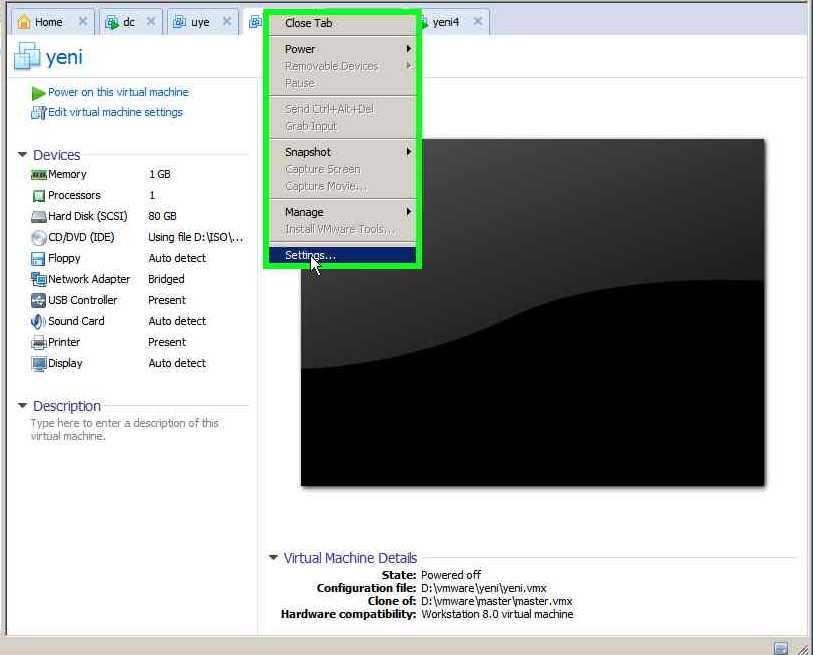
To verify which virtual hardware is currently set, you can simply select a particular VM. The Summary tab shows the VM version label in the Compatibility field.
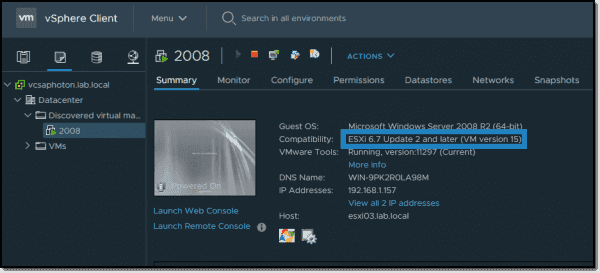
Upgrade VM Hardware
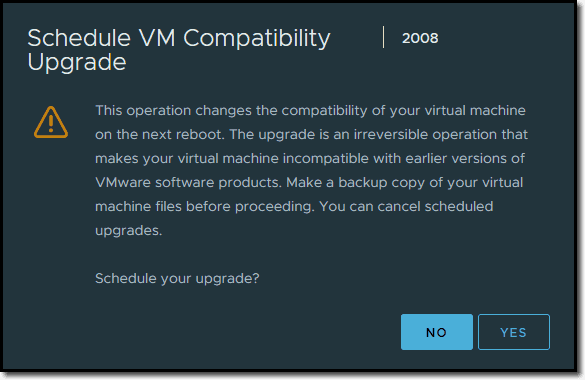
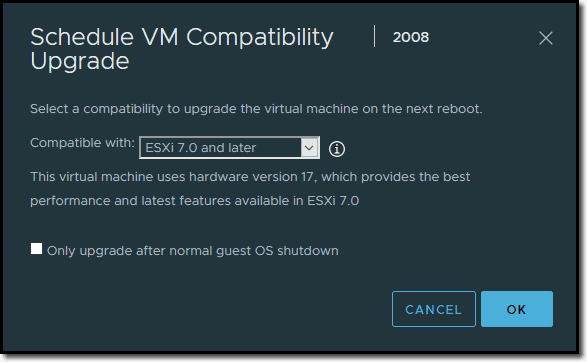
Then, via the Actions menu, simply chose Compatibility > Schedule VM compatibility upgrade.

Schedule VM compatibility upgrade
The Assistant will show a disclaimer telling you that this change to the virtual hardware is irreversible and that you should backup your VM first.
VM compatibility upgrade disclaimer
When you click Yes, the next screen gives you options for the upgrade. The «Only upgrade after normal guest OS shutdown» checkbox prevents upgrades in case you have a host, storage, or network failure in between. If there is a High Availability (HA) event and the VM must be started on another host, the virtual hardware of this VM won’t be updated. This prevents unexpected results if there is any guest OS file system corruption as the result of an HA event.

VM will be compatible with vSphere 7
Cannot Import External Resources
Cannot Import Due to Invalid URL
The following information is displayed: «The URL is invalid», or «The proxy URL is invalid».
To solve this problem, log in to the Virtual Machine Server, and run the following command to test the network connection:
# wget url
Here, url refers to the link for downloading the resource.
If the resource is from the Internet, you may need a proxy before running the wget command. Contact your network administrator to get the proxy, an then run the following commands to configure the proxy:
# export http_proxy=http://host:port/
# export ftp_proxy=http://host:port/
Here, host refers to the host name or IP address of the proxy server, and port refers to the port number of the proxy.
Cannot Import Due to NFS Disk
The following information is displayed:
Cannot obtain memory size from vm.cfg.
This error may occur when there are two or more Utility Servers in a server pool, and the disk is shared by the Network File System (NFS) mode.
Concluding Thoughts
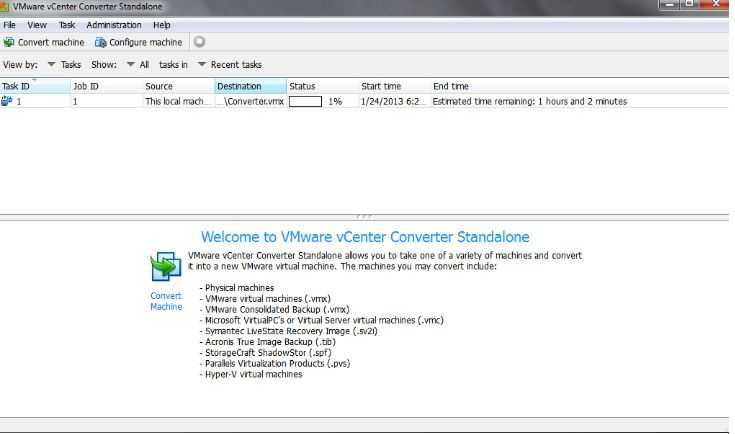
If you are working with Veeam and different sites with potentially different versions of vSphere as you are working through upgrades of your vSphere environment, you may run into problems with Veeam Restore VM hardware version is not supported by destination host. As shown however, this is a problem with the full VM restore. We can still perform the VMware files restore and get the files restored to the destination datastore. After restoring, we can either create a new VM with a lower hardware compatibility level and attach the restored files, or we can perform a low level edit of the VMX file of the restored VM files and add the VM to inventory after making the changes. Either way, it allows you to get up and running with Veeam backups that were created from an uplevel ESXi host.
Before You Start VMware Hardware Version Upgrade
As noted above, upgrading a VM to the latest hardware version may lead to further challenges. Therefore, the process requires careful planning and preparation. Consider performing the following steps before you get started:
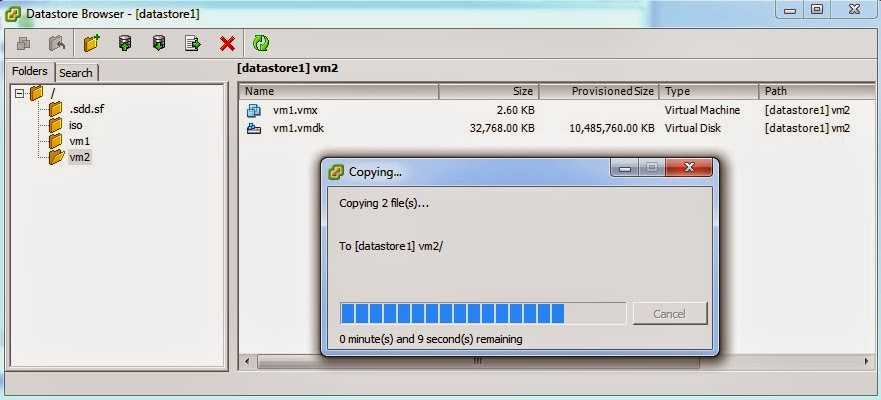
- Create a backup or a snapshot of a VM to avoid any potential problems the upgrade may cause. Below, you can find a comprehensive explanation of how NAKIVO Backup & Replication can help you with this task.
- Make sure to upgrade VMware Tools.
For reference: VMware Tools is a set of services and modules that simplify the management of a guest operating system and enhance user interactions with it. Installed in the VM’s operating system, they provide for better performance of the VM and bring about many of the VMware products’ helpful features.
Be aware that Windows-based VMs can lose their network settings unless VMware Tools are upgraded.
- The VM should be healthy and available. Make sure that its virtual disks, CD-ROM, ISO images, etc. are valid and accessible.
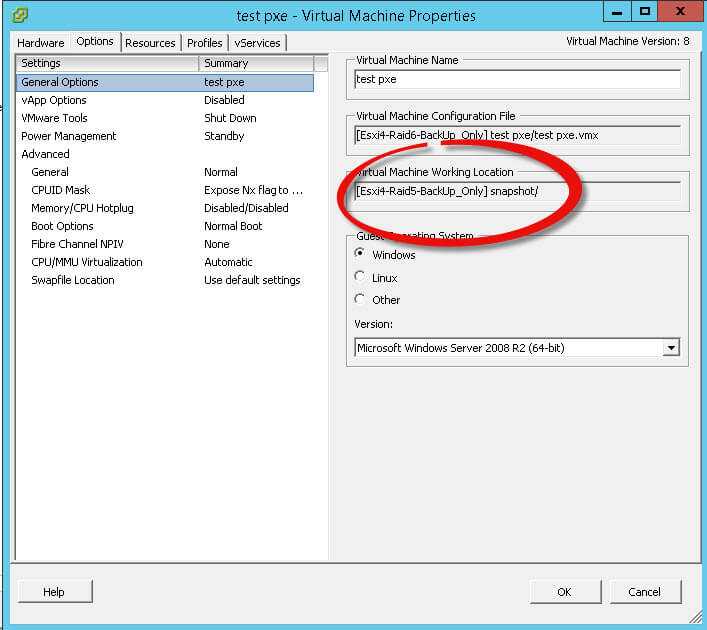
- Determine the virtual machine hardware version. To do this, select the VM in the vSphere Client inventory. After this, do either of the following:
- Click the Summary tab and see the VM’s hardware version under General;
- Right-click the VM and select Edit Settings. See the hardware version in the upper-right corner of the dialog box;
- Select a datacenter, host, or cluster, and click the Virtual Machine tab. Find the hardware version in the VM Version column. Here you can also see the information on the hardware version of multiple VMs.
- In case you are using C# client, be aware that versions above 9 are not supported.
Data Protection with NAKIVO Backup & Replication
The feature set of NAKIVO Backup & Replication enables infrastructure monitoring, automation of data protection activities, and disaster recovery orchestration. With our key functionality, you can back up and replicate your VMware-based workloads.
VMware Backup
Our product provides the means for performing backups of live VMs and all their application data. For VMware VMs, our solution relies on Changed Block Tracking (CBT), VMware technology allowing you to copy only those data blocks that have changed since the last backup cycle. In fact, this is a great helper for saving storage space. For higher reliability, you can store your backups onsite, offsite, and in the Amazon or Azure Clouds. Additionally, you can make sure your VM backups are valid and recoverable by either receiving screenshots test-recovered machines after each backup cycle or checking the availability of VMware Tools.
VMware Replication
Our VMware Replication functionality provides a way to keep identical copies (replicas) of your VMs on an ESXi host of your choice. Until the replica is needed, it is stored in a powered-off state and does not consume any resources. For your convenience, you can replicate data directly from backups, thus offloading your production environment. Also, our verification tools allow you to power on the VM replica to make sure it is fully functional.
The main features of NAKIVO Backup & Replication cover the following needs:
- Time saving – set up policy-based rules to automate routine jobs related to VM administration;
- Speed enhancement – speed up backup jobs by accelerating your network, while reducing network load and shortening backup windows at the same time;
- Flexible retention – you can store up to 30 recovery points for each replica and up to 4,000 recovery points for each backup;
- Storage efficiency – exclude swap files and partitions to reduce storage space consumption. Reduce the VM backup size even further by deduplicating and compressing data blocks.
- Downtime reduction – achieve better RTOs and RPOs by instantly recovering what you need most in the event of an actual disaster.
Concluding Thoughts
Upgrading your virtual hardware to the latest version provides you with great benefits, especially in terms of the available resources (size of memory, number of logical processors and virtual CPUs, etc.). However, you should pay special attention to the issue of compatibility: the hardware version of a VM must be compatible with the ESXi this VM is running on.
The functionality of NAKIVO Backup & Replication can satisfy the needs of any business scale. Book a free live demo today, see how the product works, and gain peace of mind knowing that your infrastructure can remain reliably protected at all times.
Cannot Log In to Oracle VM Manager
It may take a very long time to log in, or it is stuck in the Login page. This may be caused by lack of memory for OC4J.
To solve this problem:
-
Log in to the computer where Oracle VM Manager is installed, and run the following command to check the log information:
# cat /var/log/ovm-manager/oc4j.log | grep "heap"
If OC4J runs out of memory, the following information is displayed:
Internal Exception: java.lang.OutOfMemoryError: Java heap space
-
Run the following command to restart OC4J:
# service oc4j stop
# service oc4j start
If OC4J runs out of memory, you need to increase the OC4J memory size. Follow these steps to do it:
Register your VM
Your VM (or device) can be registered either via Intune or Microsoft Store for Business (MSfB). Both processes are shown here, but only pick one for purposes of this lab. We highly recommend using Intune rather than MSfB.

Autopilot registration using Intune
-
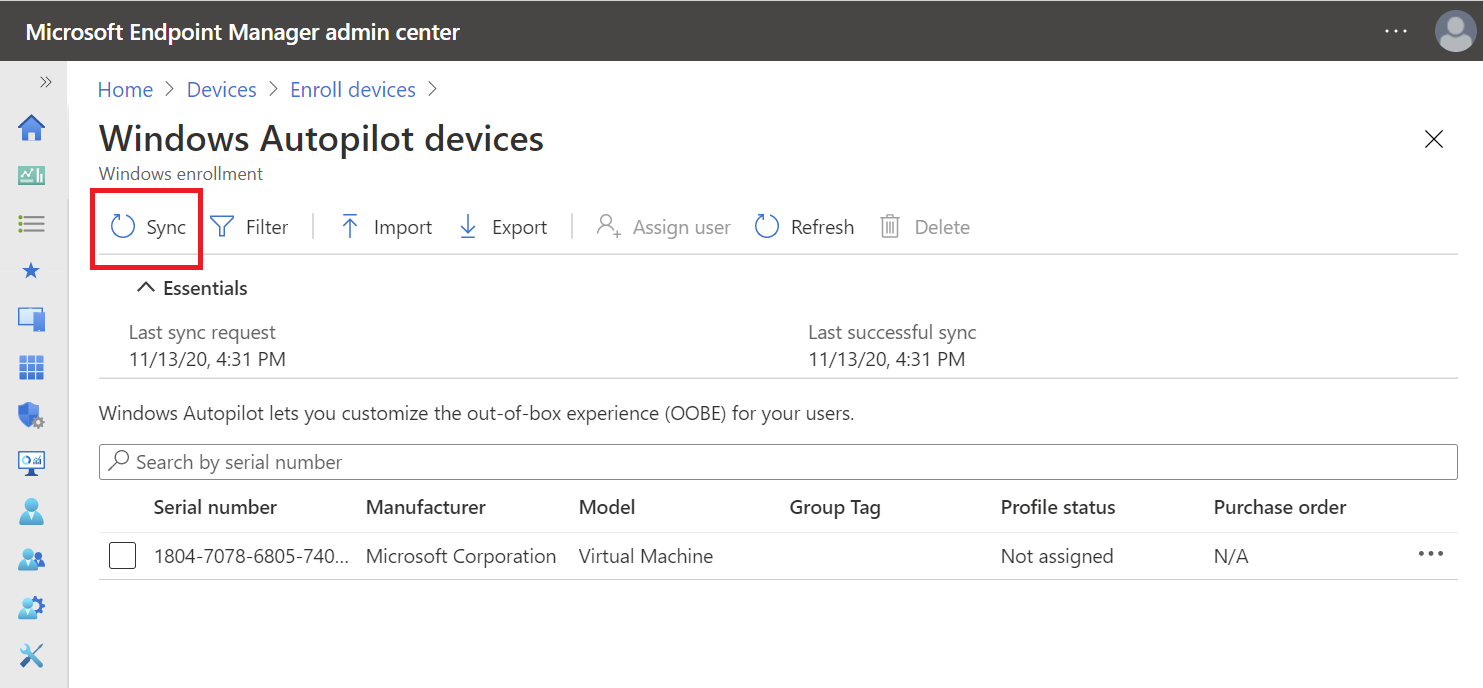
In the Microsoft Endpoint Manager admin center, choose Devices > Device enrollment | Enroll devices > Windows enrollment > Windows Autopilot Deployment Program | Devices and then on the Windows Autopilot devices page, choose Import.
Note
If menu items like Windows enrollment are not active for you, then look to the far-right blade in the UI. You might need to provide Intune configuration privileges in a challenge window that appeared.
-
Under Add Windows Autopilot devices in the far right pane, browse to the AutopilotHWID.csv file you previously copied to your local computer. The file should contain the serial number and 4K HH of your VM (or device). It’s okay if other fields (Windows Product ID) are left blank.
You should receive confirmation that the file is formatted correctly before uploading it, as shown above.
-
Click Import and wait until the import process completes. This can take up to 15 minutes.
-
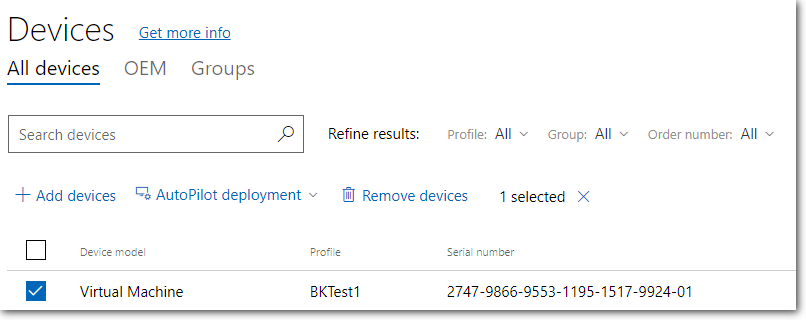
Click Refresh to verify your VM or device has been added. See the following example.
Autopilot registration using MSfB
Important
If you’ve already registered your VM (or device) using Intune, then skip this step.
Optional: see the following video for an overview of the process.
https://youtube.com/watch?v=IpLIZU_j7Z0
First, you need a MSfB account. You can use the same one you created above for Intune, or follow these instructions to create a new one.
Next, sign in to Microsoft Store for Business using your test account by clicking Sign in on the upper-right-corner of the main page.
Select Manage from the top menu, then click the Windows Autopilot Deployment Program link under the Devices card. See the following example:
Click the Add devices link to upload your CSV file. A message will appear indicating your request is being processed. Wait a few moments before refreshing to see your new device has been added.
Create and assign a Windows Autopilot deployment profile
Important
Autopilot profiles can be created and assigned to your registered VM or device either through Intune or MSfB. Both processes are shown here, but only pick one for purposes of this lab:
Pick one:
Create a Windows Autopilot deployment profile using Intune
Note
Even if you registered your device in MSfB, it will still appear in Intune, though you might have to sync and then refresh your device list.
Create a device group
The Autopilot deployment profile wizard will ask for a device group, so we must create one first. To create a device group:
-
In the Microsoft Endpoint Manager admin center, choose Groups > New group.
-
In the Group blade:
- For Group type, choose Security.
- Type a Group name and Group description (ex: Autopilot Lab).
- Azure AD roles can be assigned to the group: No
- For Membership type, choose Assigned.
-
Click Members and add the Autopilot VM to the group. See the following example:
-
Click Create.
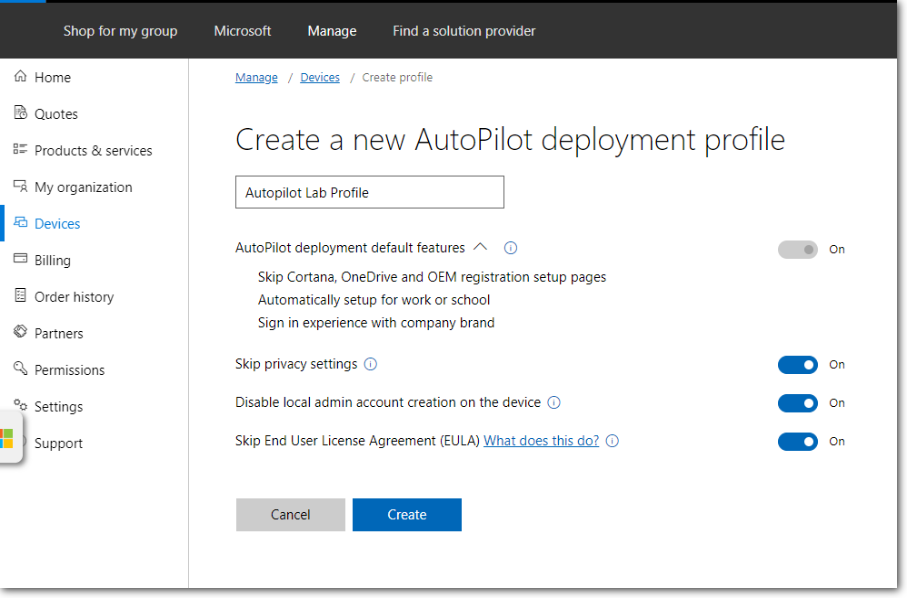
Create the deployment profile
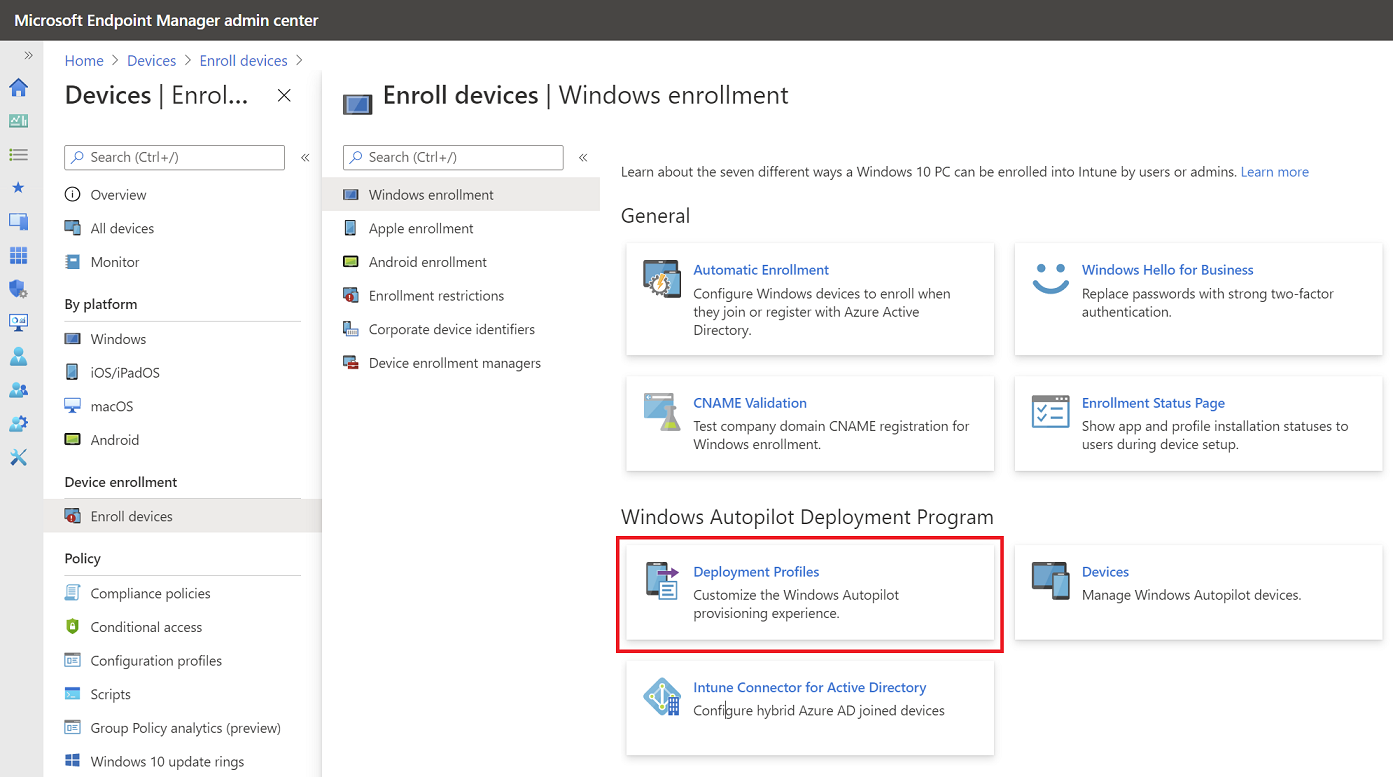
To create a Windows Autopilot profile, scroll back to the left hand pane and click Devices, then under Enroll devices | Windows enrollment select Deployment Profiles.
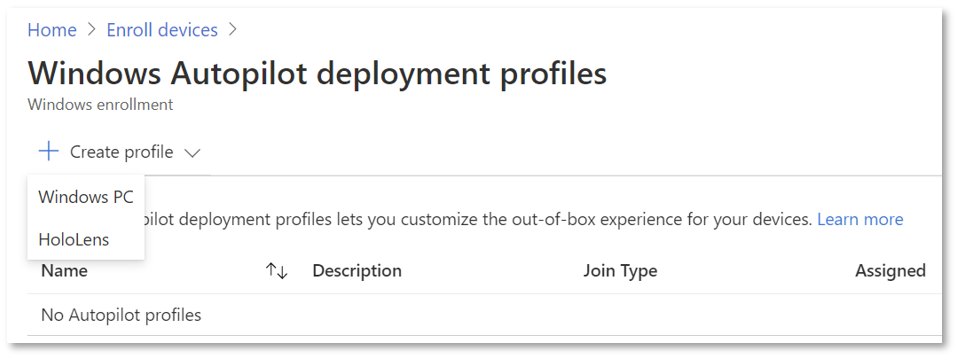
Click on Create profile and then select Windows PC.
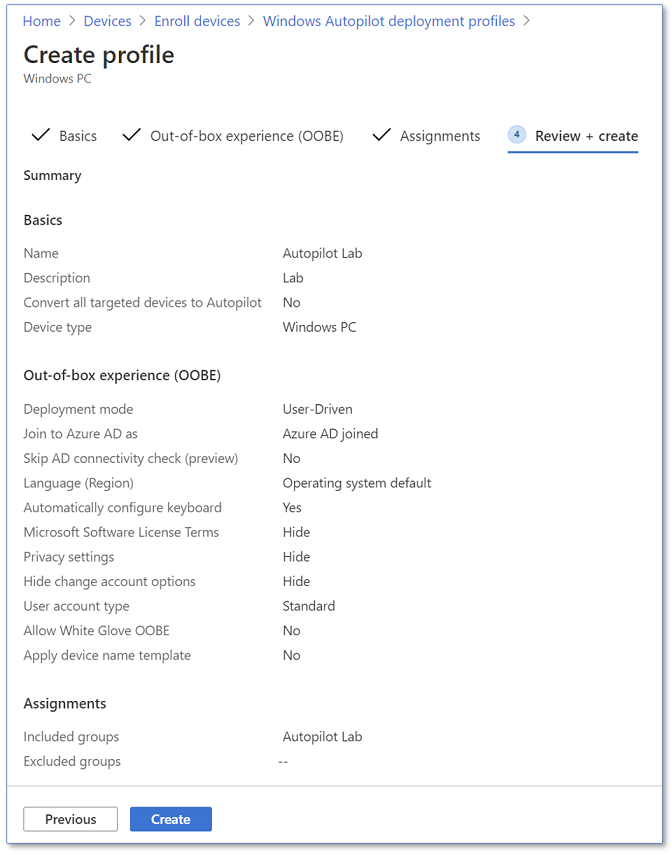
On the Create profile blade, use the following values:
| Setting | Value |
|---|---|
| Name | Autopilot Lab profile |
| Description | Lab |
| Convert all targeted devices to Autopilot | No |
Click Next to continue with the Out-of-box experience (OOBE) settings:
| Setting | Value |
|---|---|
| Deployment mode | User-driven |
| Join to Azure AD as | Azure AD joined |
| Microsoft Software License Terms | Hide |
| Privacy Settings | Hide |
| Hide change account options | Hide |
| User account type | Standard |
| Allow White Glove OOBE | No |
| Language (Region) | Operating system default |
| Automatically configure keyboard | Yes |
| Apply device name template | No |
Click Next to continue with the Assignments settings:
| Setting | Value |
|---|---|
| Assign to | Selected groups |
- Click Select groups to include.
- Click the Autopilot Lab group, and then click Select.
- Click Next to continue and then click Create. See the following example:
Click on OK and then click on Create.
Note
If you want to add an app to your profile via Intune, the OPTIONAL steps for doing so can be found in .
Create a Windows Autopilot deployment profile using MSfB
If you have already created and assigned a profile via Intune by using the steps immediately above, then skip this section.
A video is available that covers the steps required to create and assign profiles in MSfB. These steps are also summarized below.

First, sign in to the Microsoft Store for Business using the Intune account you initially created for this lab.
Click Manage from the top menu, then click Devices from the left navigation tree.
Click the Windows Autopilot Deployment Program link in the Devices tile.
To CREATE the profile:
Select your device from the Devices list:
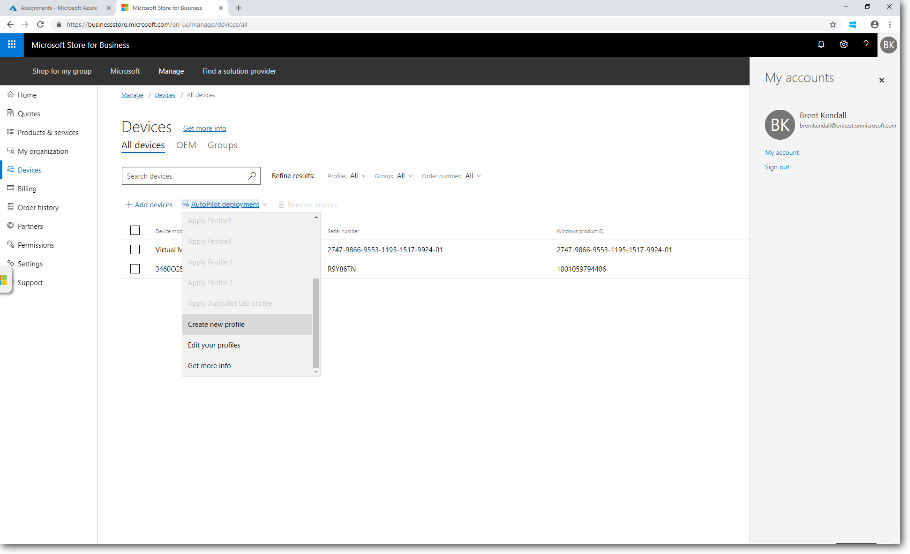
On the Autopilot deployment dropdown menu, select Create new profile:
Name the profile, choose your desired settings, and then click Create:
The new profile is added to the Autopilot deployment list.
To ASSIGN the profile:
To assign (or reassign) the profile to a device, select the checkboxes next to the device you registered for this lab, then select the profile you want to assign from the Autopilot deployment dropdown menu as shown:
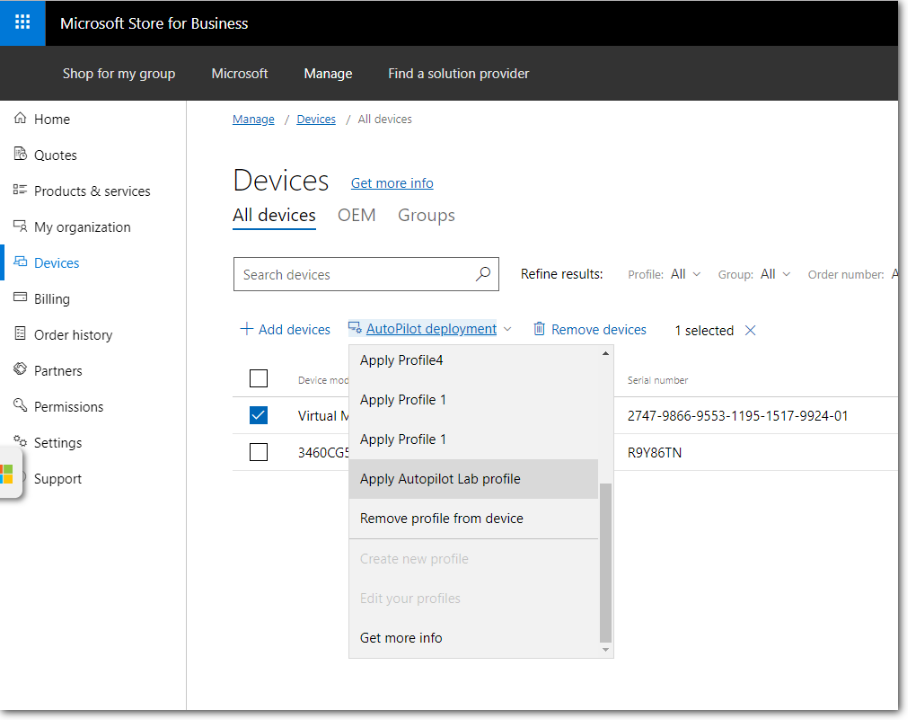
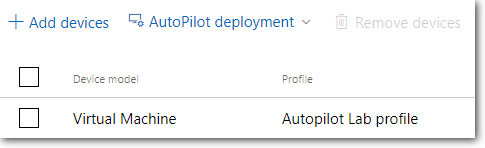
Confirm the profile was successfully assigned to the intended device by checking the contents of the Profile column:
Important
The new profile will only be applied if the device has not been started, and gone through OOBE. Settings from a different profile can’t be applied when another profile has been applied. Windows would need to be reinstalled on the device for the second profile to be applied to the device.
Prerequisites
These are the things you’ll need to complete this lab:
| Windows 10 installation media | Windows 10 Professional or Enterprise (ISO file) for a supported version of Windows 10, semi-annual channel. If you do not already have an ISO to use, a link is provided to download an evaluation version of Windows 10 Enterprise. |
| Internet access | If you are behind a firewall, see the detailed . Otherwise, just ensure that you have a connection to the Internet. |
| Hyper-V or a physical device running Windows 10 | The guide assumes that you will use a Hyper-V VM, and provides instructions to install and configure Hyper-V if needed. To use a physical device, skip the steps to install and configure Hyper-V. |
| An account with Azure AD Premium license | This guide will describe how to obtain a free 30-day trial Azure AD Premium subscription that can be used to complete the lab. |
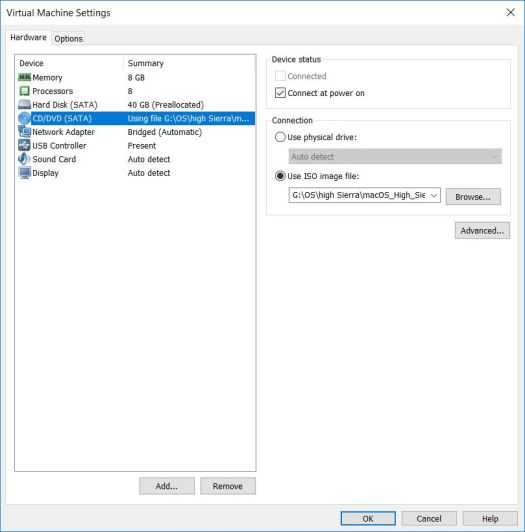
Virtual disks
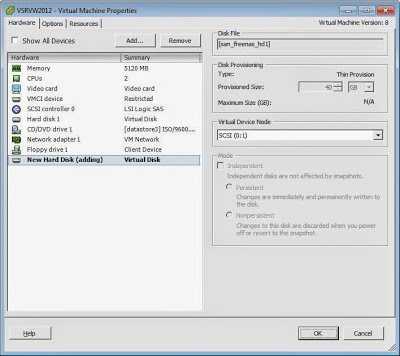
When you create a virtual machine, a default virtual hard disk is added. You can add another hard disk if you run out of disk space, if you want to add a boot disk, or for other file management purposes.
In VMware vSphere you can hot-add and hot-remove a virtual disk, and also hot-add space to existing virtual disks. For RDM disks there can be some limitations, but we don’t consider this kind of disks in this article.
Most of those operations and features are available also in other hypervisors, on ESXi they are available since version 3.x and also for the free edition!
In vSphere, disk space can only be added to existing disks. The shrink option to reduce a virtual disk size (available for example on Microsoft Hyper-V) it’s not available on vSphere.
Note that all the hot-add features are available only when virtual disks are connected to SCSI or SATA or SAS controller. On IDE controller those features do not work due to IDE/PATA limitations.
The maximum number of disks depends by the controller type. Actually we can have:
- Max 4 virtual disks on IDE controllers
- Max 60 virtual disks on SCSI/SAS controllers (up to 4 controllers)
- Max 60 virtual disks on NVMe controllers (up to 4 controllers)
- Max 120 virtual disks and/or CDROM devices on SATA controllers (up to 4 controllers)
- Max 256 virtual disks on PVSCI controllers (up to 4 controllers) new in vSphere 6.7
The maximum value for large capacity hard disks is 62 TB. When you add or configure virtual disks, always leave a small amount of overhead. Some virtual machine tasks can quickly consume large amounts of disk space, which can prevent successful completion of the task if the maximum disk space is assigned to the disk. Such events might include taking snapshots or using linked clones. These operations cannot finish when the maximum amount of disk space is allocated. Also, operations such as snapshot quiesce, cloning, Storage vMotion, or vMotion in environments without shared storage, can take significantly longer to finish.
Virtual machines with large capacity virtual hard disks, or disks greater than 2 TB, must meet resource and configuration requirements for optimal virtual machine performance.
Historically those “jumbo” disks have got some limitations in vSphere (for more information see https://vinfrastructure.it/2017/02/jumbo-disk-vmware-esxi/), but starting with vSphere 6.5 most limitations are gone.
VMs with large capacity disks have the following conditions and limitations:
- The guest operating system must support large capacity virtual hard disks and must use a GPT table (MBR table are limited to 2TB).
- You can move or clone disks that are greater than 2 TB to ESXi 6.0 or later hosts or to clusters that have such hosts available.
- You can hot-add space to a disk that is greater than 2 TB only from vSphere 6.5 and later.
- Fault Tolerance is not supported.
- BusLogic Parallel controllers are not supported.
- The datastore format must be one of the following:
- VMFS5 or later
- An NFS volume on a Network Attached Storage (NAS) server
- vSAN
- Virtual Flash Read Cache supports a maximum hard disk size of 16 TB.
VSAN from StarWind is software-defined storage (SDS) solution created with restricted budgets and maximum output in mind. It pulls close to 100% of IOPS from existing hardware, ensures high uptime and fault tolerance starting with just two nodes. StarWind VSAN is hypervisor and hardware agnostic, allowing you to forget about hardware restrictions and crazy expensive physical shared storage.
Build your infrastructure with off-the-shelf hardware, scale however you like, increase return on investment (ROI) and enjoy Enterprise-grade virtualization features and benefits at SMB price today!
Explore VSAN from StarWind
StarWind VSAN White Paper
При обновлении виртуального оборудования учитывайте следующие моменты
- Модификация версии виртуального оборудования на vCenter Server Appliance не поддерживается. Точно так же не следует вручную устанавливать какие-либо дополнительные версии VMware Tools в гостевой ОС vCenter Server Appliance.
- Обновление виртуальной машины до последней версии оборудования — это физический эквивалент замены диска из одной системы в новую. Его успех будет зависеть от устойчивости гостевой операционной системы к изменениям оборудования. VMware не рекомендует обновлять версию виртуального оборудования, если вам не нужны новые функции, представленные в новой версии.
- Перед обновлением версии виртуального оборудования виртуальной машины создайте моментальный снимок (Снапшот) или резервную копию виртуальной машины на случай, если после обновления возникнут проблемы.
- Чтобы автоматизировать этот процесс, рассмотрите возможность использования vCenter Update Manager для обновления виртуальных машин.
- vCenter Update Manager делает автоматические снимки перед обновлением виртуальных машин.
- При обновлении виртуального оборудования не требуется простоя для vCenter Server или хостов ESXi/ESX. Для виртуальных машин единственным значительным временем простоя является время выключения и перезапуска гостевых операционных систем.
Ранее я рассказывал, как уменьшать версию виртуальной машины
Обновление версии виртуальной машины в ESXi через PowerCLI
Если вы любите автоматизацию и командную строку, то для вас PowerCli это лучший вариант.
Для того. чтобы вы могли использовать преимущества PowerCLI. ваш vCenter или ESXI хост должны иметь лицензионный ключ. На бесплатной версии гипервизора это не получиться сделать, будут ограничения API
Подключаемся к вашему vCenter через команду:
Connect-VIServer DNS-имя vCenter или IP-адрес
Первое, что вы должны сделать. это посмотреть текущую версию виртуальной машины или списка:
Вывод версии для определенной виртуальной машины
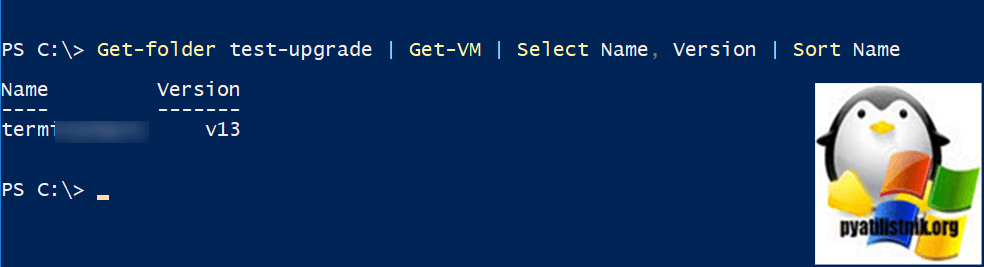
Get-VM имя виртуальной машины| Select Name, Version | Sort Name
В моем примере, это будет 13 версия.

Вывод версии для папки с виртуальными машинами
Get-folder test-upgrade | Get-VM | Select Name, Version | Sort Name
Тут test-upgrade, это папка в которой у меня лежат виртуальные машины. обычно папки используют для группировки серверов.
Теперь зная список машинок, я обновлю их до 18 версии, для этого можно использовать скрипт:
$HardwareUpdateVMs = Get-Folder test-upgrade | Get-VM Имя виртуальных машин
Foreach ($VM in ($HardwareUpdateVMs)) { $VMConfig = Get-View -VIObject $VM.Name $vmConfigSpec = New-Object VMware.Vim.VirtualMachineConfigSpec $vmConfigSpec.ScheduledHardwareUpgradeInfo = New-Object -TypeName VMware.Vim.ScheduledHardwareUpgradeInfo $vmConfigSpec.ScheduledHardwareUpgradeInfo.UpgradePolicy = “always” $vmConfigSpec.ScheduledHardwareUpgradeInfo.VersionKey = “vmx-18” $VMConfig.ReconfigVM($vmConfigSpec)
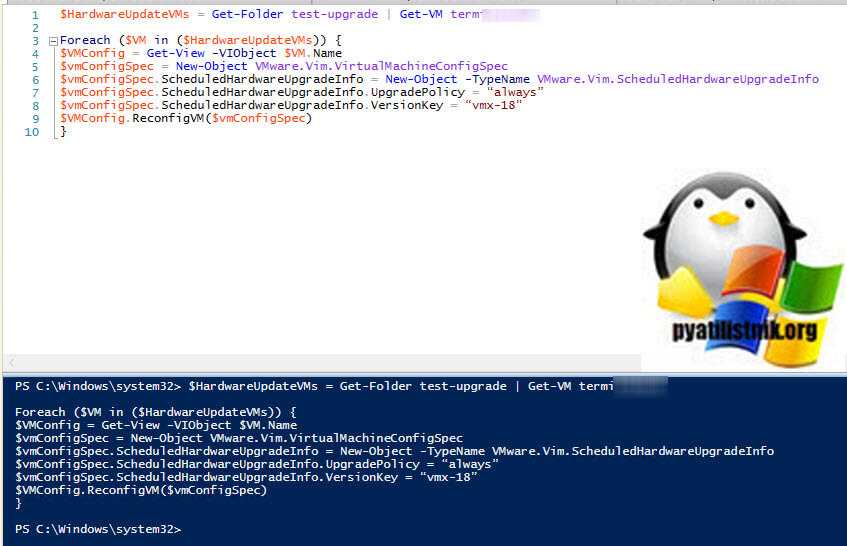
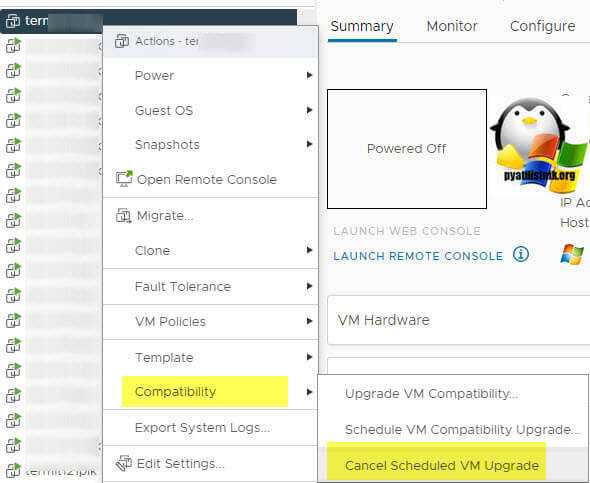
Это не приведет к автоматическому обновлению совместимости виртуальной машины, в отличие от VMware Tools, это невозможно сделать с включенной виртуальной машиной. В следующий раз, когда виртуальная машина будет перезагружена, она выключится, совместимость будет обновлена, а затем снова включится. Получается, у вас в планировщике будет стоять задание, проверить это можно увидев, что стал доступен пункт меню «Compatibility — Cancel Scheduled VP Upgrade»
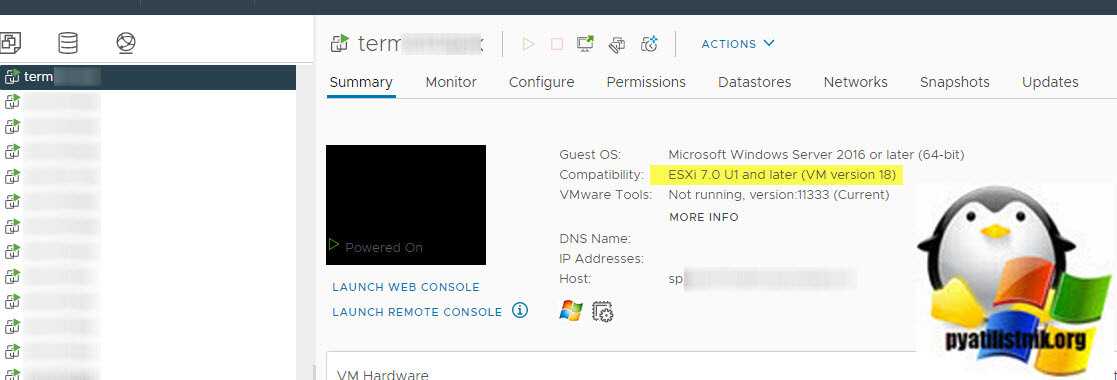
Запустив виртуальную машину я сразу вижу, что у нее «Compatibility hardware version» теперь имеет статус (VM version 18). Чем хорошо скриптом можно обновлять пачками сервера.
Introduction
Engineers, designers, and scientists have traditionally relied on dedicated graphics workstations to perform the most demanding tasks, such as manipulating 3D models and visually analyzing large data sets. These standalone workstations carry high acquisition and maintenance costs. In addition, in areas such as oil and gas, space exploration, aerospace, engineering, science, and manufacturing, individuals with these advanced requirements must be located in the same physical location as the workstation.
This guide describes hardware-accelerated graphics in VMware virtual desktops in VMware Horizon. It begins with typical use cases and matches these use cases to the three types of graphics acceleration, explaining the differences. Later sections provide installation and configuration instructions, as well as best practices and troubleshooting.
Note: This guide describes hardware-accelerated graphics in a VMware Horizon environment that uses a VMware vSphere infrastructure.
Purpose of Hardware-Accelerated Graphics
Moving the graphics acceleration hardware from the workstation to a server is a key architectural innovation. This shift changes the computing metaphor for graphics processing, putting the additional compute, memory, networking, and security advantages of the data center at the disposal of the user, so that complex models and very large data sets can be accessed and manipulated from virtually anywhere.
With appropriate network bandwidth and suitable remote client devices, IT can now offer the most advanced users an immersive 3D-graphics experience while freeing them from the limitations of the old computing metaphor:
- Fewer physical resources are needed.
- The wait time to open complex models or run simulations is greatly reduced.
- Users are no longer tied to a single physical location.
In addition to handling the most demanding graphical workloads, hardware acceleration can also reduce CPU usage for less demanding basic desktop or published application usage, and for video encoding or decoding, which includes the default Blast Extreme remote display protocol.
What Is VMware Horizon?
VMware Horizon provides a platform to deliver a virtual desktop solution as well as an enterprise-class application-publishing solution. Horizon features and components, such as the Blast Extreme display protocol, instant-clone provisioning, VMwareAppVolumes application delivery, and VMwareDynamicEnvironmentManager, are also integrated into Remote Desktop Services to provide a seamless user experience and an easy-to-manage, scalable solution.

Concluding Thoughts
Upgrading your virtual hardware to the latest version provides you with great benefits, especially in terms of the available resources (size of memory, number of logical processors and virtual CPUs, etc.). However, you should pay special attention to the issue of compatibility: the hardware version of a VM must be compatible with the ESXi this VM is running on.
The functionality of NAKIVO Backup & Replication can satisfy the needs of any business scale. Book a free live demo today, see how the product works, and gain peace of mind knowing that your infrastructure can remain reliably protected at all times.
Включение автоматического обновления инструментов при перезагрузке в web-клиенте
Использование параметров виртуальных машин для обновления VMware Tools, также является еще одним методом автоматического обновления оборудования у виртуальных машин. Включение расширенного параметра “Check and upgrade VMware Tools before each power on” нельзя использовать из-за дополнительной перезагрузки виртуальных машин. Помните, что с Windows Server 2016, VMware Tools больше не требует перезагрузки при обновлении, можно безопасно включить этот параметр, и виртуальные машины будут обновляться при каждой перезагрузке. Однако это может быть применимо не ко всем ситуациям, поэтому еще одна рекомендация — включить это для лабораторной среды или некритических рабочих нагрузок. Самый простой способ включить эту опцию — войти в vSphere Client, отредактировать настройки виртуальной машины и включить настройку.
При следующем включении ваша версия виртуального оборудования будет обновлена до последней версии.
У нас пост об автоматизации, так что давайте посмотрим, сможем ли мы найти способ использовать PowerCLI для изменения настроек виртуальной машины, чтобы это стало проще, когда у нас есть большая среда. Задача выставить списку серверов галку “Check and upgrade VMware Tools before each power on”. Для начала возьмем список виртуальных серверов из папки и посмотрим текущие статусы.
Get-Folder test-upgrade|Get-VM|Get-View | select name,@{N=’ToolsUpgradePolicy’;E={$_.Config.Tools.ToolsUpgradePolicy } } |Sort Name
Здесь мы можем увидеть, для каких виртуальных машин установлено автоматическое обновление, а для каких — вручную. Используя фильтр, мы можем искать объекты, которые настроены вручную, а затем настраивать их для установки на upgradeAtPowerCycle. Теперь давайте зададим те кто был вручную, сделать все автоматически.
$ManualUpdateVMs = Get-Folder test-upgrade|Get-VM|Get-View | Where-Object {$_.Config.Tools.ToolsUpgradePolicy -like «manual»}|select name,@{N=’ToolsUpgradePolicy’;E={$_.Config.Tools.ToolsUpgradePolicy } }
Foreach ($VM in ($ManualUpdateVMs)) { $VMConfig = Get-View -VIObject $VM.Name $vmConfigSpec = New-Object VMware.Vim.VirtualMachineConfigSpec $vmConfigSpec.Tools = New-Object VMware.Vim.ToolsConfigInfo $vmConfigSpec.Tools.ToolsUpgradePolicy = «UpgradeAtPowerCycle» $VMConfig.ReconfigVM($vmConfigSpec) }
Проверим, что теперь у всех выставлен статус в «ToolsUpgradePolicy» как «UpgradeAtPowerCycle».


