
5 ответов
Была такая же проблема и сегодня.
Найдена здесь (https://bbs.archlinux.org/viewtopic.php?id=195223), которая может быть проблемой, связанной с plymouth, и после удаления это (я вообще-то не вписываю анимацию логинов) … У меня возникли проблемы с драйверами nvidia.
Я просто удалил все программное обеспечение, связанное с nvidia, и, voilà, я здесь, набрав этот ответ .
ответ дан
23 May 2018 в 11:55
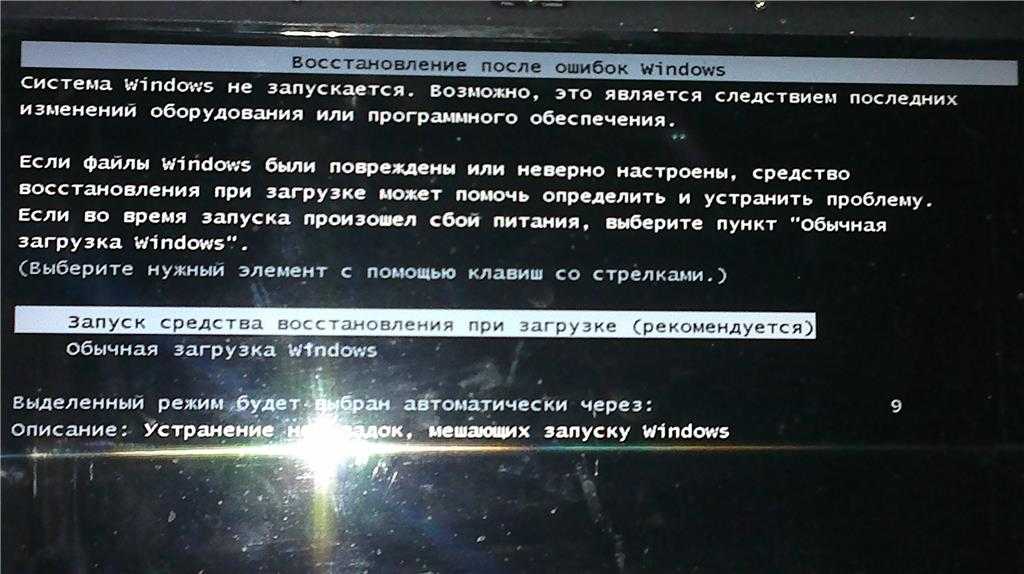
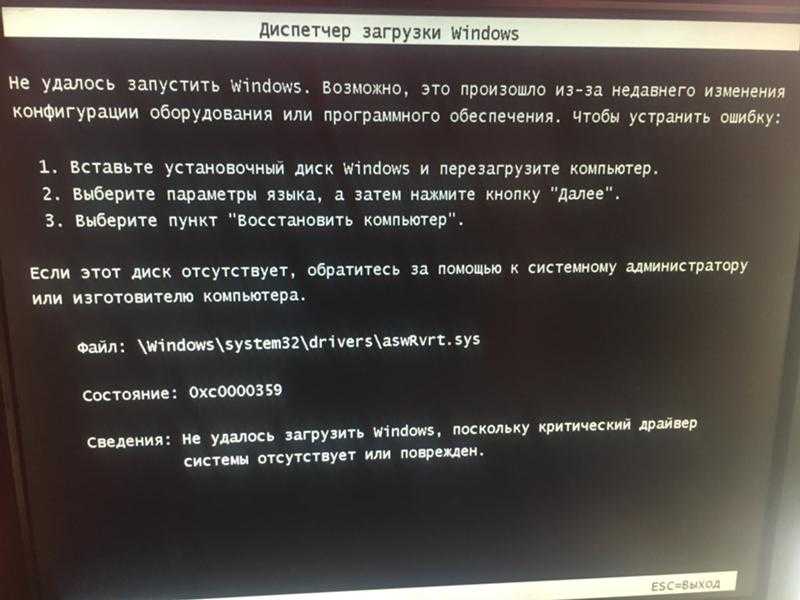
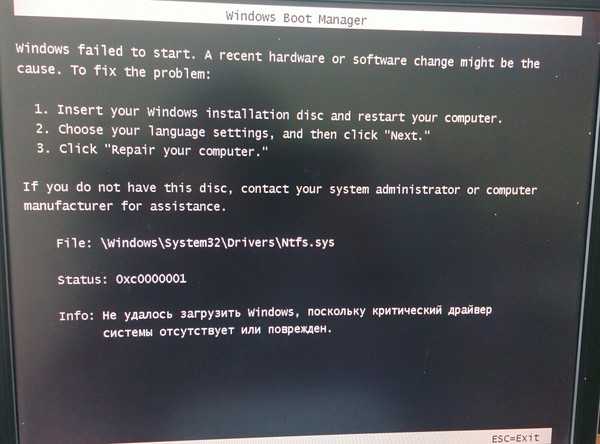
Для тех, кто перепутал с загрузкой Linux после обновления (что случилось со многими пользователями, включая меня) Вот полное решение (которое я использовал, и я смог вернуть все).
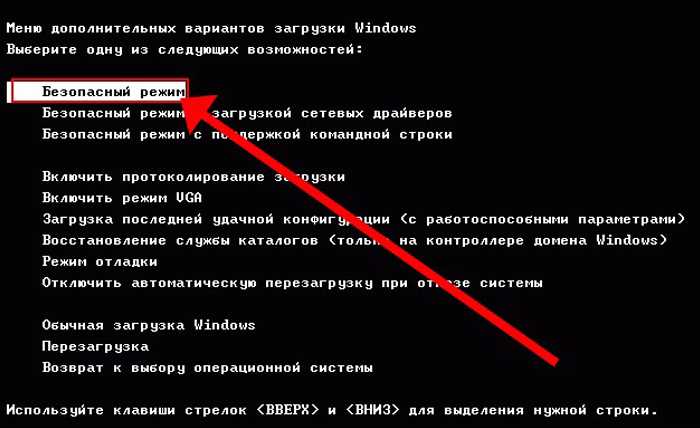
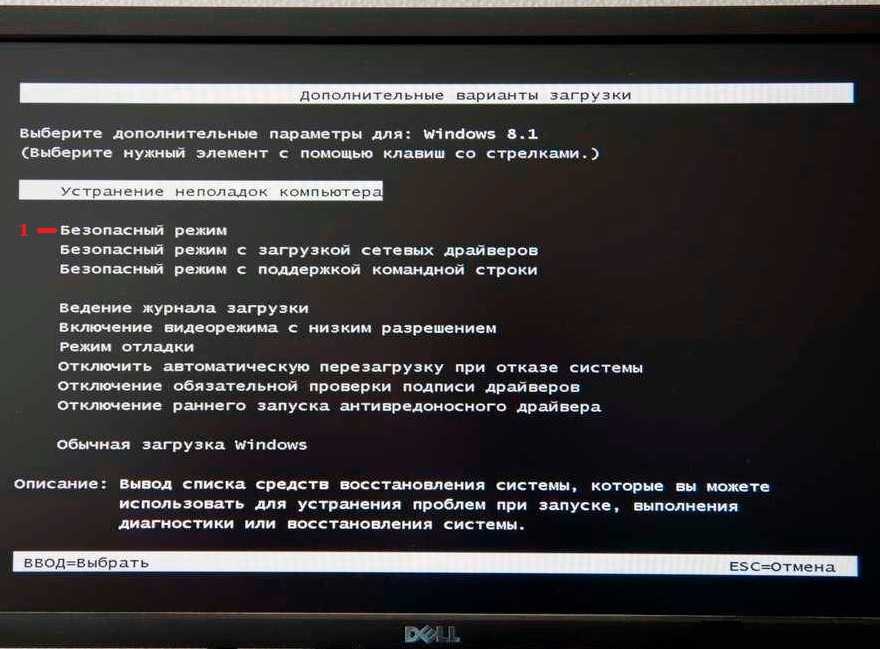
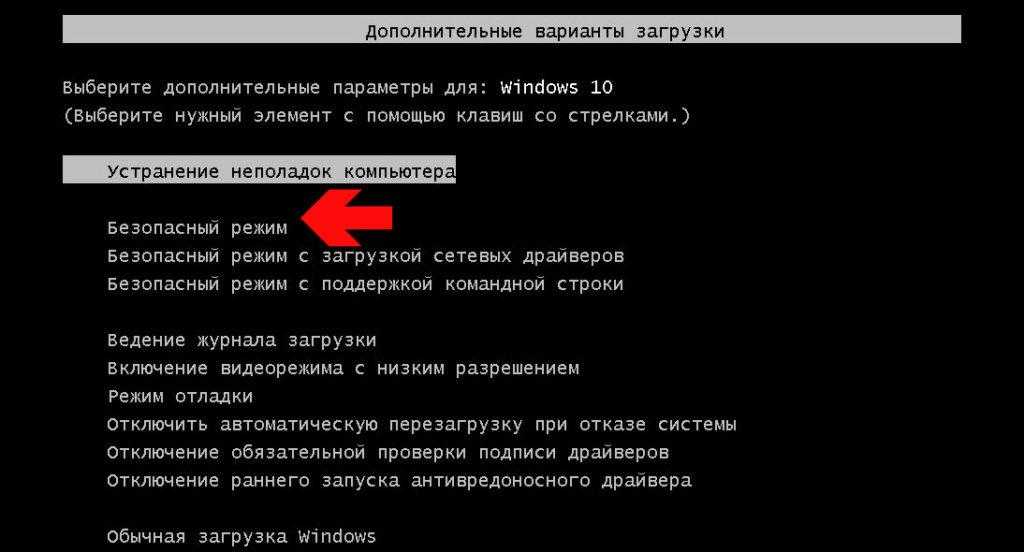
Don Паника! Если ваш компьютер повесился на экране входа в систему, нажмите Ctrl + Alt + f2. Он попросит ввести ваше имя пользователя и пароль. Подключите Ethernet-кабель (LAN-кабель) от вашего маршрутизатора или модема Wi-Fi к вашему компьютеру. Введите dhclient eth0 и нажмите enter. Для тестирования сети попробуйте ping www.google.com, если есть какие-либо сбои, пожалуйста, проверьте подключение к локальной сети, маршрутизатор или модем (подключение к WiFi — утомительный процесс, попробуйте сначала подключиться к локальной сети) Введите reboot и нажмите enter. Теперь продолжайте нажимать клавишу Esc или Shift. Войдите в последний режим восстановления ядра. Используйте клавиши со стрелками для навигации. Нажмите Enter на Networking Теперь он отобразит предыдущий экран. Нажмите на root (вам нужен root-доступ для изменения системы). Запуск
(Он загрузит 200 мб данных) Запуск
Запуск
Запуск
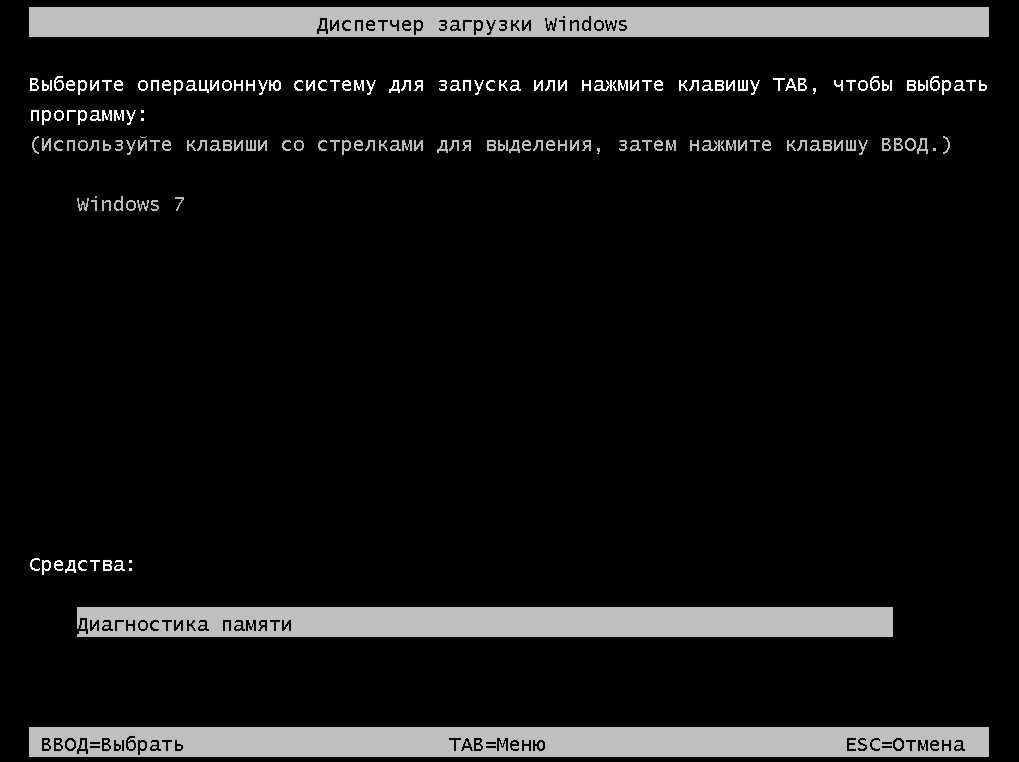
Он попросит вас выбрать один из двух вариантов: gdm & amp; . Выберите lightdm Run
(Это будет скачать 700Мб данных) Run reboot, и вы должны быть в состоянии получить свою работу обратно (Хотя ваш рабочий стол будет выглядеть некрасиво из-за противоречивых тем. Не волнуйтесь, шаги 23 и усилитель , 24 исправит эту проблему). Открыть терминал (Ctrl + Alt + T) и выполните
(очистить всю ненужную зависимость, которые могут вызвать проблемы при установке новых пакетов) Run
Run
Run
Наконец загрузить убунт-настройку от ubuntuupdates.com (версия, которая работает с Xenial Xerus и недоступна нигде!) Перезагрузите свою систему и сделайте!
ответ дан
23 May 2018 в 11:55
После установки драйвера Nvidia (361) возникла та же проблема. Я удалил его, и теперь все работает. У меня есть GeForce 920 (Optimus). Нуво отлично работает с ним, поэтому я буду придерживаться его еще несколько месяцев и попробую снова установить драйвер Nvidia (надеясь, что к тому времени ошибка будет исправлена).
ответ дан
23 May 2018 в 11:55
Вы можете пропустить ожидание и перейти к экрану входа в систему напрямую, используя «Ctrl + c», а затем работать над решением. Иногда это будет продолжаться вечно, если нет.
ответ дан
23 May 2018 в 11:55
Другое решение — загрузить mini.iso версию установщика; он обходит проблему.
Во время установки вам будет задан вопрос о том, какой тип Ubuntu будет установлен.
Убедитесь, что у вас есть хороший доступ в Интернет при его установке, он будет загружать много файлов.
ответ дан
23 May 2018 в 11:55
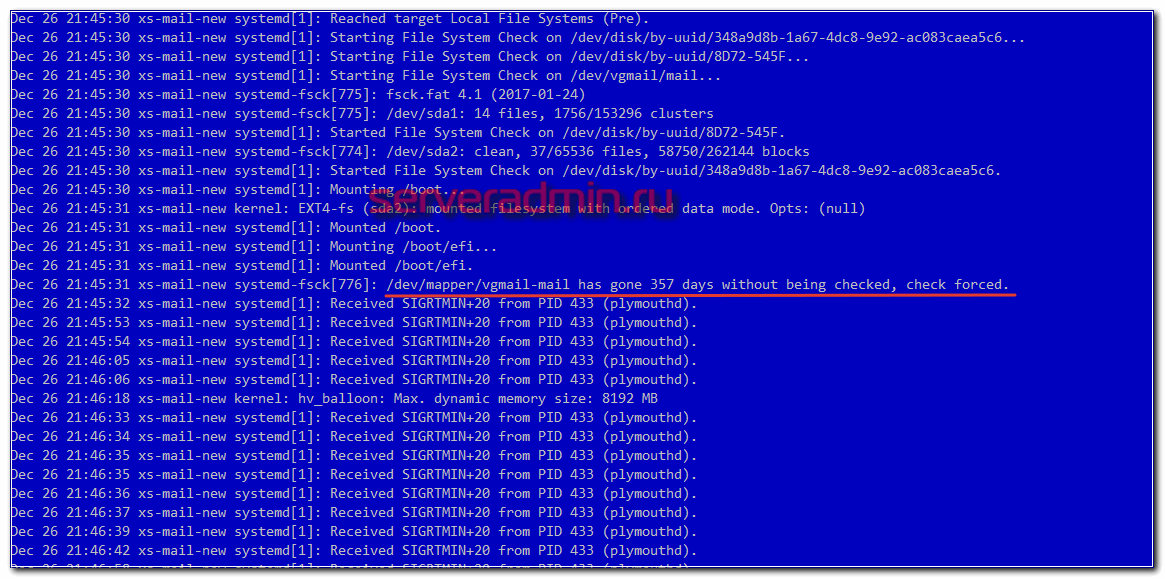
Force fsck on reboot
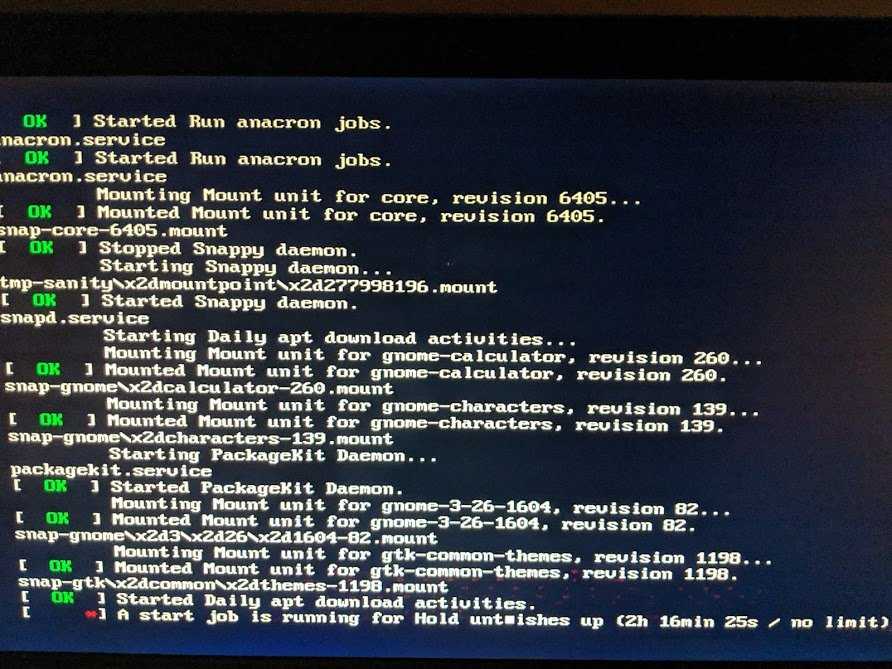
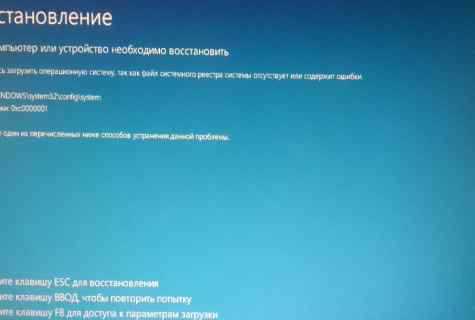
Удивительно, но на за все время своей работы системным администратором Linux, с подобной проблемой я столкнулся впервые. Как говорится, ничто не предвещало беды. Выбрал наиболее подходящее время для обновления системы и сделал его. После этого решил перезагрузить сервер. Операция была запланированная и до этого я уже обновил с десяток серверов. Но с этим последним что-то пошло не так. Долго не возвращается в мониторинг. Решил сходить на гипервизор и посмотреть, что с ним. А там такая картинка.

A start job is running for File System Check on /dev/vgmail/mail
Идет проверка раздела на ошибки. При чем этот lvm раздел размером в 3Tb, на нем хранится почтовый архив. Нет никакой индикации и не понятно, с чем вообще все это связано и сколько времени продлится. Сервер в работе, подключается куча людей. Я вижу, что операция вроде как плановая, так как никаких ошибок нет. Но то, что сервер не работает, уже ошибка. Самое главное, не понятно, сколько эта проверка может длиться. И еще всегда остается шанс, что это внештатная ситуация и с разделом какие-то проблемы. Это самый плохой расклад.
Я терпеливо подождал где-то час и не выдержал. В первую очередь хотел понять, происходил ли вообще что-то с диском. Пошел на гипервизор и проверил. Реально идет активное чтение с диска. Записи нет. Из этого сделал вывод, что можно безопасно сбросить виртуалку. К слову, весь тот час, что я ждал, прогуглил весь буржунет, чтобы понять, как принудительно прервать эту проверку. Перепробовал все, что только можно. Не помогло ничего. Прервать или отложить проверку не смог.
Параллельно сходил и проверил бэкап. Он был, свежий, все в порядке. Но сколько времени займет восстановление, если забирать эти данные по сети? Я так прикинул, никак не меньше суток, скорее ближе к двум. Надо было бы ехать и забирать локально. Сначала в один цод, потом во второй. Везде надо договариваться о приезде, оформлять пропуск и т.д. Сидеть ждать, пока локально скопируется файлы. Как-то еще внешний диск надо подключить и найти подходящего объема. В общем, та еще проблема. Одно наличие актуального бэкапа вообще не решает проблему восстановления данных.
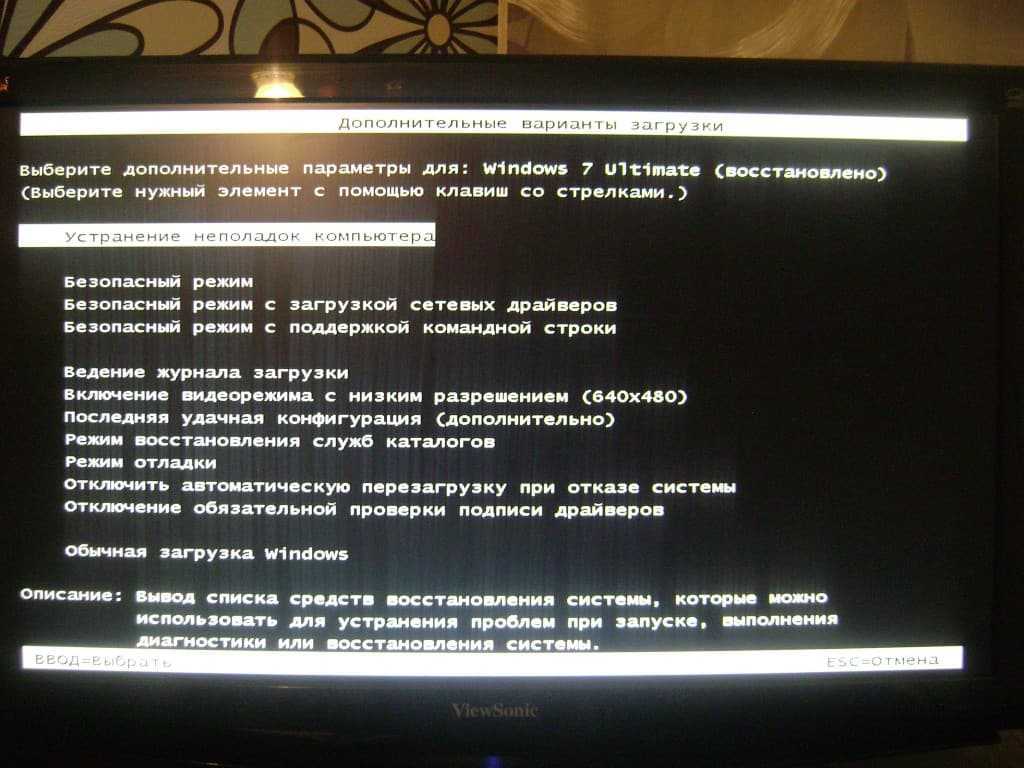
В итоге сбросил виртуалку и при загрузке выбрал режим Rescue.
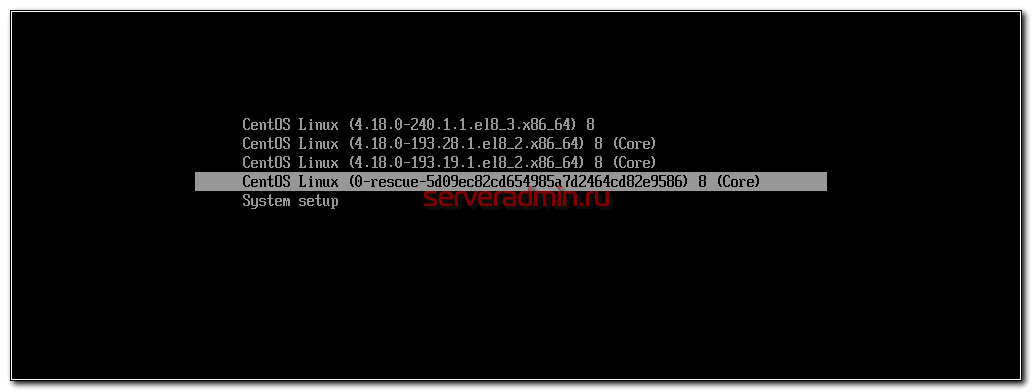
Я рассчитывал, что в этом режиме проверка диска не будет запускаться. По факту ошибся, проверка тоже запустилась, но в этот раз периодически в строке проскакивала индикация выполнения и было видно, что она продолжается. Так же, по изменению статуса, я прикинул, что проверка будет длиться около двух часов. Я посчитал, что для меня это время приемлемо в данной ситуации и решил больше не дергать виртуалку, чтобы не сделать хуже. Дождался окончания процесса.
В итоге, все завершилось и операционная система штатно загрузилась. В логах увидел подробности:
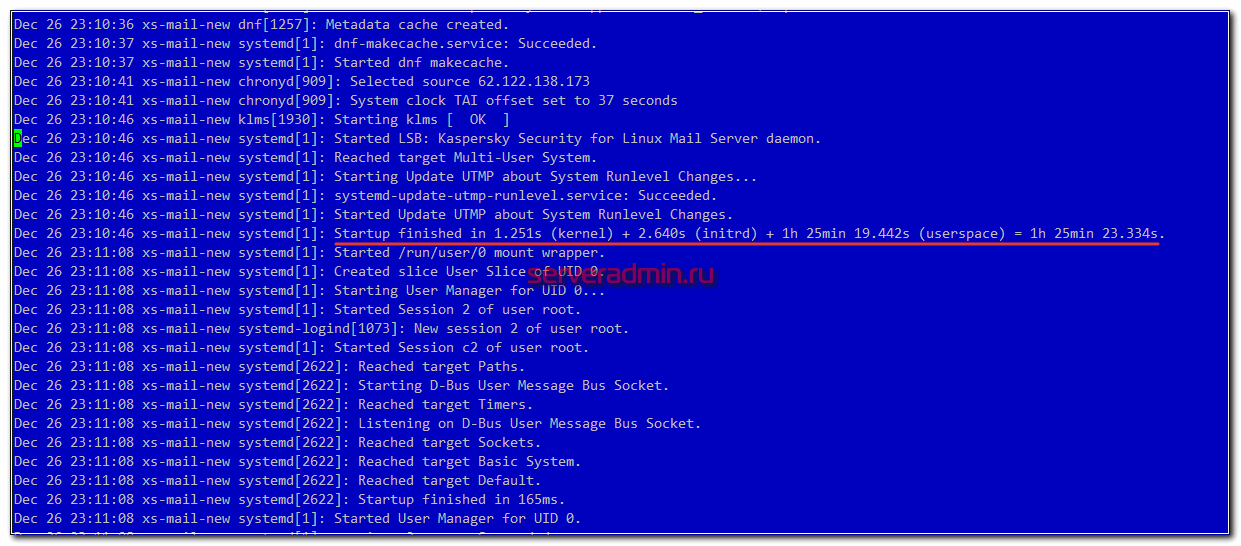
systemd-fsck: /dev/mapper/vgmail-mail has gone 357 days without beign checked, check forced.
Система в системе в виде systemd решила, что диск давно не проверяли на ошибки, поэтому принудительно инициировала этот процесс, который длился в итоге 1,5 часа. Первый раз немного не дождался окончания.
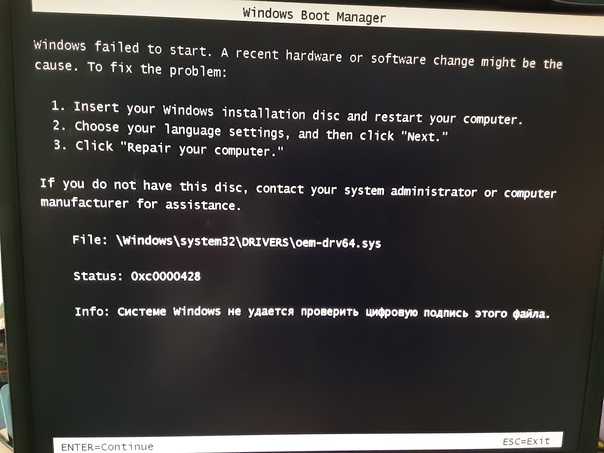
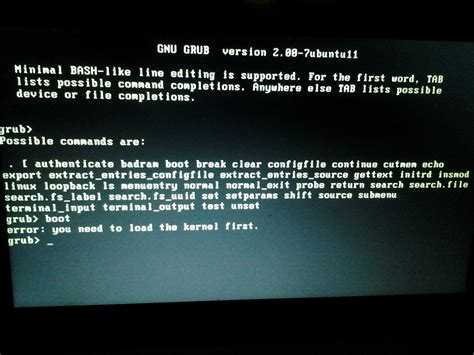
How to fix ‘A start job is running for live-config contains…’
In the boot menu, press e (or TAB). The boot options window opens. If there are several lines in it, then move the cursor to the line that begins with
linux
See if there are “quiet” and “splash” in this line?
- quiet means do not show download progress messages
- splash means show boot splash screen
I recommend removing both strings.
And, most importantly, add the following to the end:
nouveau.modeset=0
To continue downloading, press F10 (or ENTER).
If this works and the system boots successfully, then the reason for the problems with loading is the incompatibility of the drivers with the NVidia graphics card.
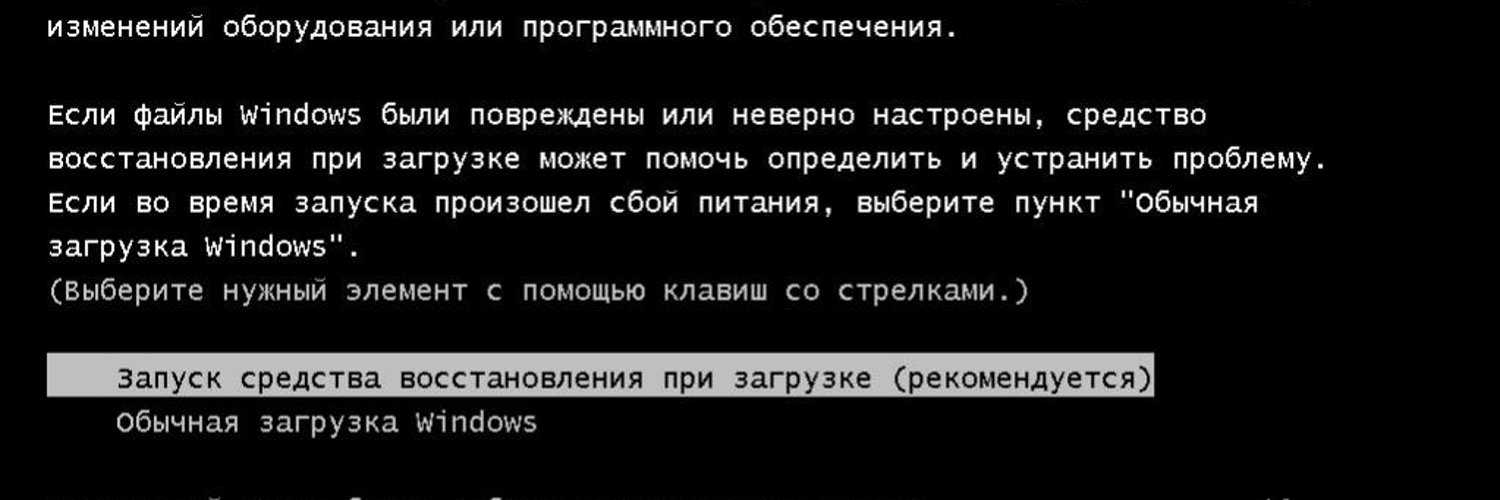
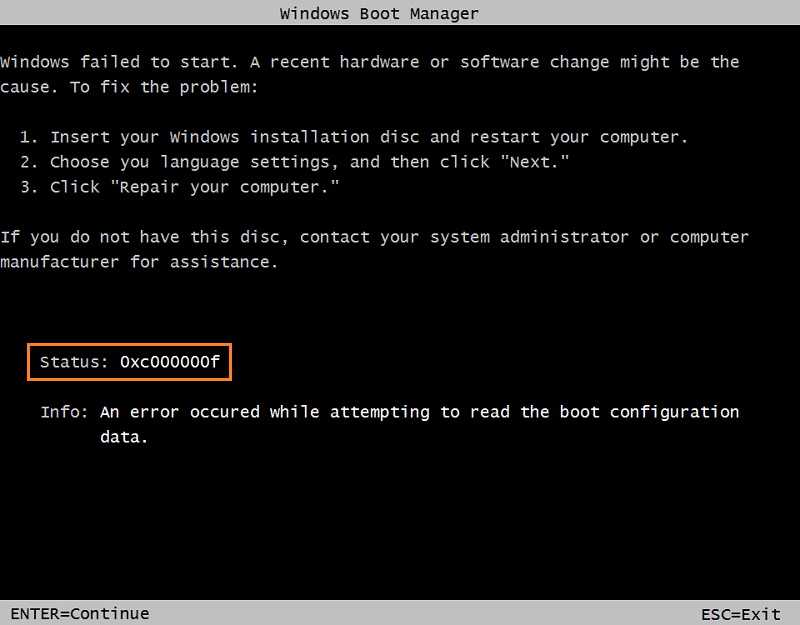
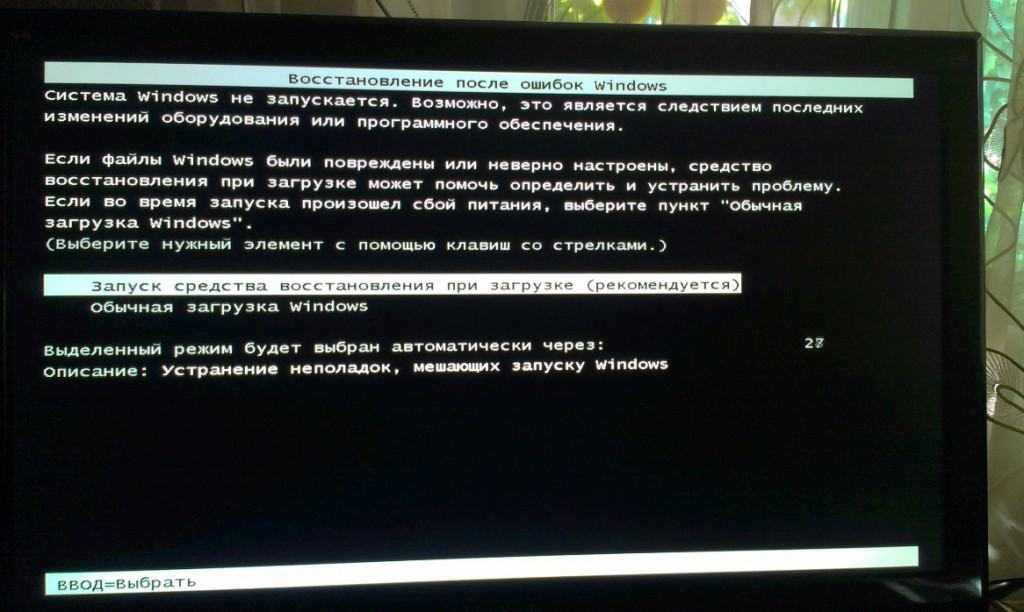
How to cancel check disk in Windows 10
The check disk command is handy as it continually checks for bugs and failures in the computer system, but you do not need it to run every time after starting the computer. If you have enabled the command, it is easier to stop it since you only need to click on any key to skip this step. You will have about 8 seconds to quickly skip checking, after which the process will automatically run. The issues come in when you have a scheduled disk check and have no time to wait for the process to finish running. In such scenarios, you have no choice but to cancel the disk check.
Before doing so, you should determine if any of the drives have a scheduled check so you can cancel it by pressing skip on the next reboot.
Как изменить файлы в Live системе
Оптические диски с Live-системами привили привычку, что информацию на такой системе невозможно изменить. Дело, конечно, в ограничениях самих оптических дисков, а не режима Live.
В режиме Live на USB носителях разделы просто монтируются с параметром «только чтение». Поэтому достаточно перемонтировать раздел в режим записи и на нём будет возможно сохранить сделанные изменения.
Далее я покажу на примере Tails (кстати, рекомендую онлайн книгу «Руководство по Tails» — там очень много информации по данному дистрибутиву для анонимности). В других дистрибутивах пути могут чуть различаться. Также имена дисков могут различаться в зависимости от конкретного компьютера. Поэтому из данной статьи вы должны усвоить принцип и отредактировать последующие команды в соответствии с вашими конкретными условиями.
Если вы исправляете проблему для Tails, то не забудьте при включении установить .
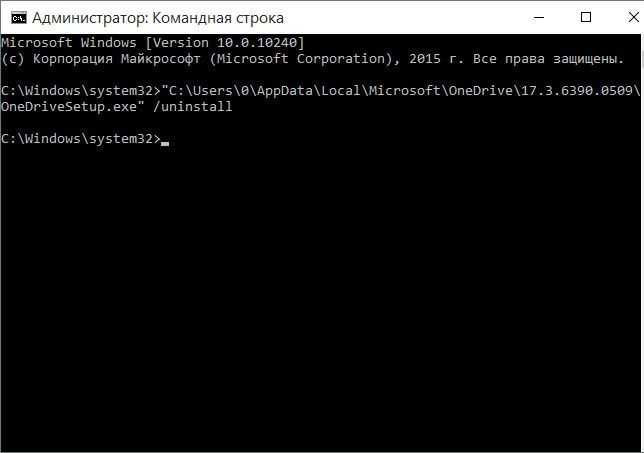
Теперь нам нужно узнать имя диска, для этого введите команду:
sudo fdisk -l
Важно правильно понять, какой из этих дисков является флешкой с Live системой. Можно сориентироваться по размеру диска
Про наименование дисков смотрите статью «Структура директорий Linux. Важные файлы Linux» — понимание, как дискам в Linux присваиваются имена, также может вам помочь.
На приведённом скриншоте, флэшка имеет имя /dev/sdb.
Теперь нужно определить, в какую точку файловой системы смонтированы разделы диска /dev/sdb. Все сделанные в системе монтирования выводит команда
mount
Используя её в паре с grep можно ускорить поиск нужно информации (здесь и далее вместо /dev/sdb введите имя вашего диска):
mount | grep '/dev/sdb'
Как видно на скриншоте, раздел /dev/sdb1 смонтирован в /lib/live/mount/medium
Также обращаем внимание на буквы ro, они означают «только для чтения».. Для перемонтирования раздела с разрешениями на запись, нужно выполнить команду вида:
Для перемонтирования раздела с разрешениями на запись, нужно выполнить команду вида:
sudo mount -o remount,rw РАЗРДЕЛ ТОЧКА_МОНТИРОВАНИЯ
Для моих данных это команда:
sudo mount -o remount,rw /dev/sdb1 /lib/live/mount/medium
Опять делаю проверку:
mount | grep '/dev/sdb'
Теперь вместо букв «ro», там «rw» — это означает, что мы можем отредактировать файлы на этом разделе.
Теперь нам нужно отредактировать конфигурационные файлы, из которых система считывает опции загрузки. Дистрибутивы Linux поддерживают загрузку в БИОС и в EFI — для каждого из этих вариантов свой конфигурационный файл. Дистрибутив может быть 32-битным или 64-битным — и вновь, для каждого из этих вариантов свой конфигурационный файл загрузки. То есть в общей сложности нам нужно будет отредактировать 4 файла.

Для Tails эти файлы расположены по следующим путям:
- /lib/live/mount/medium/syslinux/live64.cfg
- /lib/live/mount/medium/syslinux/live.cfg
- /lib/live/mount/medium/EFI/BOOT/live64.cfg
- /lib/live/mount/medium/EFI/BOOT/live.cfg
То есть искать нужно в точке монтирования (/lib/live/mount/medium/) директории syslinux и EFI/BOOT.
Открываем первые два файла:
sudo gedit /media/amnesia/Tails/syslinux/live*.cfg
Там перечислены все пункты меню, для Tails это:
- live (обычная загрузка)
- livefailsave (режим восстановления, «безопасный режим»)
Достаточно сделать изменения только для того пункта, которым вы пользуетесь. В случае Tails нужно изменить live.
Изменения нужно сделать такие же, как мы делали до этого в опциях загрузки, то есть нужно обязательно дописать:
nouveau.modeset=0
И опционально можно удалить (я всегда удаляю, т. к. это сильно упрощает решение возникающих проблем) строки:
quiet
splash
Когда всё готово, сохраняем и закрываем оба файла.
Открываем следующие два:
sudo gedit /media/amnesia/Tails/EFI/BOOT/live*.cfg
И повторяем сделанные изменения:
Также сохраните и закройте эти файлы.
Теперь попробуйте перезагрузиться. Больше не нужно редактировать параметры загрузки — система должна включиться нормально.
Force fsck on reboot
Surprisingly, for the entire time of my work as a Linux system administrator, this is the first time I’ve encountered such a problem. As they say, nothing foreshadowed trouble. I chose the most appropriate time to update the system and made it. After that I decided to restart the server. The operation was planned and before that I had already updated about a dozen servers. But something went wrong with this last one. Doesn’t return to monitoring for a long time. I decided to go to the hypervisor and see what happened to it. And there is such a picture.
A start job is running for File System Check on /dev/vgmail/mail
The section is being checked for errors. Moreover, this lvm section is 3Tb in size, it stores a mail archive. There is no indication and it is not clear what all this is connected with and how long it will last. The server is in operation, a bunch of people are connecting. I see that the operation seems to be planned, since there are no errors. But the fact that the server is down is already a mistake. Most importantly, it is not clear how long this check might take. And there is always a chance that this is an abnormal situation and there are some problems with the section. This is the worst deal.
I waited patiently for about an hour and could not stand it. First of all, I wanted to understand if something was happening to the disc at all. Went to the hypervisor and checked. In fact, there is an active reading from the disk. There is no entry. From this I concluded that it is possible to safely reset the virtual machine. By the way, all that hour that I was waiting, I googled the entire bourgeoisie to understand how to forcefully interrupt this check. I tried everything I could. Nothing helped. I could not interrupt or postpone the check.
In parallel, I went and checked the backup. He was fresh, all right. But how long will it take to recover if this data is collected over the network? I figured that, no less than a day, rather closer to two. It would be necessary to go and pick it up locally. First, to one data center, then to the second. Everywhere you have to negotiate your arrival, issue a pass, etc. Sit and wait while files are copied locally. Somehow you need to connect an external drive and find a suitable size. In general, that’s another problem. The mere presence of an up-to-date backup does not solve the problem of data recovery at all.
As a result, I dropped the virtual machine and selected Rescue mode at boot.
I expected that in this mode the disk check would not start. In fact, I made a mistake, the check also started, but this time the progress indication periodically skipped in the line and it was clear that it was continuing. Also, based on the status change, I figured that the check would take about two hours. I thought that this time was acceptable for me in this situation and decided not to pull the virtual machine anymore, so as not to make it worse. I waited until the end of the process.
As a result, everything ended and the operating system booted normally. I saw the details in the logs:
systemd-fsck: /dev/mapper/vgmail-mail has gone 357 days without beign checked, check forced.
The system in the system in the form of systemd decided that the disk had not been checked for errors for a long time, so it forcibly initiated this process, which eventually lasted 1.5 hours. The first time did not wait for the end a bit.
Converting inetd Services to SMF Services
The inetd.conf file on your system should contain no
entries. The inetd.conf file should contain only comments
that this is a legacy file no longer directly used. If the
inetd.conf file contains any entries, follow the
instructions in this section to convert these configurations to SMF services.
Services that are configured in the inetd.conf file but are
not configured as an SMF service are not available for use. Services that are
configured in the inetd.conf file are not restarted by the
inetd command directly. Rather, the inetd
command is the delegated restarter for the converted services.


During initial system boot, configurations in the
inetd.conf file are automatically converted to SMF
services. After initial system boot, entries might be added to the
inetd.conf file by installing additional software that is
not delivered by Image Packaging System (IPS) packages. Software that is
delivered by IPS packages includes any required SMF manifest, and that SMF
manifest instantiates that service instance with the correct property
values.
If the inetd.conf file on your system contains any
entries, use the inetconv command to convert those
configurations to SMF services. The inetconv command converts
inetd.conf entries into SMF service manifest files and
imports those manifests into the SMF repository to instantiate the service
instances. See the
man page for information about command options and to see examples of using the
command.
The name of the new SMF manifest incorporates the
service_name from the inetd.conf
entry. The entry from the inetd.conf file is saved as a
property of the new service instance. The new SMF manifest specifies property
groups and properties to define the actions listed in the
inetd.conf entry. After running the
inetconv command, use the svcs and
svcprop commands to ensure the new service instance was
created and has the correct property values.
The inetd command is the delegated restarter for SMF
internet services. Do not use the inetd command directly to
manage these services. Use the inetadm command with no
options or operands to see a list of services that are controlled by
inetd. Use the inetadm,
svcadm, and svccfg commands to configure
and manage these converted services.
The inetconv command does not modify the input
inetd.conf file. You should manually delete any entries in
the inetd.conf file after successfully running
inetconv.
For information about configuring inetd services that
are already converted to SMF services, see .
What is chkdsk.exe?
This is pronounced as “check disk”, and it is basically a command that checks drives. It works by displaying the status report of the disk and can even fix the issues found. However, to use this tool, your computer should have Autochk.exe in its system.
The computer hard disk stores all the files in folders. Also, it contains some security information on who can access those files. The hard disk carries so much information, and CHKDSK’s work is to ensure that all the information about the folders, data, and security status is correct. Unfortunately, an error might occur when the computer shuts down abruptly or when you eject or remove a USB device unsafely. It could also be as a result of hardware issues or malware. These problems are reflected in the hard disk’s administrative information, thus forcing the CHKDSK command to run in order to detect and fix those issues.
The CHKDSK command scans the hard disk and fixes any file issues on the drive. There is a range of possible reasons why the Check Disk command is triggered, some of which include:
Conclusion
Previously, I repeatedly encountered a forced check of the mdadm array for errors. This puts a heavy load on the disks and dramatically decreases system performance. I always follow this and turn off the check. Some stupid idea to initiate such checks automatically, without the consent of the administrator, or by manually selecting the launch conditions. Moreover, in different distributions, this can be implemented in different ways. Checks should be done on suspicion of errors, and not just so that it was.
Now I will separately and closely monitor fsck in order to safely reboot. By the way, if you want to be guaranteed to reboot the system by disabling the fsck check, you must use the -f flag on reboot.
# shutdown -rf now
In practice, I have not tested it. I learned about this already after analyzing this situation.
Online course on Linux
If you have a desire to learn how to build and maintain highly available and reliable systems, I recommend that you get acquainted with online course “Administrator Linux. Professional” at OTUS. The course is not for beginners, for admission you need basic knowledge of networking and installing Linux on a virtual machine. The training lasts 5 months, after which successful graduates of the course will be able to pass interviews with partners. What this course will give you:
- Knowledge of Linux architecture.
- Mastering modern methods and tools for data analysis and processing.
- Ability to select a configuration for the necessary tasks, manage processes and ensure system security.
- Possession of the basic working tools of the system administrator.
- Understanding the specifics of deploying, configuring, and maintaining Linux-based networks.
- The ability to quickly resolve emerging problems and ensure the stable and uninterrupted operation of the system.
Check yourself on the entrance test and see the details of the program on.
Did the article help? Subscribe to the author’s telegram channel
Hard drive issues
Chances are that some problems with the drive have been detected. This is the leading cause of Windows 10 running CHCKDSK every time you turn your PC on. It does so to check for any file system issues like bad sectors that put the entire computer system at risk and could even result in hard drive failure. It is recommendable that you give the program time to run, hoping that it will fix the problem. It will indicate if it found any issues and show how they should be solved. The report is in Check Disk’s log file, which you can access by going to the Start menu and then typing ‘event viewer.’ Click on it and select the application. You will find comprehensive information on any found issues, and you can also do that by checking the system logs for any sources listed as the cause of the underlying problems. If you notice that the check disk utility keeps running after every startup, it means that the hard drive is failing, and that should cause alarm.
How to change files in a Live system
Optical discs with Live systems have instilled the habit that information on such a system cannot be changed. The point, of course, is the limitations of the optical discs themselves, not the Live mode.
In Live mode on USB drives, partitions are simply mounted with the read-only option. Therefore, it is enough to remount the partition in the writable mode and it will be possible to save the changes made on it.
Next, I will show Tails as an example. In other distributions, paths may vary slightly. Also, drive names may vary depending on the specific computer. Therefore, from this article you should learn the principle and edit the subsequent commands in accordance with your specific conditions.
If you are fixing a problem for Tails, then remember to set the Administrator Password.
Now we need to find out the name of the disk, for this enter the command:
sudo fdisk -l
It is important to correctly understand which of these disks is a flash drive with a Live system. You can navigate by the size of the disk.
In the screenshot above, the flash drive is named /dev/sdb.
Now you need to determine at which point in the file system the /dev/sdb disk partitions are mounted. All mounted file systems are displayed by the command
mount
Using it paired with grep, you can speed up the search for information you need (hereinafter, instead of /dev/sdb, enter the name of your disk):
mount | grep '/dev/sdb'
As you can see in the screenshot, the /dev/sdb1 partition is mounted in /lib/live/mount/medium. Also pay attention to the ‘ro’ letters, they mean ‘read-only’.
To remount a partition with write permissions, you need to run a command of the form:
sudo mount -o remount,rw VOLUME MOUNT_POINT
For my data, this is the command:
sudo mount -o remount,rw /dev/sdb1 /lib/live/mount/medium
Again I do a check:
mount | grep '/dev/sdb'
Now instead of the letters “ro”, there is “rw” — this means that we can edit the files in this volume.
Now we need to edit the configuration files from which the system reads the boot options. Linux distributions support loading into BIOS and EFI – each of these options has its own configuration file. The operating system can be 32-bit or 64-bit – and again, for each of these options its own boot configuration file. That is, in total, we will need to edit 4 files.
For Tails, these files are located in the following paths:
- /lib/live/mount/medium/syslinux/live64.cfg
- /lib/live/mount/medium/syslinux/live.cfg
- /lib/live/mount/medium/EFI/BOOT/live64.cfg
- /lib/live/mount/medium/EFI/BOOT/live.cfg
That is, you need to look at the mount point (/lib/live/mount/medium/) for the syslinux and EFI/BOOT directories.
sudo gedit /media/amnesia/Tails/syslinux/live*.cfg
All menu items are listed there, for Tails it is:
- live (normal download)
- livefailsave (recovery mode, “safe mode”)
It is enough to make changes only for the item that you are using. In the case of Tails, you need to change ‘live’.
Changes need to be made the same as we did before in the boot options, that is, you must definitely add:
nouveau.modeset=0
And optionally, you can delete (I always delete, because this greatly simplifies the solution of problems) lines:
quiet
splash
When everything is ready, save and close both files.
We open the following two:
sudo gedit /media/amnesia/Tails/EFI/BOOT/live*.cfg
And repeat the changes made:
As well, save and close these files.
Now reboot your system. You no longer need to edit the boot parameters – the system should start normally.
Как отключить fsck при загрузки системы
По идее, чтобы подобные проверки не запускались автоматически, достаточно в fstab, в последнем столбце написать 0. Напомню, что это за параметр. Формат файла fstab следующий:
filesystem dir type options dump pass
Последняя строка как раз для fsck, может принимать следующие значения:
- 0 — проверка отключена полностью. То, что надо было указать мне в самом начале.
- 1 — наивысший приоритет проверки.
- 2 — менее высокий приоритет очередности проверки.
У меня стояла цифра 2. Я не знаю, чем руководствовался, когда настраивал fstab. Скорее всего на автомате указал или скопировал. Не подумал о последствиях. Есть только один момент, который меня беспокоит. Не факт, что systemd руководствуется этим параметром, а не каким-то своим. Она давно уже живет своей жизнью и требует отдельных настроек и внимания к себе. Нужно будет разобраться с этим моментом повнимательнее.
Incorrect shutdowns
The primary trigger of the check disk process is if the system shuts down inappropriately. You are supposed to switch off the computer via the Start menu and give it time to shut down completely. If the computer goes off abruptly or if you shut it down by pressing the Start button, you are likely to experience data losses and file system issues that force it to go through a check disk routine when booting. Also, you should not make the mistake of shutting the computer down by unplugging it from the power supply. The check disk command is triggered to check if the hard disk is okay after undergoing the improper shutdown. This could also happen if you experience a power failure.
Online course on Linux
If you have a desire to learn how to build and maintain highly available and reliable systems, I recommend that you get acquainted with online course “Administrator Linux. Professional” at OTUS. The course is not for beginners, for admission you need basic knowledge of networking and installing Linux on a virtual machine. The training lasts 5 months, after which successful graduates of the course will be able to pass interviews with partners. What this course will give you:
- Knowledge of Linux architecture.
- Mastering modern methods and tools for data analysis and processing.
- Ability to select a configuration for the necessary tasks, manage processes and ensure system security.
- Possession of the basic working tools of the system administrator.
- Understanding the specifics of deploying, configuring, and maintaining Linux-based networks.
- The ability to quickly resolve emerging problems and ensure the stable and uninterrupted operation of the system.
Check yourself on the entrance test and see the details of the program on.
SMF Best Practices
Most services describe configuration policy. If the configuration you want
is not implemented, modify the policy description by modifying the service.
Modify the values of service properties or create new service instances with
different property values. Do not disable service instances and edit
configuration files that are intended to be managed by an SMF service.
Do not modify manifests and system profiles that are delivered by Oracle
or third-party software vendors. These manifests and profiles might be replaced
when you upgrade your system, and then your changes to these files will be lost.
Instead, either create a site profile to customize the service, or use the
svccfg command or the inetadm command to
manipulate the properties directly. The
/lib/svc/manifest/site and
/var/svc/manifest/site directories are also reserved for
site-specific use. Oracle Solaris does not deliver manifests into those
directories.
To apply the same custom configuration to multiple systems, use the
svcbundle command or the svccfg extract
command to create a profile file. Customize property values in that file, and
include comments about the reason for each customization. Copy the file to
/etc/svc/profile/site on each system, and restart the
manifest-import service on each system. See .
When you create a site profile, make sure the configuration defined does
not conflict with configuration defined in another site profile for the same
service or service instance. When SMF finds conflicting configuration in the
same layer of the service configuration repository, the affected service
instance is placed in the maintenance state.
Do not use non-standard locations for manifest and profile files. See
for manifest and profile
standard locations.
When you create a service for your own use, use site at
the beginning of the service name:
svc:/site/service_name:instance_name.
Do not modify the configuration of the master restarter service,
svc:/system/svc/restarter:default, except to configure
logging levels as described in .
Before you use the svccfg delcust command, use the
svccfg listcust command with the same options. The
delcust subcommand can potentially remove all administrative
customizations on a service. Use the listcust subcommand to
verify which customizations will be deleted by the delcust
subcommand.
In scripts, use the full service instance FMRI:
svc:/service_name:instance_name.
How to disable fsck at system boot
In theory, to prevent such checks from starting automatically, it is enough to write 0 in the last column in fstab. Let me remind you what this parameter is. The fstab file format is as follows:
filesystem dir type options dump pass
The last line is just for fsck, it can take the following values:
- 0 – check is disabled completely. What should have been pointed out to me at the very beginning.
- 1 is the highest priority of the check.
- 2 – lower priority of the check queue.
I had the number 2. I do not know what was guided by when I set up fstab. Most likely indicated or copied on the machine. I didn’t think about the consequences. There is only one thing that worries me. It is not a fact that systemd is guided by this parameter, and not by some of its own. She has been living her own life for a long time and requires separate settings and attention to herself. It will be necessary to deal with this moment more closely.
Should one disable check disk?
It depends on how the system behaves or operates. As mentioned earlier, the check disk process is crucial for detecting and fixing disk-related errors. However, if it becomes a nuisance, then you should disable it. The most annoying part of running a disk checker is when it keeps running when not needed. This mostly happens when you do not switch off the computer properly. The blue screen may appear, and this means danger. On booting the computer, it says that it’s checking the file system or that one of the disks needs to be checked. Although you may cancel the command and go ahead to boot the computer, it is recommendable that you let it finish the scan.
Pressing any key will stop the check disk process, but once you restart the computer, the command is likely to run again. If this happens, it means that your computer has an underlying issue that you should stop ignoring. It means that Windows still wants the drive to be scanned. If you ignore it, it will keep reminding you until you have it checked.
Letting the disk checker do its job is the best thing to do, but it can sometimes be time-consuming, and you do not have all that time to wait. Also, you may realize that even after letting it run the scan, it will still want to run after the next booting session. If you eject a USB flash before the system has finished running or if the system shuts down improperly, probably due to a power failure, Windows automatically detects the issue and will force another check disk scan. In such a case, you can disable it.
Do I need check disk in Windows 10?
The answer to this question is a simple yes. You may have noticed that disk checking in Windows 10 is a bit different from that on other Windows versions, but it offers great help in getting rid of bugs and other issues that could be slowing down the system. The check disk command helps in correcting any problems that could have been caused by corrupted software, sudden or improper shutdowns, or malware attacks. This, in return, helps in improving the computer’s performance.
Windows 10 has a disk checker, which is a tool meant for detecting and fixing disk issues automatically. This means that you do not have to run the traditional disk check to identify any underlying problems and fix them. The command periodically checks the hard drive for any bad sectors and system errors and automatically performs maintenance, so you do not have to run it.
To run chkdsk in Windows 10, you should:
- Right-click on the drive that you wish to scan.
- Click on Properties.
- Click the Tools tab.
- Press the Check button.
With this, the chkdsk utility will check for any errors on the file system.
If there are any errors detected, the system will ask you to check the disk, and if there are no errors, then a message will pop up, showing that you do not need the scan. However, when the chkdsk tool keeps running after every computer startup, this could be a sign of an underlying problem, and you should have the issue checked.


